wikiHow is a “wiki,” similar to Wikipedia, which means that many of our articles are co-written by multiple authors. To create this article, 30 people, some anonymous, worked to edit and improve it over time.
This article has been viewed 918,695 times.
Learn more...
Photoshop allows you to create images with transparency (transparent backgrounds, layers or portions) using various transparency options through the opacity meter or the background options that appear when you create a new document. Furthermore, you can use the selection or eraser tools to make only some areas of your image transparent. People often add transparency in Photoshop when they are printing on paper with textured design or adding an image to a textured background on a website because the texture shows through in the transparent areas. With a little bit of practice you'll be adding transparency in Photoshop in no time.
Steps
Creating a Transparent Background
-
1Click "File"→"New". Go to File in the top menu and select "New." A new window will pop up where you can assign the properties of your new Photoshop document.
-
2Select "Transparent". A menu will pop up and under the section which says "Background Contents", where you should choose "Transparent". The button appears at the very bottom of the new document pop-up window.Advertisement
-
3Click OK. Press the OK button.
-
4Check the layers. Look at the Layer Window or the Layers tab in your document properties bar (it should already be open by default). The background layer should look like a checkered gray and white box (indicating that it is transparent).


Making Layers Transparent
-
1Select the layer. Select the layer that you want to make transparent by clicking on it from the list of layers in the Layers tab.
-
2Select the opacity. Click on the numeric box that appears next to Opacity at the top of the Layers tab. The default opacity is 100 percent.
-
3Lower the opacity. Drag the arrow on the opacity meter that appears to change the opacity of the layer. If you want the layer to be completely transparent you should change the opacity to 0 percent.


Creating Transparent Selections
-
1Select your layer. Select a layer that is not transparent, but make sure that the layers underneath it including the background layer are transparent.
-
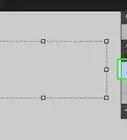
2Select the area to alter. Create your selection using one of the selection tools.
-
3Copy the selection. Click copy.
-
4Delete the selection. Press delete. You should now have a hole in the image.
-
5Create a new layer. Paste your copied selection onto a new layer.
-
6Lower the opacity. The area inside the selection that you had made will become transparent.


Making Transparent Drawings
-
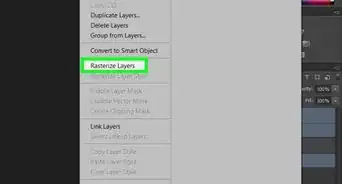
1Create or select your layer. Select a layer (must have more than 0 percent opacity, preferably should be 100 percent opaque). All of the underlying layers must be transparent.
-
2Click the Eraser tool. Pick the Eraser tool from the tool bar.
-
3Change the settings. Choose the size and shape of the eraser using the Options bar that appears when you have the Eraser tool selected.
-
4Draw using the Eraser tool. Essentially, you will be deleting the areas that you "draw" in, exposing the transparent layers underneath.


Community Q&A
-
QuestionI cannot understand the use of the grey and white transparency. Can you clarify, please?
 Community AnswerThat's a transparent background. It's to show what's transparent. Once you upload the image it'll disappear.
 -
QuestionWhat format do I need to save an image in to keep its transparency?
 Community AnswerI tried Method 1 above, and it works perfectly. I saved in .PNG format to maintain transparency in the finished product.
Warnings
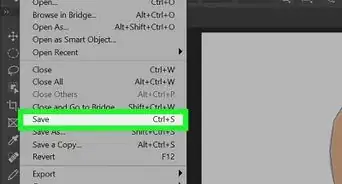
- When you add transparency in Photoshop using any of the transparency options, the information is not stored when an image is saved in JPEG format. It is best to save images with transparency in the Photoshop Document (PSD) format.⧼thumbs_response⧽


-Step-9-Version-2.webp)
References
About This Article
1. Click File.
2. Click New.
3. Select Transparent from the "Background" menu.
4. Click OK.