This article was co-authored by wikiHow staff writer, Janice Tieperman. Janice is a professional and creative writer who has worked at wikiHow since 2019. With both a B.A. and M.A. in English from East Stroudsburg University, she has a passion for writing a wide variety of content for anyone and everyone. In her free time, you can find her working on a new crochet pattern, listening to true crime podcasts, or tackling a new creative writing project.
There are 17 references cited in this article, which can be found at the bottom of the page.
This article has been viewed 1,473 times.
Learn more...
You’ve just picked up a few rolls of washi tape—but what exactly are you supposed to do with them? Created from rice paper, this colorful tape has a gentle adhesive that’s easy to peel away from just about any surface, making it perfect for all of your decorative and organizational needs.[1] X Research source From journals and calendars to pencils and envelopes, we’ve covered tons of different items you can decorate with your washi tape. Read on to get started!
Things You Should Know
- Use washi tape as both a decorative and organizational tool in your journal or calendar.
- Add colorful and decorative flair to your cards, envelopes, gift wrap, gift tags, pencils, and electronics.
- Take your organization to the next level with washi tape storage labels.
- Incorporate washi tape into your home decor by using it on your window blinds and walls.
Steps
Journals
-
Color-code and decorate your journal with strips of washi tape. Fold long strips of tape along the edge of individual pages so you can easily find them later, or color-code different parts of your journal with different tabs and squares.[2] X Research source Take your journal game to the next level with washi tape by:
- Making a swatch page with pieces of tape
- Creating beautiful page borders
- Tracking your mood
- Embellishing the cover

Planners and Calendars
-
Optimize your calendar or planner with multi-colored strips of washi tape. Have a vacation or family visit coming up? Block off multiple days on your calendar with a long strip of tape so you know when you’ll be away.[3] X Research source
- Make your calendar extra organized by labeling the tape with the event that’s happening.
- Draw a fun banner with washi tape flags over the weekend section of the calendar.[4] X Research source

Birthday Cards
-
Add colorful accents to birthday cards with washi tape. Draw a curved line along the front of your birthday card—this acts as the outline for your bunting banner. Then, cut out small, rectangle- or flag-shaped pieces of washi tape and stick them along the curve of the line.[5] X Research source
- You could also stack small pieces of tape on top of one another to create a cute birthday cake.

Envelopes
-
Decorate your greeting card envelopes with a fun splash of color. Measure and cut out strips of washi tape that fit nicely along the triangular fold of your envelope. For an especially fun touch, cut out small triangles or flag shapes from the tape and create a mini line of bunting along the front.
- Washi tape is a great way to spruce up greeting card and invitation envelopes.

Picture Frames
-
Upcycle an old picture frame. Cut off pieces of washi tape that are long enough to cover the width of your photo frame. Then, layer these strips of tape vertically along the border of the frame to create a seamless, colorful look.[6] X Research source
- The strips of tape on the left and right edges of the frame will need to be longer than the strips spanning the top and bottom edges.

Gift Tags
-
Add a colorful touch to your birthday or holiday gift tags. Grab a plain gift tag and decorate the surface with multiple strips of colorful washi tape. For a festive touch, choose holiday-appropriate patterns and colors for your tag decor.[7] X Research source
- You could mix and match green, red, and white washi tapes for the gift tags on your holiday presents.
- Making a gift for a friend? Choose a color or pattern of washi tape that your friend would really like and apply it directly to the gift tag.

Gifts
-
Add some extra personality to your wrapped gifts. Keep things simple and classic by applying a few stripes of washi tape to a gift-wrapped box. To jazz up a gift bag, fold a small piece of washi tape along a piece of twine to make an adorable bunting banner.[8] X Research source
- Cut out a triangle from the bottom of each washi tape flag to emulate that classic bunting look.

Cupcake Decor
-
Make adorable cupcake toppers. Fold a small, 1 to 2 in (2.5 to 5.1 cm) piece of washi tape along one end of a toothpick. Then, press the sticky side of the tape together to create a mini flag. Simply stick the decorated toothpick into the cupcake to give the treat a festive touch.
- For style points, cut out an inverted triangle from the outside of the flag to give it a little extra flair.

Pencils
-
Add some style to your school or office supplies. Cut off a small piece of tape that’s long enough to wrap around the entire surface of the pencil. Starting on the eraser end of the pencil, press one end of the washi tape in place. Then, carefully turn the pencil to wind the tape around the surface.[9] X Research source
- Try to keep the pattern lined up as you apply the tape. It’s okay if you need to peel away some of the tape and start over!

Computer Keyboard
-
Cover your computer keys with small pieces of washi tape. Clean off your keyboard and trace around the surface of a key with a regular piece of paper. Use this paper as a template to trace and cut out your washi tape embellishments. Then, simply center and stick the pieces onto your keys![10] X Research source
- Don’t worry—washi tape is pretty thin, so you should still be able to see the keyboard letters and symbols beneath the tape.

Laptops
-
Make your own laptop skin. Measure the width of your laptop and cut out strips of washi tape matching that measurement. Then, apply the pieces of tape in overlapping horizontal layers along the top of your device.[11] X Research source
- Create a uniform look by using just one color, or spice things up by alternating different colors and patterns! The choice is yours.
- You might want to clean your laptop before applying any tape.

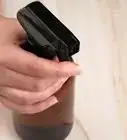
Phone Case
-
Upgrade a clear phone case with strips of washi tape. Grab a few rolls of washi tape in varying colors and patterns. Then, stick the strips along the outside of your case to give it a bright and stylish makeover. Trim around the edges and camera opening with an X-ACTO knife to give it a polished final touch.[12] X Research source
- You could alternate striped washi tape with solid-colored tape for an eye-catching look.

Storage Labels
-
Keep your belongings organized with marker-labeled strips of washi tape. Use your washi tape in the exact same way you’d use masking tape—just cut off a small, 2 to 4 in (5.1 to 10.2 cm) piece of tape and stick it on whatever you’d like to label. Then, write out your label on the piece of washi tape using a permanent marker.[13] X Research source You might create a washi tape label system for your:
- Dresser drawers
- Kitchen cabinets
- School locker
- Filing cabinets

Cord Labels
-
Organize all of your electronics with handy washi tape labels. Snip off a small, 1 to 2 in (2.5 to 5.1 cm) piece of washi tape and wrap it around the base of a cord (like a phone charger). Fold the sticky ends of the tape together to create a colorful tab. Then, label the tab with whatever that cord gets used for.[14] X Research source
- Use washi tape to label your video game systems, laptop chargers, HDMI cords, and more! This labeling system can be super helpful if you keep all of your cords in one place.

Paper Clip Bookmarks
-
Turn an ordinary paper clip into a fun bookmark. Cut off a small, 1 to 2 in (2.5 to 5.1 cm) piece of washi tape and loop it through one end of the paper clip. Then, fold both ends of the tape together and slide the paper clip onto the page you’d like to mark. You now have a brand new bookmark![15] X Research source
- Cut an inverted triangle into the top of your folded washi tape to give it a more classic look.
- This fun craft works best with larger paper clips. If you only have small paper clips, slice the washi tape in half vertically before sliding it through the clip.

Wall Decor
-
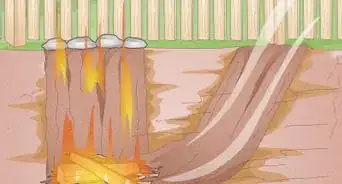
Channel your artistic side with washi tape-inspired wall art. Outline fun designs on your walls, like a giant tree with stretching branches, or cut your tape into small circles that you can polka-dot all over your room.[16] X Research source
- Give your bedroom walls a minimalistic look by applying a large grid of brightly-colored washi tape along the walls. For an even more dynamic look, extend the tape grid to the floor, too.
- Washi tape doesn’t use a heavy-duty adhesive so it won’t damage your walls. To be extra safe, always peel the tape off slowly when you’re removing it from your wall.[17] X Research source

Window Blinds
-
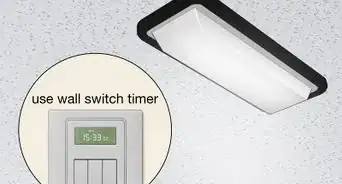
Turn your simple blinds into a colorful accent. Clean off your blinds and apply long strips of washi tape over the surface of each blind. Continue decorating each one until your blinds are completely covered and decorated in a fun new color or pattern.[18] X Research source
- This is a pretty big project, so you may need multiple rolls of washi tape to get the job done.
- If you don’t have a lot of tape on hand, try alternating colors or patterns on every other blind.

Keys
-
Make your keys super easy to tell apart with washi tape. Have a lot of keys on your key ring? Remove each one and decorate the wide, round end with a piece of washi tape. Then, cut around any openings or indentations on the key so you can thread it back onto your key ring.[19] X Research source
- You might use a yellow-and-orange-colored washi tape for your house key, a polka-dotted tape for your car keys, and a seashell-patterned tape for your gym locker.

Nail Art
-
Give yourself an impromptu manicure. Stick a short 1 in (2.5 cm) strip of washi tape on each fingernail. Then, trim around the edge of your nail with a pair of precision scissors. Apply a coat of clear nail polish on top to keep your nail art looking fresh and sharp.[20] X Research source
- Use this technique to give yourself a pedicure, too!

Stickers

You Might Also Like

 How to Get Spray Foam off Your Hands

 How to Defrost a Samsung Ice Maker: A Quick Guide
References
- ↑ https://www.washingtonpost.com/lifestyle/kidspost/make-your-mark-with-washi-tape-pencils/2016/08/09/2e4f8d2c-5a90-11e6-831d-0324760ca856_story.html
- ↑ https://thetinylife.com/47-genius-ways-to-use-washi-tape-in-your-bullet-journal/
- ↑ https://thetinylife.com/47-genius-ways-to-use-washi-tape-in-your-bullet-journal/
- ↑ https://thechiclife.com/2015/01/decorate-planner-washi-tape.html
- ↑ https://fudgemylife.org/diy-card-washi-tape-flags/
- ↑ https://www.latimes.com/home/la-lh-washi-tape-picture-frames-20131211-story.html
- ↑ https://www.makinghomebase.com/a-holiday-craft-washi-tape-gift-tags/
- ↑ https://www.todaysparent.com/family/activities/washi-tape-gift-wrapping-ideas/
- ↑ https://www.washingtonpost.com/lifestyle/kidspost/make-your-mark-with-washi-tape-pencils/2016/08/09/2e4f8d2c-5a90-11e6-831d-0324760ca856_story.html
- ↑ https://www.ellison.com/creative-ways-to-use-washi-tape-in-the-office
- ↑ https://makesomethingmondays.com/craft-ideas/diy-washi-tape-laptop-skin/
- ↑ https://www.topinspired.com/top-10-creative-ways-you-can-decorate-your-phone-case/
- ↑ https://www.theorganizedmama.com/15-ways-to-make-labels-for-every-space-in-your-home/
- ↑ https://www.weareteachers.com/washi-tape-ideas/
- ↑ https://www.brit.co/washi-workspace/
- ↑ https://www.homedit.com/15-diy-washi-tape-ideas-to-add-color-to-your-home/
- ↑ https://www.housedigest.com/951615/how-to-use-washi-tape-as-decor/
- ↑ https://www.mrgapartments.com/2016/03/spruce-place-washi-tape/
- ↑ https://www.weareteachers.com/washi-tape-ideas/
- ↑ https://www.diys.com/washi-tape-nail-art/
- ↑ https://www.weareteachers.com/washi-tape-ideas/