This article was co-authored by Luigi Oppido and by wikiHow staff writer, Janice Tieperman. Luigi Oppido is the Owner and Operator of Pleasure Point Computers in Santa Cruz, California. Luigi has over 25 years of experience in general computer repair, data recovery, virus removal, and upgrades. He is also the host of the Computer Man Show! broadcasted on KSQD covering central California for over two years.
There are 18 references cited in this article, which can be found at the bottom of the page.
This article has been viewed 330,977 times.
Touch typing, or the ability to type quickly without looking at the keyboard, can help take your productivity to the next level. This skill can seem pretty daunting if you don’t have a lot of computer experience, but it’s easy to get the hang of with enough practice. Focus on learning the basics first, and then you can gradually type more quickly!
Steps
-
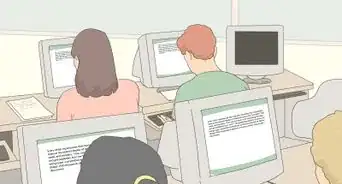
1Sit up straight with your elbows bent at a 90-degree angle. Touch typing involves a lot of muscle memorization, but it also involves good posture, too. Find a comfortable chair that supports your back, where you can sit upright for long periods of time. Keep your elbows bent at right angles, and curl your fingers over the keyboard so it’s easier to type.[1] Additionally, try to keep your head about an arm’s length away from the screen, while keeping your wrists straight and your fingers curled.[2]
- If you have poor posture, you may have more difficulty typing.
- It may help to use a wrist pad to support your hands. Many typists also prefer to keep their feet propped up on a footrest.
-
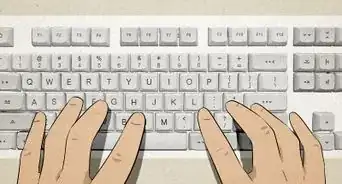
2Curl your fingers on the “home” keys, or “ASDF” and “JKL;.” Meet the home keys, which are the most important keys used during touch typing. These will help you find your way around the keyboard. Keep in mind that there are different home keys for different fingers.[3]
- You can identify the home row by finding the lifted ridges on the “F” and “J” keys.
- On your left hand, place your pinky finger on the “A” key; your ring finger onto the “S” key; your middle finger onto the “D” key; and your pointer finger onto the “F” key.
- On your right hand, place your pinky finger onto the semicolon key; your ring finger onto the “L” key; your middle finger onto the “K” key; and your pointer finger onto the “J” key.
Advertisement -
3Find the different keys that your left hand will touch. Divide your keyboard into different “zones,” which will help you fine-tune your touch typing. Use your left pointer finger to touch the “V,” “B,” “R,” “T,” “5,” and “6” keys and your left middle finger to touch the “E,” “C,” and “4” keys. Try to touch the “W,” “X,” and “3” keys with your left ring finger, while using your left pinky to touch the “Q,” “Z,” “1,” and “2” keys.[4]
-
4Search for the keys that your right hand will press. Use your right pointer finger to touch the “H,” “N,” “M,” “U,” “Y, and “7” keys, then use your right middle finger to touch the “comma,” “I,” and “8” keys. Aim to use your right ring finger to touch the “O,” “9,” and “period” keys, while using your right pinky finger to touch the “0,” “P,” “backslash,” “apostrophe,” “minus sign,” “equal sign,” and both bracket keys.[5]
- Don’t worry—it can be difficult to memorize all of the finger placements at first. As you practice, you’ll be able to memorize the different placements more accurately!
-
5Reach your fingers up to type numbers or letters from the QWERTY row. Bring your fingers up a row to tap and press on the “Q,” “W,” “E,” “R,” “T,” “Y,” “U,” “I,” “O,” and “P” keys, as well as the bracket and numerical keys. After pressing on these upper keys, bring your fingers back to the home row.[6]
- Practice slowly moving your fingers up a row, and then moving them back to the home row.
- Your left pinky will touch “Q” and “1,” your left ring finger will touch “W” and “2,” your middle finger will touch “E” and “3,” and your left pointer finger will touch “R,” “T,” “4,” and “5.”
- Your right pointer finger will touch “Y,” “U,” “6,” and “7,” your middle finger will touch “I” and “8,” your ring finger will touch “O” and “9,” and your right pinky will touch “P” and “0.”
-
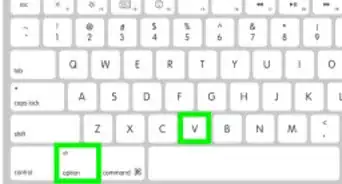
6Move your fingers down to type letters on the bottom row. Dip your fingers below the home row of keys so you can hit the “Z,” “X,” “C,” “V,” “B,” “N,” “M,” “comma,” “period,” and “backslash” buttons. Get the hang of moving your fingers down and then returning them to the home row, which will help your typing habits become more efficient.[7]
- For reference, your left pinky will tap the “Z” key, your left ring finger will tap the “X” key, your left middle finger will touch the “C” key, and your left pointer finger will touch the “V” and “B” keys.
- On your right hand, our right pointer finger will touch the “N” and “M” keys, your middle finger will touch the “comma” key, your ring finger will touch the “period” key, and your pinky will touch the backslash button.
-
7Hit the spacebar with either thumb. Keep both of your thumbs perched on top of the spacebar to make your typing patterns more convenient. As you type, you can use either finger to add spaces within your sentences.[8]
- You may prefer using a certain thumb to press the spacebar, which is totally normal!
-
8Press any utility keys with your pinkies. Stretch your pinkies to the sides in case you need to enter, backspace, tab, or shift. Try to get in the habit of pressing the shift key while you press another letter key, as this will help your typing become more productive.[9]


Practicing Your Finger Placements
-
1Type the “home” keys without looking at the keyboard. Practice typing the home key letters while keeping your eyes on the screen. Start with the letter “A,” then work your way to the ending semicolon key in the row. Once you’ve finished typing out different combinations of these letters, look at the screen and see how well you did.[10]
- For instance, you can type “FFFF,” “DDDD,” “SSSS,” and “AAAA” one after the other.
- You can also try combinations like “FADS,” “JKL;,” “AFDS,” and “;LKJ.”
-
2Create simple words with the “E,” “R,” “U,” and “I” keys. Stretch your left and right pointer fingers up to press the “U” and “R” buttons. Similarly, use your middle fingers to touch the “I” and E” keys. Practice typing these keys sequentially, then typing the letters in different combinations. Continue practicing until you start to get the hang of which finger goes where.[11]
- For example, you can type words like “deer,” “reed,” and “freed” to practice, or made-up words like “jiku,” “julu,” or “ikiu.”
-
3Add “T,” “G,” and “H” into your typing practice. Stretch your pointer fingers to the left and right to tap the “G” and “H” buttons, which are also part of the home row. Additionally, practice reaching your left pointer finger upwards so you can tap on the letter “T.” Try several repetitions of touching these buttons and returning your fingers back to the home key spaces.[12]
- For instance, you can type something like “fg” or “ft,” or something like “jhjkik” or “huhi.”
-
4Write out words with “W,” “S,” “Y,” “L,” and “O.” Practice typing with your middle fingers now, focusing specifically on the “W,” S,” “O,” and “L” keys. You can also practice stretching your right pointer finger to tap the “Y” key, which will expand your typing repertoire even more. Try writing different words or exercises with these letter so you can see how much progress you’ve made.[13]
- For example, you can type out things like “ffds,” “fdsdf,” jhyhj,” “klol,” and “jklkjyj.”
-
5Practice moving your fingers down to type “N,” “M,” “V,” and “B.” Move both of your fingers to the bottom row to practice typing—reach for “V” and “B” with your left pointer finger, and “N” and “M” with your right pointer finger. It’s okay if you have trouble hitting the right keys at first! Just practice typing different sequences with these letters to get the hang of the movements.[14]
- For instance, you can type words like “oven,” “tent,” “them,” “fiver,” “boney,” and “mousey.”
-
6Type words with “C,” “A,” “P,” “Q,” “Z,” and “X.” Reach your left middle finger downwards to touch the “C” key, and use your pinky fingers to press “Q,” “A,” “Z,” and “P.” At this point, train your left ring finger to reach down and touch the “X” key, as well.[15]
- You can write a variety of different words to help you get the hang of these finger movements. For instance, type words like “farmer,” “frame,” “trumpet,” “arrange,” “mixes,” “zigzag,” and “lazy.”
-
7Add punctuation and capital letters to your sentences. Use your pinky fingers to press the “shift” keys while typing a letter key, which helps you create capital letters quickly. Additionally, use your right middle and ring fingers to type commas and periods. You can use your right pinky to type semicolons, colons, and apostrophes, as needed.[16]


Honing Your Skills
-
1Set aside time each day to practice typing. Find time each day to sit in front of your keyboard and try a few different practice sessions, which really help you figure out where your fingers are supposed to go on a keyboard.[17] Boosting your typing skills will really help you in the long run, especially if you’d like to work in an office or other position that involves a lot of typing.[18]
- With regular practice, you’ll notice your typing speed increase over time!
-
2Practice your typing in short increments so you don’t get tired. Set aside 10 minutes each day to go through different typing exercises and review different placements of your fingers as you touch type. It’s easy to get frustrated, especially if you find yourself hitting the wrong keys—with this in mind, give yourself plenty of breaks so you don’t lose patience with yourself.[19]
- You can set up two or three 10-minute practice sessions for yourself each day, or figure out another schedule that works well for you. Whatever you do, choose a training schedule that feels manageable!
-
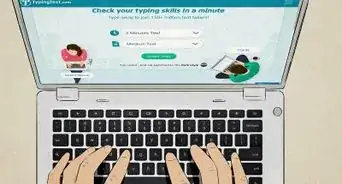
3Download a typing program so you can get extra practice time. Search online to see if there are any free demo or trial copies of professional programs. These programs can help a lot, while also offering a whole new environment to type in. Try some free online typing tutors that offer different ranges of courses for all skill levels.[20]
- For instance, sites like “Typing Club,” “KeyBR,” and “Typing Academy” are all great places to get started.
-
4Try out different typing games to make typing fun. Look online for goal-based games that make typing more fun. A lot of these games are geared towards kids learning their way about the computer, but anyone can use them![21] Practice with these games and see if you notice any improvement in your touch typing skills.[22]
- For instance, games like Dance Mat Typing are great starting points.


Community Q&A
-
QuestionWhy are the keys not in alphabetical order?
 Tom De BackerTop AnswererBecause modern keyboards evolved from old mechanical typewriters. On those, each key has an arm that punches the letter through the ink ribbon onto the paper. They organized the letters in such an manner that the most often-used letters are never next to each other to avoid two of those arms getting hooked into each other, blocking the typewriter. By the time electronic keyboards rolled around, many typists had already learned how to speed type, so they kept the same keyboard layout.
 -
QuestionHow fast should I be typing after a year of practicing?
 Community AnswerThere is no set amount that you "should" be typing. Instead, start timing your typing using a typing speed website. After a year, you should see a definite increase in the words per minute that you can type.
 -
QuestionWhy do many beginners find it hard to learn typing?
 Community AnswerBecause they are not willing to spend the time to practice. Initially it is a monotonous exercise. You must have patience and determination to master this skill.
Warnings
- Don't press the keys too hard - it's not good for the keyboard if you bash away at them! Press lightly!⧼thumbs_response⧽
- It’s really important to maintain the proper posture while you type, especially if you plan on typing for long periods of time. If you don’t use the proper posture, you could end up straining yourself.[23]⧼thumbs_response⧽


References
- ↑ https://myhealth.alberta.ca/Health/Pages/conditions.aspx?hwid=hw200906
- ↑ https://www.mayoclinic.org/healthy-lifestyle/adult-health/in-depth/office-ergonomics/art-20046169
- ↑ https://www.lfpl.org/jobshop/docs/keyboarding-tipsheet.pdf
- ↑ http://www.typing-lessons.org/preliminaries_4.html
- ↑ https://www.readandspell.com/us/finger-placement-for-typing
- ↑ https://m.youtube.com/watch?v=2S3lhm8LaZo&t=2m31s
- ↑ http://www.typing-lessons.org/preliminaries_4.html
- ↑ https://www.lfpl.org/jobshop/docs/keyboarding-tipsheet.pdf
- ↑ https://www.learntyping.org/beginner-typing-lesson-4
- ↑ https://www.learntyping.org/beginner-typing-lesson-1a
- ↑ https://www.learntyping.org/beginner-typing-lesson-1b
- ↑ https://www.learntyping.org/beginner-typing-lesson-2a
- ↑ https://www.learntyping.org/beginner-typing-lesson-2b
- ↑ https://www.learntyping.org/beginner-typing-lesson-3
- ↑ https://www.learntyping.org/beginner-typing-lesson-5
- ↑ https://www.typing.com/student/lesson/384/paragraph-practice
- ↑ Luigi Oppido. Computer & Tech Specialist. Expert Interview. 31 July 2019.
- ↑ https://www.freecodecamp.org/news/i-learned-to-touch-type-at-the-ripe-old-age-of-29-was-it-worth-it-112ef2150fec/
- ↑ https://www.readandspell.com/us/teach-yourself-to-type
- ↑ https://www.readandspell.com/us/teach-yourself-to-type
- ↑ Luigi Oppido. Computer & Tech Specialist. Expert Interview. 31 July 2019.
- ↑ https://www.bbc.co.uk/bitesize/topics/zf2f9j6/articles/z3c6tfr
- ↑ https://myhealth.alberta.ca/Health/Pages/conditions.aspx?hwid=hw200906
About This Article