This article was co-authored by Spike Baron and by wikiHow staff writer, Nicole Levine, MFA. Spike Baron is the Owner of Spike's Computer Repair based in Los Angeles, California. With over 25 years of working experience in the tech industry, Spike specializes in PC and Mac computer repair, used computer sales, virus removal, data recovery, and hardware and software upgrades. He has his CompTIA A+ certification for computer service technicians and is a Microsoft Certified Solutions Expert.
This article has been viewed 269,054 times.
Did you close Microsoft Word without saving your document? You're definitely not alone! Don't panic—Microsoft Word has plenty of built-in options that can help you recover documents on your PC or Mac. This wikiHow teaches you how to restore unsaved or damaged Word documents, as well as how to go back to previous revisions. If you can't recover your Word document using these tools, you'll need to use data recovery software or restore from a backup to recover the document.
Things You Should Know
- If a document you need is damaged or corrupted, you can repair it using the Open and Repair feature in Word.
- If you save your documents to OneDrive or SharePoint, you can restore them to previous versions.
- If you forgot to save, find the file in /Preferences/AutoRecovery on a Mac or using Recover Unsaved Documents on a PC.
Steps
Recover Unsaved Documents (PC)
-
1Open Microsoft Word. You'll find it in the Windows Start menu.
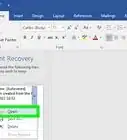
- If Word crashed before you could save your document, you may see a panel called "Document Recover" in the left side menu upon opening the app. If this panel opens, click your unsaved file in the panel to open it, and then go to File > Save As to save it now. If this worked for you, there's no need to continue with this method.
-
2Click the File menu. It's at the top-left corner of Word.Advertisement
-
3Click Info. It's near the top of the left panel.
-
4Click the Manage Document icon. It's in the right panel and looks like a sheet of paper with a magnifying glass. A small menu will expand.
-
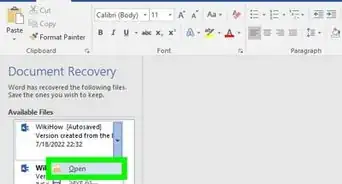
5Click Recover Unsaved Documents on the menu. This opens the Unsaved Files folder, in which you'll see a list of recently backed-up files that were automatically saved by Word but not yet officially saved by you.
-
6Select the document and click Open. This opens the document in Word.
- If you didn't see your document in the folder, it's possible that you saved it to your Documents or Desktop folder.
-
7Save your recovered document. So you don't lose the document again, click the Save As button in the gray bar running across the top of the document and save it to a folder you'll remember (such as Documents). If you don't see this option, click File and select Save As.


Recover Damaged Documents (PC)
-
1Open Microsoft Word. If you can't open your Word document because it's damaged or corrupted, you can usually use the built-in repair tool to recover the document.[1] You'll find Word in your Windows Start menu.
-
2Click the File menu. It's at the top-left corner.
-
3Click Open. It's in the left panel toward the top.
-
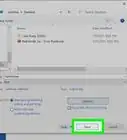
4Click Browse. It's at the bottom of the "Open" column in the center. This opens your computer's file browser.
-
5Navigate to the location of the damaged file. For example, if it's in your Documents folder, navigate to that location.
-
6Click the file once to select it. Don't double-click it.
-
7Click the down-arrow next to "Open." A menu will expand.
-
8Click Open and Repair. It's toward the bottom of the menu. If the file is repairable, Word will repair it now.
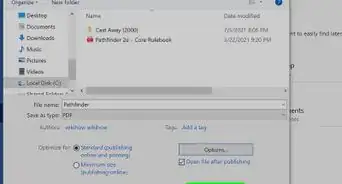
- If the document isn't repairable, you can usually extract the text without the formatting and images. To do this, select Recover Text from Any File from the "File Type" drop-down menu at the bottom-right corner and then click Open. At this point, you can either save the file by clicking File > Save As or paste it into a new file.


Restore Previous Revisions (PC)
-
1Open Microsoft Word. As long as you saved your document to your OneDrive or SharePoint in Microsoft 365, you can return to a previous version of the document. You'll find Microsoft Word in your Windows Start menu.
-
2Open the file you want to revert. To do this, click the File menu, select Open, navigate to and select the file, and then click Open.
-
3Click the File menu. It's at the top-left corner.
-
4Open your version history. This lets you see different saved revisions of the document organized by date. The steps to do this are different by version:
- Word 365: Click Info in the left panel, and then select Version history (the clock icon) in the center panel.
- Word 2019 or 2016: Click History on the menu. If you don't see it, it's usually because you have a subscription to Microsoft 365. In this case, click Info in the left panel and then select Version history in the center panel.
-
5Click the version you want. All versions now appear in the right panel under "Version history." Clicking a version opens it in a separate Word window.
-
6Click Restore to switch back to the selected version. This will undo any changes you've made since the revision you selected.


Recover Unsaved Documents (Mac)
-
1
-
2Click the Go menu. It's in the menu bar that runs along the top of the screen. A menu will expand.
-
3Click Go to Folder on the menu. It's near the bottom of the menu.
-
4Enter the path to the AutoRecovery folder. To do this, type or paste the following path into the box (replacing username with the username you use to log into your Mac): /Users/username/Library/Containers/com.Microsoft/Data/Library/Preferences/AutoRecovery
-
5Click the Go button. This opens a folder that contains files that were automatically saved by Word.[2] Files in this folder begin with the word "AutoRecover."
- You won't see the file here if you selected Don't Save when closing Word. Unfortunately, there's no way to recover a document if you selected that option.
-
6Double-click the file you want to recover. This should open it in Word.
- If it doesn't open in Word, click the file once, press Return, and then type .doc at the end of the file name. Press Return again to save the new file name and follow any confirmation requests.
- If you are prompted to select an application, click Open With and choose Microsoft Word.
-
7Press Command to save the file. This opens the Save As dialog window, which allows you to save the document with any file name (and to any location) you wish.
-
8Select a saving location and click Save. If you don't see a list of folders to save to, click the On My Mac button to browse for a folder on your Mac first.[3]


Recover Damaged Documents (Mac)
-
1Open Microsoft Word on your Mac. If you can't open your Word document in Word on your Mac because it's damaged or corrupted, you can usually use the built-in recovery tool to recover the text within. You'll find Word on your Launchpad and/or in the Applications folder.
-
2Click the Word menu. It's in the menu bar at the top of the screen.
-
3Click Preferences on the menu. A dialog window will appear.
-
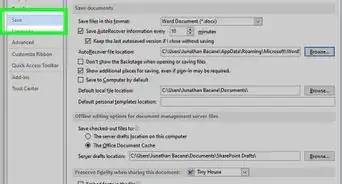
4Click the General icon under "Authoring and Proofing Tools." It's near the top-left corner.
-
5Check the box next to "Confirm file format conversation at Open." It's the first option.
-
6Return to Word and click the File menu. It's near the top-left corner of the screen.
-
7Click Open on the menu. The option to open a file will appear.
-
8Select Recover Text from the "Open" menu. It's the menu near the bottom-right.
-
9Select the document and click Open. This opens the text from the document, and hopefully some or all of the original formatting. You may lose some non-text details, but the text should be intact.


Restore Previous Revisions (Mac)
-
1Open Microsoft Word on your Mac. If you accidentally saved changes to your Word document and want to revert to a previous version, you can do so easily in Word 365, 2019, or 2016 for Mac.[4] You'll find the program on the Launchpad and/or in the Applications folder.
- This method only works for files saved to your OneDrive or SharePoint in Microsoft 365.
-
2Open the file you want to revert. To do this, click the File menu, select Open, navigate to and select the file, and then click Open.
-
3Browse the version history. This will let you view different saved revisions of the document organized by date. The steps to do this are different by version:
- Word 365: Click the click the name of the document in the title bar of Word (at the top), and then select Browse version history.
- Word 2019 & 2016: Click the File menu and select Browse Version History.
-
4Click the version you want. The version list appears in a panel on the right side of Word. Clicking a document version opens it in a separate window.
-
5Click Restore to switch back to the selected version. It's at the top of the document. This will undo any changes you've made since the revision you selected.


Expert Q&A
-
QuestionCan I retrieve a Word document that wasn't saved?
 Spike BaronSpike Baron is the Owner of Spike's Computer Repair based in Los Angeles, California. With over 25 years of working experience in the tech industry, Spike specializes in PC and Mac computer repair, used computer sales, virus removal, data recovery, and hardware and software upgrades. He has his CompTIA A+ certification for computer service technicians and is a Microsoft Certified Solutions Expert.
Network Engineer & Desktop SupportIf it isn't in your recovered files folder and you aren't in a corporate environment, it may be gone for good. If you are in a corporate setting, there's going to be an exchange server somewhere and there will be a copy of your file on that. -
QuestionBy mistake, I deleted the file data, after the delete I saved the file. How can I get the data back?
 Community AnswerGo to the recycle bin icon on your desktop and right click it. A menu will show up, click on restore.
 -
QuestionHow do I recover documents deleted from my PC that are permanently deleted and are not in my recycle bin?
 Community AnswerThis will be difficult, but you will need to look for a recovery program.


References
- ↑ https://support.microsoft.com/en-us/office/open-a-document-after-a-file-corruption-error-47df9d48-2165-4411-a699-1786ac734bc3
- ↑ https://support.microsoft.com/en-us/office/recover-files-in-office-for-mac-6c6425b1-6559-4bbf-8f80-4f038402ff02
- ↑ https://support.microsoft.com/en-us/office/save-a-file-in-office-for-mac-421a5172-9bc6-4ef0-b452-c0939bdce786
- ↑ https://support.microsoft.com/en-us/office/view-previous-versions-of-office-files-5c1e076f-a9c9-41b8-8ace-f77b9642e2c2#ID0EBBBAAA=Mac
- ↑ https://support.microsoft.com/en-us/office/change-save-frequency-and-where-word-autorecovery-files-are-stored-ddd81816-39ff-48f4-989e-8bf1db78b2d9#:~:text=files%20in%20Word-,Go%20to%20Word%20%3E%20Preferences.,then%20select%20Open%20or%20Choose.
About This Article

1. Open Word.
2. Go to File > Info > Manage Document.
3. Click Recover Unsaved Documents.
4. Select the document and click Open.
5. Click Save As to save the document.