This article was co-authored by wikiHow Staff. Our trained team of editors and researchers validate articles for accuracy and comprehensiveness. wikiHow's Content Management Team carefully monitors the work from our editorial staff to ensure that each article is backed by trusted research and meets our high quality standards.
There are 9 references cited in this article, which can be found at the bottom of the page.
This article has been viewed 17,429 times.
Learn more...
Molex is a company that manufactures a variety of different types of electrical connectors that are used for applications such as computers and electronic devices. Their connectors are sturdy and long-lasting, but they can wear out over time and may need to be checked or replaced to make sure they’re functioning properly. Fortunately, Molex connectors are actually pretty easy to open up so you can examine the pins and replace them if they’re damaged or worn out.
Steps
Removing the Connector Pins
-
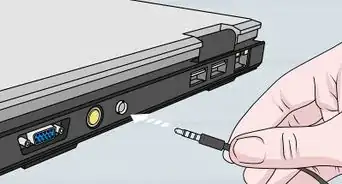
1Unplug the connector if it’s attached to an electrical device. Molex connectors are often used to power electrical boards, computer fans, and disk drives, as well as electronic devices such as video game consoles and RC batteries. If your Molex connector is already plugged into an electrical board or device, turn off the device so there isn’t any electricity flowing through the wires. Then, grasp the connector where it’s plugged in and firmly pull on it to separate it.[1]
- You could potentially shock yourself, so make sure the device is turned off. Unplug the main power cord to be extra safe.
- Don’t unplug the connector by pulling on the wires or you could damage them.
-
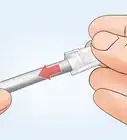
2Push down on a pin with an extraction tool or screwdriver. Look at the end of the connecter where it plugs into a device for small metal pins that are holding the wires in place. If you have a Molex extraction tool, use it to press down on 1 of the pins through the small slot. If you don’t have an extraction tool, use a small flathead screwdriver.[2]
- Press down on the pin gently to avoid damaging it so you’re able to reuse the connector.
- You can also use a paper clip or even a staple to press down on an individual pin.
Advertisement -
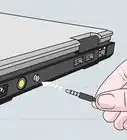
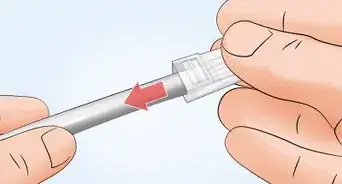
3Pull on the wire connected to the pin to remove it. While you’re holding down the pin with 1 hand, use your other hand to take hold of the wire connected to the pin. Gently tug on the wire to separate it from the pin. Slide the wire all of the way out of the connector.[3]
- If you’re having trouble separating the wire, you may not be holding the pin down to release it. Make sure you’ve got the pin pressed down.
Note: It’s important that you keep track of the order of the wires as you remove them from the connector so you can reinstall them correctly. Take a picture of the connector before you remove the pins so you can reference it when you reinstall them.
-
4Cut off the old connector pin with wire cutters. Take a pair of wire cutters or scissors and locate the base of the connector pin on the end of the wire. Make a clean cut through the base of the connector pin to separate it, and then dispose of it in the garbage.[4]
-
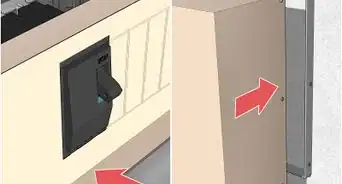
5Remove any additional wires that need new pins. If you plan to replace the connector pins on multiple wires, push down on the pins individually and slide them out of the connector. Use your wire cutters to snip off the connector pin from the end of the wires. Keep the wires in order so they’re easier to reinstall into a new connector.[5]


Replacing the Connector Pins
-
1Insert a new connector pin into the appropriate slot on a wire crimper. A wire crimper is a handheld tool that drives the connector pins though the wire insulation to securely attach them to the end of a wire. Choose a connector pin that fits onto the wire and slide it into 1 of the slots on the crimper.[6]
- The crimper has multiple slots, each a different gauge or size. Choose the slot that holds your connector pin snugly.
- Make sure you choose connector pins that match the type of Molex connector you have so they’ll fit into the slots.
- You can find wire crimpers and connector pins at electronic supply stores, department stores, or by ordering them online.
Tip: Look up the Molex connector you have online to find out what type of connector pins it uses so you can replace them.
-
2Slide the end of the wire into connector pin. Take your wire and push the end of it into the connector pin being held by the crimper. Push the wire into the pin until the end of the wire is even with the end of the pin.[7]
- Don’t push the wire so far that it’s sticking out of the other side of the connector pin.
-
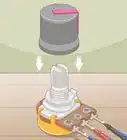
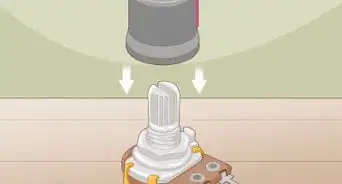
3Squeeze the handle of the crimper to attach the pin to the wire. Lightly squeeze the crimper to drive the metal of the pin into the insulation surrounding the wire so it’s connected to the actual wire. Open the crimper to remove the wire and gently tug on the connector pin to make sure it’s securely attached.[8]
- Be careful not to squeeze so hard that it damages the connector pin. A gentle, but firm crimp will push the metal of the pin through the insulation just fine.
-
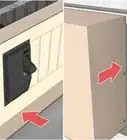
4Push the wire into the correct slot on the connector to reinstall it. Once you’ve replaced the connector pins, slide the pin into the Molex connector slot until it clicks into place. Give a light tug to make sure it’s attached. Make sure you install the wires in the same order they were in when you removed them.[9]


Warnings
- Turn off the device before you try to open up the pins with a screwdriver so you don’t shock yourself.⧼thumbs_response⧽
Things You’ll Need
- Molex extraction tool or small flathead screwdriver
- Wire crimper
- New connector pins
- Wire cutters


References
- ↑ https://youtu.be/p0jBupYVreI?t=18
- ↑ https://youtu.be/p0jBupYVreI?t=130
- ↑ https://youtu.be/p0jBupYVreI?t=156
- ↑ https://youtu.be/p0jBupYVreI?t=216
- ↑ https://youtu.be/IFR9Wnslruk?t=102
- ↑ https://youtu.be/h4xdpWOKBr0?t=107
- ↑ https://youtu.be/h4xdpWOKBr0?t=132
- ↑ https://youtu.be/p0jBupYVreI?t=397
- ↑ https://youtu.be/p0jBupYVreI?t=432
About This Article