This article was co-authored by wikiHow staff writer, Nihal Shetty. Nihal Shetty is a Writer and Editing Fellow at wikiHow who splits his time between Michigan and Mexico City. Before his role at wikiHow, he was an instructor of Russian literature at the University of California, Berkeley. Nihal received a BA in Comparative Literature from Columbia University and an MA in Russian at Berkeley.
There are 14 references cited in this article, which can be found at the bottom of the page.
This article has been viewed 20,562 times.
Learn more...
So you’ve spent the afternoon putting together a jigsaw puzzle, but then the unthinkable happens—after looking everywhere, you realize that there’s a missing piece. If you’re the artsy type, the next question in your mind is probably predictable: how do you make a replacement? We’re here to help by showing you how to make a new puzzle piece by hand or on a computer. Here’s our complete guide on how to make a missing puzzle piece.
Steps
Drawing a Missing Puzzle Piece by Hand
-
1Remove the part of the puzzle that’s surrounding the missing piece. After putting together the rest of the puzzle, dislodge the squares surrounding the missing piece.[1]
-
2Stick the pieces together with tape. To make sure that the pieces you removed from the completed puzzle don’t fall apart, use a few pieces of clear, easily removable tape to stick the backs of the pieces together.[2]Advertisement
-
3Cut out a piece of cardboard large enough to replace the piece. Ideally, your cardboard should be of a similar thickness to the rest of the puzzle. It’s okay if the cardboard piece is wide or long—you’ll be trimming it to fit the puzzle anyways.[3]
- If you don’t have cardboard that’s the right thickness, use a cereal box. Cut out squares of the cereal box and stack them on top of one another until they’re a similar thickness to the puzzle. Then glue them together with a glue stick and place them under a heavy object to dry.[4]
- If you’re using a cereal box, be sure that the brown side of the box is facing outwards on both sides after you’ve glued the pieces together.
-
4Trace the missing piece of the puzzle onto the cardboard. Use a sharp pencil for this so that you can be as precise as possible. Be sure that you’re tracing as close to the edges of the surrounding pieces of the puzzle as possible.[5]
-
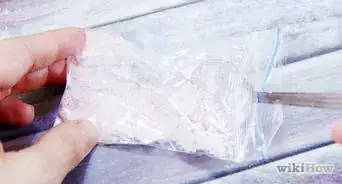
5Cut out the traced part of the cardboard. Start by using a pair of scissors to remove the bulk of the cardboard surrounding the traced piece. Then, focus on cutting out the curves of the traced cardboard with as much precision as possible.[6]
- When cutting out the finer curves of the traced piece, you may want to use a craft knife and cutting board instead of scissors. This can help you be more precise.[7]
- If you’re unsure how well you cut the piece, try fitting it into the surrounding parts of the puzzle. If it’s a snug fit, you’re good to go.
- If the piece is too large when you try to fit it into the puzzle, trim it some more. If it’s too small, you may want to consider starting over and retracing the missing puzzle.
-
6Glue a piece of white paper on the replacement piece. For a hardier surface than plain printer paper, use poster board or specialized adhesive paper. A regular glue stick works well, but other kinds of craft glue work just as well.[8]
-
7Trim the paper so it covers the top of the piece. Make sure that there is no paper hanging over the edges. You can use a pair of scissors for this, or a craft knife and cutting board if you prefer.[9]
-
8Fit the replacement piece into the puzzle and draw the design. Use the puzzle box for guidance on what the missing piece should look like, and start by using an erasable pencil in case you make a mistake. Fill in the colors with colored pencils, paint, or markers.[10]
- Be careful not to get color on the surrounding pieces. After using a pencil to outline what the piece should look like, consider removing the replacement piece from the rest of the puzzle before coloring it.
-
9Finish the piece with a spray varnish. Lightly spray your piece for a couple of seconds to give it a glossy finish that protects it from future wear-and-tear. Let it dry for a few hours. While this isn’t a strictly necessary part of making a replacement puzzle piece, it can help your piece blend in with the rest.[11]
- Your local art supply store will have spray varnishes for sale, which may also go by the name of spray sealants. A sealant used for acrylic paintings can work well here.


Using a Computer to Make a Missing Puzzle Piece
-
1Scan a picture of the completed puzzle on the box. Place the box of the puzzle, which likely contains the puzzle’s full image, into a high-quality scanner. Download this image onto your computer.[12]
- If you don’t have a scanner, visit your local library or copy shop. There should be scanners available for use at these locations.
- If you don't have a scanner, you can also try taking a photo of the completed puzzle on the box instead.
- You may also be able to find a copy of the image online, but be careful—it’s possible that the puzzle makers altered the dimensions of the image, or that the resolutions available online are low-quality.
-
2Crop the image to the area surrounding the missing piece. Use a free photo editing software, like GIMP, to edit the image. Using the crop tool, click on a point near the missing puzzle piece, and drag the box to crop the larger image into a smaller area surrounding the missing piece.[13]
- If you have Photoshop or have access to another photo editing software, you can use this instead.
-
3Resize the area of the missing piece. Start by taking your real-world puzzle and using a ruler to measure the length and width of the area that you’ve cropped digitally on your photo editing software. Enter this information into your photo editing software—the option to do this may be located under the “Image Size” tab, depending on what software you’re using.[14]
- For example, if the area surrounding the missing puzzle piece that you’ve cropped in your photo editing software is 5 cm long and 4 cm wide in the real world, enter this information into the software to change the cropped area’s dimensions.
-
4Print the image. Using matte-finished paper will make your replacement puzzle piece look all the more polished. However, it’s a good idea to first print the image on cheaper paper, so that you can double-check to make sure that it’s the right size before wasting high-quality sheets.[15]
-
5Place the printed image under the missing part of the puzzle, then trace. Adjust the placement of the image so that it lines up with the rest of the puzzle, then use a sharp pencil to trace its contours with the surrounding puzzle pieces.[16]
-
6Glue the image to a piece of cardboard, then cut it out. Use a glue stick to adhere the image to the cardboard, then use a pair of scissors to cut out the area surrounding the traced part of the image. For getting precise cuts on the curves of the puzzle piece, try using a craft knife.[17]
- Check to make sure that the cardboard isn’t too thick for the puzzle before using it as your replacement piece. If the cardboard is too thick, stack multiple pieces of a cereal box together instead until they reach the right thickness, then glue them together.
-
7Finish the replacement piece with a spray varnish. Spray it on the piece, then let it dry for a few hours. A spray varnish will make your replacement piece look glossy and keep it from future wear-and-tear. This step is optional, but it can help your replacement piece blend in with the rest of the puzzle.[18]
- Check your local art supply store to find a spray varnish. This product may also be called “spray sealant.” A spray sealant used for sealing acrylic paintings is a great option.


Things You’ll Need
Drawing a Missing Puzzle Piece by Hand
- Easily-removable tape
- Cardboard or a cereal box
- A glue-stick
- Scissors or a craft knife
- A sharp, erasable pencil
- White paper
- Colored pencils, markers, or paint
- Artist’s sealant
Using a Computer to Make a Missing Puzzle Piece
- A computer with photo-editing software, like GIMP or Photoshop
- A scanner or high-quality camera
- A printer
- Printer paper or high-quality matte paper
- Cardboard or a cereal box
- A glue stick
- A sharp, erasable pencil
- Scissors or a craft knife
- Artist’s sealant


References
- ↑ https://youtu.be/nmnDOZL7wZ4?t=8
- ↑ https://youtu.be/dy_MlrQTRX8?t=143
- ↑ https://youtu.be/nmnDOZL7wZ4?t=8
- ↑ https://earlymath.erikson.edu/diy-puzzles-made-from-cardboard-can-develop-spatial-thinking/
- ↑ https://youtu.be/nmnDOZL7wZ4?t=35
- ↑ https://youtu.be/nmnDOZL7wZ4?t=48
- ↑ https://www.norwichbulletin.com/story/news/2012/12/01/glittering-garland-use-old-cereal/47397057007/
- ↑ https://artfulparent.com/choosing-paper-for-your-childrens-art/
- ↑ https://youtu.be/dy_MlrQTRX8?t=307
- ↑ https://youtu.be/nmnDOZL7wZ4?t=132
- ↑ https://www.art-is-fun.com/spray-sealant-for-painting
- ↑ https://www.thriftyfun.com/Making-a-Replacement-Puzzle-Piece.html
- ↑ https://www.gimp.org/tutorials/GIMP_Quickies/
- ↑ https://helpx.adobe.com/photoshop/using/image-size-resolution.html
- ↑ https://www.thriftyfun.com/Making-a-Replacement-Puzzle-Piece.html
- ↑ https://www.oldpuzzles.com/restoration-old-puzzles/wooden-puzzles/making-replacement-pieces
- ↑ https://www.thriftyfun.com/Making-a-Replacement-Puzzle-Piece.html
- ↑ https://www.art-is-fun.com/spray-sealant-for-painting
About This Article