X
wikiHow is a “wiki,” similar to Wikipedia, which means that many of our articles are co-written by multiple authors. To create this article, 10 people, some anonymous, worked to edit and improve it over time.
This article has been viewed 42,787 times.
Learn more...
Cake pops or balls are a great and unique way to indulge in cake without having to modify a recipe. Petite in size, they can be enjoyed by kids and adults for any occasion.
Yields 48 cake balls.
Ingredients
- Your favorite vanilla cake recipe
- 6 ounces fresh blueberries
- ¼ to ½ cup vanilla icing
- 24 ounces white chocolate melts
- Blueberries
- Streusel or crumb topping
Steps
Part 1
Part 1 of 3:
Creating the Cake Pops Mixture
-
1Bake the cake. Follow the specific recipe you are using, in addition to adding the fresh blueberries. Follow the regular ingredient amounts, utensils and baking dishes, steps or instructions, oven temperatures, and baking times as well.
-
2Slice the cake. Using a damp knife, cut the cake in sections or quarters. This allows the insides of the cake to cool faster, rather than having the cake cool down from the outside in.Advertisement
-
3Crumble the cake. When the cake pieces has reached room temperature or are warm to handle, use your hands to crumble the cake in a large mixing bowl. You will want to break down any chunks, especially any hard corners.
-
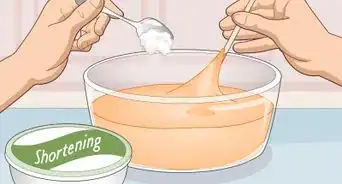
4Add the icing. Start with 1/4 cup of icing in the bowl. Use a wooden spoon to thoroughly incorporate the cake crumbs and icing together until you achieve a consistency of dough, as if you're making cookie dough. Add additional icing, if needed.
-
5Refrigerate the mixture. Having the mixture chilled makes it easier for you to roll it into balls.


Advertisement
Part 2
Part 2 of 3:
Making the Cake Balls
-
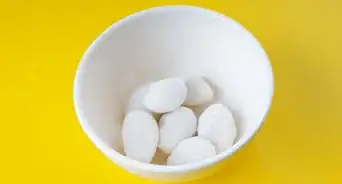
1Scoop the mixture. Use a cookie dough scooper to help you make even ball amounts, about 1 tablespoon (15 ml) (15 grams). To avoid multitasking, scoop the entire mixture and place the balls onto a flat surface (such as a baking sheet or counter top), lined with parchment paper.
-
2Roll the cake balls. Use both palms of your hands and circle each ball in a circular motion, to allow any flat surfaces become evenly round.
-
3Chill the cake balls. For the best results, it's recommended to refrigerate the cake balls for at least two hours. By doing this, any coating won't affect the prepared cake when dipping.


Advertisement
Part 3
Part 3 of 3:
Coating and Decorating the Cake Balls
-
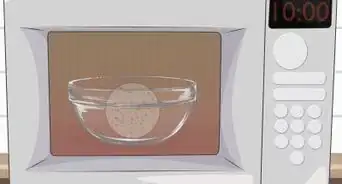
1Melt the chocolate. You can either use a microwave-safe bowl or a double boiler. Stir the chocolate to make sure everything is melted evenly.
-
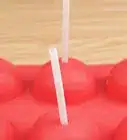
2Insert sticks into the cake balls. Prick them in the center, just enough to pick them up from the parchment paper and hold.
- If you want to present the cake balls on a stick, it's recommended to use lollipop sticks, which can be found in specialty baking aisles. Dip about 1/2 inch (1.27 cm) of the stick into the melted chocolate prior to inserting them into the cake balls.
- If you want to present the cake balls in decorative individual wrappers, poke them with toothpicks.
-
3Dip the cake balls. While holding the lollipop stick or toothpick, submerge the cake ball into the melted chocolate. When lifting, gently lift them in a swirling motion or give them a gentle shake.
- If you are using toothpicks, remove them from the balls. Add a very small amount of extra melted chocolate to cover the holes. You can use the back of a spoon to evenly spread out any extra coating as well.
-
4Repeat with the rest. Place the chocolate covered cake ball in its original location on the waxed paper. Pick up the next one and repeat the dipping until everything is covered.
-
5Drizzle additional melted chocolate on top. You can even create zig-zag lines by moving your arm back and forth in a uniform way across the entire sheet of cake balls.
-
6Use the blueberries on the cake balls. Place one berry on the top of each cake ball as a garnish.
-
7Make the streusel topping. Combine 1/4 cup butter, a cup of flour, and 1 cup brown sugar together in a medium bowl. In a 350ºF/180ºC oven, bake the topping for about 10 minutes. Sprinkle on top of the cake balls.
-
8Chill the cake balls again. To ensure a hard coating and for any topping to appear more uniform, place the cake balls in the freezer or refrigerator for an hour or two.
-
9Finished.


Advertisement
Things You'll Need
- Cookie scoop
- Mini cupcake liners
- Large bowl
- Baking sheet
- Parchment paper
- Wooden spoon
- Lollipop sticks


References
- Ankeny, Robin. Cake Balls: Amazingly Delicious Bite-Sized Treats. Philadelphia: Running Press, 2012. Print.
About This Article
Advertisement