This article was co-authored by wikiHow Staff. Our trained team of editors and researchers validate articles for accuracy and comprehensiveness. wikiHow's Content Management Team carefully monitors the work from our editorial staff to ensure that each article is backed by trusted research and meets our high quality standards.
This article has been viewed 90,430 times.
Learn more...
You don't have to be a kid to enjoy the mouth-puckering taste of sour candy. But while you can find a wide variety of sour candies at the store, it's a little more fun to make your own at home. Whether you prefer sour gummies, hard candies, or jelly candies, you can whip them up at home with relative ease. The only special equipment you need is a candy thermometer -- and a little patience.
Ingredients
- 1 cup (200 g) frozen fruit, such as strawberries, blueberries, and raspberries, defrosted
- ⅓ cup (79 ml) water
- 1 tablespoon (15 ml) fresh lemon juice
- 2 tablespoons (43 g) honey
- 4 teaspoons (12 g) unflavored gelatin
- ½ cup (100 g) sugar
- 1 to 3 teaspoons (6 to 18 g) citric acid
- Powdered Sugar
- 10 tablespoons (125 g) sugar
- 3 tablespoons (56 ¼ g) corn syrup
- 3 tablespoons (45 ml) water
- 1 tablespoon (18 ¾ g) citric acid
- 1 tablespoon (15 ml) raspberry extract
- ⅓ cup (79 ml) freshly squeezed lime, lemon, orange juice
- 1 teaspoon (6 g) citric acid, divided
- ½ cup (118 ml) water, divided
- 4 envelopes powdered unflavored gelatin
- ½ cup (100 g) granulated sugar
- 1 tablespoon (8 g) powdered sugar, plus more for dusting
- 1 tablespoon (8 g) cornstarch
- 1 tablespoon (12 ½ g) granulated sugar
Steps
Preparing Sour Gummy Candy
-
1Puree the fruit. Add 1 cup (200 g) of frozen fruit, such as strawberries, blueberries, or raspberries, that has been defrosted to a food processor. Process the fruit until it is pureed smooth.[1]
- If you don’t have a food processor, you can puree the fruit in a blender.
-
2Heat the fruit, water, lemon juice, and honey to a simmer. Add the pureed fruit, 1 cup (79 ml) of water, 1 tablespoon (15 ml) of fresh lemon juice, and 2 tablespoons (43 g) of honey to a small saucepan. Place it on the stove over medium-low heat, and heat it until it reaches a simmer, which should take 2 to 3 minutes.[2]
- Stir the mixture with a whisk periodically to ensure that the ingredients are well blended.
Advertisement -
3Whisk the gelatin into the mixture. Once the mixture reaches a simmer, sprinkle 4 teaspoons (12 g) of unflavored gelatin over it. Use a whisk to mix it in, stirring constantly.[3]
- Add the gelatin to the mixture slowly. If you dump it in all at once, it can form a glob that you won’t be able to get rid of.
-
4Return the mixture to a simmer. After the gelatin is incorporated, continue heating the mixture on medium-low. Allow it to come back to a simmer, stirring often to ensure that the ingredients are combined.[4]
- The mixture’s texture will change as the gelatin melts in. Instead of have a grainy, jelly-like consistency, it will become smooth and glassy.
-
5Remove the mixture from the heat and strain it to remove hard bits. When the gelatin is fully melted in, take the pan off the stove. Pour into a heatproof measuring cup through a sieve to remove any hard bits of fruit or gelatin and discard the solids.[5]
- If there are any bubbles on the top of the mixture after you’ve strained it, remove them with a spoon.
-
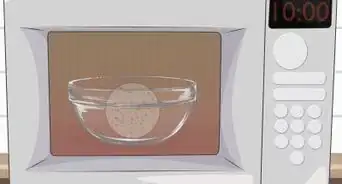
6Pour the mixture into molds and chill them for several hours. Once the mixture is strained, add it to silicone candy molds. Place the molds in the refrigerator for at least 6 hours to fully set up.[6]
- Because the candy has the texture of gummy bears, you may want to use bear-shaped molds.
- If you don’t have candy molds, you can pour the mixture into a baking sheet that’s lined with plastic wrap and cut it with a knife or cookie cutters after it’s set.
- When using molds, it helps to place them on baking sheets before filling them. That makes it easier to carry the candy to the fridge without spilling the mixture.
- If you notice any bubbles in the mixture after you’ve poured it into the mold, pop them with a toothpick.
-
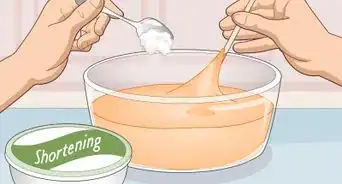
7Mix the sugar and citric acid. For the coating, add ½ cup (100 g) of sugar and 1 to 3 teaspoons (6 ¼ to 18 ¾ g) citric acid to a small bowl. Whisk them together well to ensure that they’re fully blended.[7]
- Choose the amount of citric acid based on how sour you want the candies to be. A single teaspoon (6 ¼ g) will be fairly sour, but adding more makes the candy’s flavor more intense.
-
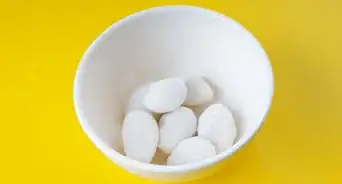
8Unmold the candy and toss it in the sugar mixture. When the candy has chilled for several hours, remove it from the fridge. Carefully pop the candies out of the molds, and drop them in the bowl with the sugar coating. Toss well to ensure that they’re coated on all sides.[8]
-
9Store the candy in an airtight container. The candy is ready to eat right away, but if you have any leftovers, place them in an airtight container. They’ll stay fresh for about a week.[9]


Making Sour Hard Candy
-
1Grease a baking sheet and cover it lightly with powdered sugar. Use some softened butter to lightly coat the pan, and sprinkle a few pinches of powdered sugar over it. Tilt the sheet in all directions to ensure that the sugar evenly coats its surface. Set the sheet aside for the moment.
- You can substitute non-stick cooking spray for the butter if you prefer.
-
2Mix the citric acid and extract. Add 1 tablespoon (18 ¾ g) of citric acid and 1 tablespoon (15 ml) of raspberry extract to a small bowl. Whisk them together well until they’re fully blended, and set the bowl aside for the moment.
- You can use any type of flavor extract that you think would work well with a sour flavor in place of the raspberry. Lemon, lime, orange, and strawberry are other tasty options.
-
3Combine the sugar, corn syrup, and water. Clip a candy thermometer onto the side of a small saucepan. Add 10 tablespoons (125 g) of sugar, 3 tablespoons (56 ¼ g) of corn syrup, and 3 tablespoons (45 ml) of water to the pan, and whisk well to ensure that they’re fully combined.
- When you clip the thermometer in place, make sure that it’s not touching the bottom of the pan.
-
4Heat the mixture until it reaches 305 to 310°F (151 to 154°C). Place the sugar mixture on the stove, and turn the heat up to high. Allow the mixture to cook until it reaches the right temperature.
-
5Take the pan off the heat and stir in the flavoring mixture. Once the mixture has reached the right temperature, remove it from the stove. Whisk the mixture and slowly pour the citric acid and flavoring mixture in, blending until it’s fully incorporated.
-
6Pour the mixture onto the baking sheet. The mixture will still be hot, so add it to the prepared baking sheet slowly. Make sure that it’s spread in as even a layer as possible.
- If you’d like, you can sprinkle a little more powdered sugar over the top once it’s on the sheet.
-
7Allow the candy to cool to room temperature. It needs to cool down in order to set up and harden. Leave it out on the counter or table until it cools completely, which should take about 15 to 30 minutes.
-
8Break the cooled candy into bite size pieces. When the candy has hardened, use the handle of a kitchen spoon or other utensil to hit it. When it’s broken into small pieces, store them in an airtight container and enjoy.


Whipping Up Sour Jelly Candy
-
1Combine the fruit juice, citric acid, and some water in a saucepan. Add ⅓ cup (79 ml) of freshly squeezed lime, lemon, or orange juice, ½ teaspoon (3 g) of citric acid, and ¼ cup (59 ml) of water to a small, straight-sided saucepan. Whisk the ingredients together and heat them on low until the granules dissolve completely, which should take 3 to 5 minutes. Take the pan off the heat.[10]
-
2Sprinkle the gelatin over the mixture and let it sit for a few minutes. Use four envelopes of unflavored gelatin and spread them as evenly as possible over the fruit juice mixture. Don’t stir the mixture -- allow the gelatin to sit until it absorbs the liquid on its own.[11]
-
3Mix the water with the sugar. Add ½ cup (100 g) of granulated sugar and the remaining ¼ cup (59 ml) of water to another small, straight-sided pan. Whisk the two together until they’re fully combined.[12]
-
4Bring the sugar mixture to a boil to dissolve the sugar. Place the pan on the stove, and heat it over medium heat. Allow the mixture to cook until it reaches a boil and the sugar dissolves completely.[13]
- Stir the mixture with a whisk constantly until the sugar dissolves.
-
5Heat the mixture until it reaches 300°F (148°C). When the mixture comes to a boil, place a candy thermometer in the pan. Allow the mixture to cook until it reaches the right temperature without stirring it at all.[14]
-
6Pour the hot sugar mixture into the gelatin mixture. After the sugar mixture reaches the right temperature, carefully add it to the gelatin mixture. The sugar will form a big clump when it hits the gelatin, which is normal.[15]
-
7Stir the mixture over the heat until it softens. Place the pan with the candy mixture on the stove, and heat it on medium-low. Use a whisk to stir it continuously until the mixture softens and dissolves, leaving no hard bits behind.[16]
-
8Transfer the mixture to a glass dish and let it cool for a couple of hours. Take the pan off the heat, and carefully pour the candy mixture into an 8-inch (20-cm) glass baking dish. Allow it to sit on the countertop for 2 hours to set up.[17]
-
9Whisk the powdered sugar and cornstarch together. Add 1 tablespoon (8 g) of powdered sugar and 1 tablespoon (8 g) of cornstarch to a small bowl. Use a whisk to blend them together well.[18]
-
10Mix the granulated sugar into citric acid. To make the coating, add 1 tablespoon (12 ½ g) of granulated sugar and ½ teaspoon (3 g) of citric acid to a separate small bowl. Stir the two together well, and set aside.[19]
-
11Unmold the candy and cut it into strips. Lightly dust a cutting board or countertop with powdered sugar to prevent sticking. Peel up a corner of the candy block to pull it out of the dish and onto your work surface, and turn the block over so both sides are coated with the powdered sugar. Use a sharp knife to cut the candy into a dozen ½-inch (13-mm) strips and then cut each strip into 5 pieces that are approximately 1 ¼- inch (3-cm) long.[20]
-
12Toss the candy in the citric acid mixture. Drop the candy into the bowl with the citric acid and sugar mixture, and use a fork to stir them around until they’re well coated. If the candy begins to get sticky, toss it in the cornstarch mixture first and then into the citric acid mixture.[21]
-
13Let the candy dry until the coating hardens. Place the coated candy pieces on a wire cooling rack, and allow them to dry until the coating is crunchy and hard. It should take approximately 8 hours.[22]
-
14Store the candy in an airtight container. Once the candy is dry, you can eat it right away. If there are leftovers, place them in a jar or bag and store at room temperature. They should stay fresh for about a week.[23]


Community Q&A
-
QuestionCan I heat it up on the stove?
 Community AnswerThe pictures in this article show a hot plate, but you can use a regular stove to make these recipes.
Things You’ll Need
Sour Gummy Candy
- Food processor
- Small saucepan
- Whisk
- Heat-proof measuring cup
- Sieve
- Silicone candy molds
- Small bowl
- Fork
- Airtight container
Sour Hard Candy
- Baking sheet
- Small bowl
- Whisk
- Candy thermometer
- Small saucepan
- Wooden spoon or other utensil
- Airtight container
Sour Jelly Candies
- 2 small, straight-sided saucepans
- Whisk
- Candy thermometer
- 8-inch (20-cm) glass baking dish
- 2 small bowls
- Knife
- Wire cooling rack
- Airtight container


References
- ↑ http://www.biggerbolderbaking.com/sour-gummy-bears/
- ↑ http://www.biggerbolderbaking.com/sour-gummy-bears/
- ↑ http://www.biggerbolderbaking.com/sour-gummy-bears/
- ↑ http://www.biggerbolderbaking.com/sour-gummy-bears/
- ↑ http://www.biggerbolderbaking.com/sour-gummy-bears/
- ↑ http://www.biggerbolderbaking.com/sour-gummy-bears/
- ↑ http://www.biggerbolderbaking.com/sour-gummy-bears/
- ↑ http://www.biggerbolderbaking.com/sour-gummy-bears/
- ↑ http://www.biggerbolderbaking.com/sour-gummy-bears/
- ↑ http://www.autumnmakesanddoes.com/2013/02/19/diy-sour-patch-kids-recipe-and-classic-snacks-made-from-scratch-giveaway/
- ↑ http://www.autumnmakesanddoes.com/2013/02/19/diy-sour-patch-kids-recipe-and-classic-snacks-made-from-scratch-giveaway/
- ↑ http://www.autumnmakesanddoes.com/2013/02/19/diy-sour-patch-kids-recipe-and-classic-snacks-made-from-scratch-giveaway/
- ↑ http://www.autumnmakesanddoes.com/2013/02/19/diy-sour-patch-kids-recipe-and-classic-snacks-made-from-scratch-giveaway/
- ↑ http://www.autumnmakesanddoes.com/2013/02/19/diy-sour-patch-kids-recipe-and-classic-snacks-made-from-scratch-giveaway/
- ↑ http://www.autumnmakesanddoes.com/2013/02/19/diy-sour-patch-kids-recipe-and-classic-snacks-made-from-scratch-giveaway/
- ↑ http://www.autumnmakesanddoes.com/2013/02/19/diy-sour-patch-kids-recipe-and-classic-snacks-made-from-scratch-giveaway/
- ↑ http://www.autumnmakesanddoes.com/2013/02/19/diy-sour-patch-kids-recipe-and-classic-snacks-made-from-scratch-giveaway/
- ↑ http://www.autumnmakesanddoes.com/2013/02/19/diy-sour-patch-kids-recipe-and-classic-snacks-made-from-scratch-giveaway/
- ↑ http://www.autumnmakesanddoes.com/2013/02/19/diy-sour-patch-kids-recipe-and-classic-snacks-made-from-scratch-giveaway/
- ↑ http://www.autumnmakesanddoes.com/2013/02/19/diy-sour-patch-kids-recipe-and-classic-snacks-made-from-scratch-giveaway/
- ↑ http://www.autumnmakesanddoes.com/2013/02/19/diy-sour-patch-kids-recipe-and-classic-snacks-made-from-scratch-giveaway/
- ↑ http://www.autumnmakesanddoes.com/2013/02/19/diy-sour-patch-kids-recipe-and-classic-snacks-made-from-scratch-giveaway/
- ↑ http://www.autumnmakesanddoes.com/2013/02/19/diy-sour-patch-kids-recipe-and-classic-snacks-made-from-scratch-giveaway/
About This Article

Making sour candy at home is a fun and rewarding way to spend an afternoon, and you only need a few simple ingredients. To make sour gummy candy, first, puree frozen fruit, like strawberries, blueberries, or raspberries, in a food processor or blender. Once it’s smooth, simmer the fruit on the stove with water, lemon juice, and honey. After 2-3 minutes, whisk some gelatin in, which will eventually give it a gummy texture. Let it simmer for a few more minutes, then remove the mixture from the heat and strain it through a sieve to remove any hard bits. Pour the remaining liquid into silicone candy molds and chill them in your refrigerator for at least 6 hours so they can fully set. If you don’t have molds, line a baking sheet with plastic wrap and pour the mixture on top. Once the candies are set, toss them in a mixture of sugar and citric acid to give them a sour kick. To learn how to make sour hard candy, read on!