This article was co-authored by wikiHow Staff. Our trained team of editors and researchers validate articles for accuracy and comprehensiveness. wikiHow's Content Management Team carefully monitors the work from our editorial staff to ensure that each article is backed by trusted research and meets our high quality standards.
This article has been viewed 86,194 times.
Learn more...
Candy melts are often used to make candy and coat cake pops. They are similar to white chocolate, but don't actually contain any cocoa. As such, you can't melt them the same way that you would melt white, milk, or dark chocolate. While you can always refer to the instructions printed on the back of the bag, there are a few tricks that you can use to ensure that you end up with a perfect batch each time.[1]
Steps
Microwaving Candy Melts
-
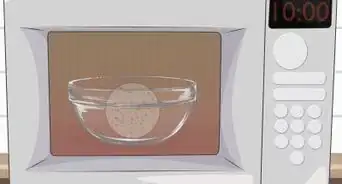
1Empty a package of candy melts into a microwave-safe bowl. Most packages contain 12 to 16 ounces (340 to 452 g) of wafers. If your package contains more than that, measure out 12 to 16 ounces (340 to 452 g) of wafers into a bowl and save the rest for later.[2]
- Alternatively, empty the candy melts into a heavy-duty, plastic, resealable bag, then zip it tightly.
- For a smaller batch, fill a plastic piping bottle halfway with candy melts instead. Leave the bottle's lid off.
-
2Heat the candy melts in the microwave for 1 minute at about 40% power. Do not use full power; slow and steady is the key here. If you use full power, the wafers may overheat and turn hard, like seized chocolate.[3]
- Depending on the strength of your microwave, you may have to go as low as 30% power or as high as 50%. Do not go higher than 50% power, however.[4]
Advertisement -
3Stir the candy melts with a rubber spatula. Use a pot holder or oven mitt to take the bowl out of the microwave. Give the wafers a stir with a rubber spatula. Don't worry if they don't look fully melted yet.[5]
- If you're using a plastic bag, gently massage the bag. Use a towel or oven mitt to protect your hand.
- If you poured the wafers into a bottle, knead the bottle instead. If the bottle is too hot, cover your hand with a towel or oven mitt to protect it.
-
4Heat and stir the wafers at 30-second intervals until they melt. Pop the bowl back into the microwave and heat it for 30 seconds at 40% power. Take the bowl out, then give the wafers a stir. Repeat this process until the candy takes on a honey-like consistency.[6]
- As the candy continues to melt, reduce the intervals to 20 and then to 15 seconds to prevent overheating.[7]
- If you put the candy into a plastic bag, massage the bag after each 30-second interval.
- If you are using a plastic bottle, heat the bottle at 15-second intervals instead. Stir the candy melts with a skewer or knead the bottle with your hands.
-
5Use the candy as desired. Pour it into plastic candy molds, drizzle it over homemade chocolate, or dip cake pops into it. Be sure to work quickly, however, or the candy will harden.
- If the candy does harden, just pop it back into the microwave for 10 to 15 seconds, then give it a stir.


Using a Double-Boiler
-
1Fill a pot with water 2 inches (5.1 cm) of water. This will be your double-boiler, so make sure that the bottom of the heat-safe glass bowl that you'll be using doesn't touch the water. If you need to, set the bowl on top of the pot to test it out, but be sure to take it off later.[8]
- The water should be about 1 inch (2.5 cm) away from the bottom of the bowl.
- This method works the best for dipping cake pops and fruit.
-
2Bring the water to a simmer, then take it off the burner. This is important; if you leave the pot on the stove, the candy will overheat and burn. Low heat is key to melting the candy.[9]
-
3Place the bowl on top of the pot, then add the candy melts. Make sure that the bowl is made from glass and heat-safe. A metal bowl will generate too much heat, and a plastic bowl may warp. You can try using an actual double-boiler made from 2 pots, but it may get too hot. A bowl would be much better.
- How many wafers you depends on the amount you need. You can use the entire bag or just a portion.
-
4Stir the wafers until they melt and achieve a honey-like consistency. Use a rubber spatula for this, as the melting wafers may stick to a wooden or metal one. As you continue to stir, the wafers will soften and melt together.[10]
- The candy is ready when it is smooth and dribbles slowly off of the spatula, like honey.
-
5Use the melted candy for your project. Leave the bowl on the pot if you are dipping things into it, like cake pops, marshmallows, or strawberries. This way, the candy will remain fluid and easy to work with.
- If you want to use the candy for drizzling or filling molds, scoop it up with a spoon or sauce ladle.


Using a Slow Cooker for Large Amounts
-
1Empty 1 package of candy melts into a slow cooker or crock pot. A typical package of candy melts contains about 12 to 16 ounces (340 to 452 g) of wafers. If your package is larger than that, measure out 12 to 16 ounces (340 to 452 g), and start with that.[11]
- This method is ideal for large amounts of candy melts, between 3.5 and 5 pounds (1.6 and 2.3 kg), or 3.5 to 5 bags.
- You will be adding more candy melts into the slow cooker later.
-
2Turn the slow cooker onto a LOW heat setting. Never use a high heat setting, as this will cause the candy to burn. The key to melting the candy perfectly is to use a low, slow heat.[12]
- Make sure that your slow cooker is on a heat-safe surface, such as tile or marble.
-
3Allow the wafers to melt for about 20 minutes, stirring occasionally. How long it takes for the wafers to melt will vary a little each time, but expect it to take about 20 minutes. Use a rubber spatula to stir the candy every so often to help it melt faster.[13]
- Do not get impatient and turn the heat up. The candy will burn.
-
4Add a second package of candy melts and stir it until it melts. This second batch shouldn't take as long to melt as the first batch. Expect this batch to take anywhere from 10 to 15 minutes.[14]
- Be sure to scrape the bottom of the slow cooker. This will ensure that everything melts evenly.
-
5Continue to add bags of candy melts until you get your desired amount. Wait for each batch to melt before adding another bag. Plan on using between 3.5 and 5 bags of candy melts total.[15]
- As you add more batches of candy, they will melt faster and faster.
-
6Switch the slow cooker to a WARM setting, then use the candy as desired. This setting will keep the candy in a fluid state without actually overheating it. This is perfect for projects like cake pops. If you wish to use the candy to fill molds or drizzle over things, you can turn the slow cooker off.
- Use a spoon or sauce ladle to scoop the melted candy up and drizzle it over treats. You can also use a spoon or sauce ladle to pour the candy into molds.


Coloring, Flavoring, and Thinning Candy Melts
-
1Add colored wafers to a batch of white wafers to create pastel shades. Empty a bag of white wafers into your bowl, pan, or slow cooker, then add a handful of colored wafers. Melt the candy as desired, then add in more colored wafers until you get the shade you want.[16]
- Colored candy melts are vibrant, so it's easier to color a batch of white wafers with a few colored ones than the other way around.
-
2Mix 2 or more colors to create a new color. Candy melts come in all sorts of colors, but if you want a specific color, like blue-green or red-orange, you will have to mix it yourself. Simply add a little bit of each color (not the entire bag) into your bowl, pot, or slow cooker, then melt it as directed.[17]
- Check the manufacturer's website; sometimes they post color combinations.
-
3Use oil-based food coloring and white wafers as an alternative. Use a toothpick or skewer to pick up a drop of oil-based food coloring, then dip it into the melted candy. Stir it in with a rubber spatula. Add more drops until you get the color you want.[18]
- Do not use liquid food coloring, or the candy will seize. You can find oil-based food coloring in the baking section of a craft store.
-
4Flavor candy melts with oil-based candy flavoring, if desired. Melt the wafers using 1 of the methods above, then stir in 1/4 to 1/2 teaspoon of oil-based candy flavoring. Do not use regular extracts, as these are water-based and will cause the candy to seize.[19]
- You can find oil-based candy flavoring in the baking section of a craft store.
- A dram is the same thing as a bottle.
- Candy melts taste like vanilla on their own. Candy flavoring can give more unique flavors, like strawberry.
-
5Stir in 1 teaspoon of shortening if the candy melts are too thick. The melted wafers should be thin enough to drip off a spoon like honey. Sometimes, however, the melted candy is too thick to do that, even after it's been melted. If that happens, stir in 1 teaspoon of shortening for every 12 to 16 ounces (340 to 452 g) of candy melts.[20]
- If you put the candy into a plastic bag, open the bag first, then add the shortening. Close the bag, and massage the shortening in.
- For plastic bottles, add the shortening into the bottle, then stir it in with a skewer.


Community Q&A
-
QuestionI used Wilton candy melts to make a lollipop. The chocolate I used looks cracked and old once hardened in the mold. Does that mean the chocolate is old? Or did I do something wrong in the melting process?
 Sage HudsonCommunity AnswerThe chocolate is most likely old. Throw it away. Candy melts don't last as long as normal chocolate, because they're not technically chocolate at all. If you've had the melts for more than 2-3 months, it's time to toss them.
Warnings
- Avoid adding too much shortening. If you do, the candy may not set up properly.⧼thumbs_response⧽
- Avoid getting the melted candy wet, or it may seize. If it seizes, stir in some shortening. If that doesn't fix it, toss it and melt a new batch.[23]⧼thumbs_response⧽
Things You'll Need
Microwaving Candy Melts
- Microwave-safe bowl
- Rubber spatula
- Candy melts
Using a Double-Boiler
- Large saucepan
- Heat-safe glass bowl
- Rubber spatula
- Candy melts
Using a Slow Cooker for Large Amounts
- Slow cooker
- Rubber spatula
- Candy melts
Coloring, Flavoring, and Thinning Candy Melts
- Oil-based food coloring (optional)
- Oil-based candy flavoring (optional)
- Shortening (optional)


References
- ↑ https://www.craftybaking.com/howto/candy-melts-heat-and-reheat
- ↑ https://www.craftybaking.com/howto/candy-melts-heat-and-reheat
- ↑ https://www.craftybaking.com/howto/candy-melts-heat-and-reheat
- ↑ https://www.craftsy.com/cake-decorating/article/how-to-melt-candy-melts/
- ↑ https://www.craftybaking.com/howto/candy-melts-heat-and-reheat
- ↑ https://www.craftybaking.com/howto/candy-melts-heat-and-reheat
- ↑ http://thepioneerwoman.com/food-and-friends/candy-coatings-101/
- ↑ https://www.craftybaking.com/howto/candy-melts-heat-and-reheat
- ↑ https://www.craftybaking.com/howto/candy-melts-heat-and-reheat
- ↑ https://www.craftybaking.com/howto/candy-melts-heat-and-reheat
- ↑ https://www.craftybaking.com/howto/candy-melts-heat-and-reheat
- ↑ https://www.craftybaking.com/howto/candy-melts-heat-and-reheat
- ↑ https://www.craftybaking.com/howto/candy-melts-heat-and-reheat
- ↑ https://www.craftybaking.com/howto/candy-melts-heat-and-reheat
- ↑ https://www.craftybaking.com/howto/candy-melts-heat-and-reheat
- ↑ https://www.craftsy.com/cake-decorating/article/how-to-melt-candy-melts/
- ↑ https://www.dreamalittlebigger.com/post/troubleshooting-wilton-candy-wafers.html
- ↑ https://www.dreamalittlebigger.com/post/troubleshooting-wilton-candy-wafers.html
- ↑ https://www.dreamalittlebigger.com/post/troubleshooting-wilton-candy-wafers.html
- ↑ https://www.craftybaking.com/howto/candy-melts-heat-and-reheat
- ↑ https://www.craftsy.com/cake-decorating/article/how-to-melt-candy-melts/
- ↑ https://www.wineandglue.com/why-didnt-i-think-of-this-sooner/
- ↑ https://www.dreamalittlebigger.com/post/troubleshooting-wilton-candy-wafers.html
About This Article

To melt candy melts, start by emptying a package of wafers into a microwave-safe bowl. Next, heat the melts for 1 minute at about 40% power, so that the wavers can melt slowly. Then, use a pot holder to take the bowl out, and stir the wafers with a rubber spatula. Continue to heat and stir the wafers at 30-second intervals, and repeat this process until the candy takes on a honey-like consistency. For more tips, including how to use a slow cooker for large amounts, keep reading!