This article was written by Jason Williams and by wikiHow staff writer, Travis Boylls. Jason Williams is an AV & Security Specialist and the Owner of Williams AV & Security. With more than 35 years of experience, he specializes in home automation and home theater system installations. Jason is an AVIXA Certified Technology Specialist, a CEDIA Certified Cabling & Infrastructure Technician, a Pakedge Certified Network Administrator, and holds a Georgia Low Voltage Unrestricted License.
This article has been viewed 605,232 times.
Do you want to improve your home audio? Maybe you want to set up a home theater system. Adding a surround sound is a great way to enhance your home movie-watching and gaming experience. A standard stereo system has two speaker channels placed in front to the left and right. A surround sound system adds an additional speaker in the center and at least 2 more speakers behind to simulate sound coming from all directions. Additionally, surround sound systems also have a subwoofer for enhanced bass. While surround sound may seem complicated, it's actually pretty easy to set up. This wikiHow article teaches you how to set up a surround sound system.
Things You Should Know
- Surround sound speakers can be connected using an audio receiver, soundbar, or a surround sound Bluray/DVD player.
- Surround sound systems can have a 2-speaker (2.1) setup, a 5-speaker (5.1) setup, or a 7-speaker (7.1) setup.
- Try to hide the wires under carpets or through the walls, or use a wireless Bluetooth receiver to connect the rear speakers.
Steps
Preparing Your Equipment
-
1Examine your available speakers. The way in which you set up the speakers depends on how many you have. The most common setups are 2.1, 5.1, and 7.1, where the number before the decimal refers to the number of speakers you have, and the ".1" refers to the use of a subwoofer.
- 2.1 — This is a standard stereo configuration. It uses two left, and right speakers placed in front, and a subwoofer.
- 5.1 — This is the most common surround sound configuration. It has three speakers placed left, right, and center in front, and two speakers placed left and right in the rear. It also has a subwoofer.
- 7.1 — This is a more advanced setup with 7 speakers. Three speakers are placed left, right, and center in front, two speakers are placed left and right to the side of the viewing area, and two speakers are placed left and right in the rear. It also has a subwoofer.
-
2Make sure that you have an audio receiver. Unlike powered speakers, the average surround sound speaker can't project audio on its own. A receiver takes the sound from your TV and transmits it to the connected speakers via wires.
- Most surround sound kits include a receiver. If you bought your surround sound set second-hand, you may have to buy the receiver separately.
- Some surround sound systems use a soundbar or DVD/Blu-ray player instead of a receiver. The speakers and TV will still connect the same way. A soundbar will have the front, left, right, and center speakers built-in.
- All speakers will connect to your receiver via AV cable or speaker wire, but the receiver can use optical, HDMI, or AV cables to connect to your TV. Make sure that your receiver's audio input matches your preferred audio output on your TV.
Advertisement -
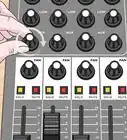
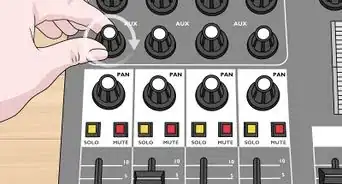
3Check the speaker input type on the receiver. Some receivers have AV inputs for the speakers. Others have spring clips or binding posts that you can use to connect speaker wire.
- AV — Receivers that use an AV connection will have a single circular input for each speaker. The inputs are usually labeled and colored-coded. If you are using a soundbar, the rear speaker inputs may be on the soundbar or the subwoofer.
- Spring Clips — Receivers that have spring clips will have two inputs for each speaker. They will be color-coded black and red for the positive and negative wires. They will have a lever that you push down to insert the bare speaker wire.
- Binding Posts — Receivers that have binding posts have two inputs for each speaker color-coded red and black for the positive and negative wires. Binding posts have a round knob that you can turn. They also have an input on top for banana plugs.
-
4Determine your TV's audio output type. On the back or side of your TV, you should see an "Audio Out" (or similar) section with at least one of the following types of audio output:
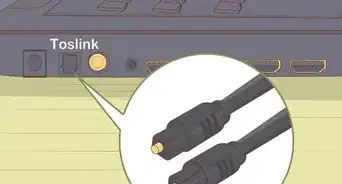
- Optical — This will be a small square-shaped port. Optical audio is the newest and clearest type of audio, and most modern receivers and soundbars support it.
- HDMI — This is a thin rectangle-shaped port with notched corners. HDMI is the most commonly used cable format for transmitting both audio and video.
- AV — These are circular. red and white ports. These are used for basic audio. All receivers should support AV input.
-
5Verify that you have all of the cables that you need. You'll need a separate AV (the red and white cables) or speaker wire to attach each speaker to the receiver, and an optical, HDMI, or AV set of cables to connect the receiver to the TV's audio ports.
- If you don't have the proper cables, you can find them online or in tech department stores. Online is usually cheaper.
-
6Read your surround sound system's manual. Each surround sound system will have a slightly different set of instructions detailing the best way to set it up. While you can follow general instructions to get decent sound out of your speakers, the best way to optimize them for perfect sound is by reading their manual first.


Placing the Speakers
-
1Arrange the speakers and their wires before connecting anything. This process is known as "blocking", and it helps you ensure that you'll be able to optimize your speaker placement without having to stretch out wires, move furniture, and so on.
-
2Place the subwoofer near the center of the home theater. The subwoofer is omnidirectional sound, which means you will achieve similar results no matter where the subwoofer is placed. Many people like to place it towards the front of the configuration so that it is easily connected to the receiver, but you can also place it off to the side or wherever you have room for it.
- Although subwoofers are omnidirectional, placing them against walls and corners will amplify the bass, making it difficult to control.
- Subwoofers should also be placed in an area that is well-ventilated. Avoid placing them on loose structures or next to anything that vibrates. This will help reduce sound vibration.
- Consider your neighbors. Subwoofer frequencies can easily carry through walls and disturb those who live next to you as well as above or below you. Avoid placing them next to walls or floors that you share with your neighbors.
-
3Place the front left and right speakers on each side of the TV. If the speakers are marked as "left" and "right", make sure that they're on the correct side as per their manual's instructions.
- Front speakers should be placed the same distance from either side of the TV (e.g., three feet on each side). The front left and right speakers can be as wide as you want.
-
4Angle the front speakers towards the audience. Each speaker should be angled slightly inward so that it points directly toward the center of the seating area.
- You should be able to "draw" a symmetrical triangle between the two speakers and the center of the seating area.
- If you can raise your front speakers to ear level, you will notice a marked difference in sound quality.
-
5Place the center channel speaker above or below the TV in the center. The center channel bridges the gap between the left and right speaker. It helps when sound pans from left to right, and keeps dialog synced with moving mouths on the screen.[1]
- Angle the center channel up or down so that it points at the audience.
- Do not place the center channel behind the TV, or you will not be able to hear it.
- Most 2.1 stereo systems will not have a center speaker.
-
6Place the rear surround sound speakers behind the viewing area. The rear speakers should be placed to the left and right just slightly behind and outside the viewing area and angled inward towards the center viewing area.
- The back channel speakers should be the same height as the surround speakers.[2]
- If you have a 2.1 system, you will not have rear speakers.
-
7Place the side speakers to the side of the viewing area (7.1 only). If you have a 7.1 surround sound system, you will have additional side speakers. Place these to the side of the viewing area and angle them towards the viewing area.
- The surround channel speakers are what give the effect of sound happening around the viewer. They do not transmit as much sound as the front speakers, but they enhance the action on the TV by enveloping the viewer.
-
8Raise the rear and side surround sound speakers. Your surround speakers should be placed about one or two feet above ear level and angled down slightly so that they point at the audience.
- Speakers can be placed on a speaker stand, on a shelf, or mounted to the wall. Tall speakers can be placed on the floor.


Connecting the Speakers
-
1Turn off and unplug your TV. Once your TV is off and completely unplugged from its power source, you can proceed with placing and connecting the speakers.
-
2Place your receiver near your TV. The receiver must be close enough to both the TV and a power source that you can adequately plug it into both.
- Your receiver may also need plenty of room to vent heat, so don't lock it in a cabinet.
-
3Run wire from each speaker to the receiver. In some cases, the wire may be permanently attached to the speaker. In other cases, you will need to connect the wire to the speaker using an AV, spring clips, or binding posts. Do everything you can to hide your wires as you run them, as doing so will prevent people or animals from accidentally tripping on them and pulling your speakers.
- If you can, run the wires under the carpet or through the wall.
- Make sure to leave some slack at each end to keep the wires from becoming stressed.
- Some newer surround sound systems use a wireless receiver to connect the rear speakers. If this is the case, plug in the wireless receiver near the rear speakers and then connect the speakers to the wireless receiver.
- If you need your speaker wires to reach further, replace them with a longer wire instead of extending them to get the best sound quality.
- If your speaker wires are longer than 100 ft (30 m), use a thicker gauge to preserve the quality of the sound.
-
4Connect the speakers to the receiver. Some receivers allow you to connect speakers using AV wire. Some use spring clips, or binding posts. Use one of the following steps to connect the speakers to your receiver:
- AV — If your speakers connect using an AV cable. Plug the cable from each speaker into the appropriately labeled input. The different speakers will usually have color-coded wires and inputs. For some surround sound systems, the rear speaker inputs may be located on the subwoofer or a wireless receiver.
- Spring Clips — If your receiver has spring clips, you will need to connect two wires for each speaker. Insert the red wire into the red clip and the black wire into the black clip. Press down on the clip and insert the bare wire into the opening. Then release the clip. If there is no bare wire exposed, you will need to strip the ends of the wire with wire strippers. If the wires are clear, plug the wire with writing into the red terminal, and the wire without writing into the black terminal. Make sure you connect the wire to the correct color-coded terminal on both the receiver and speaker.
- Binding Posts — Binding posts can accept bare speaker wire or banana plugs. To insert bare speaker wire, turn the binding posts to loosen them. Insert the bare wire into the opening at the bottom and then turn the binding posts to tighten it. Turn it tight, but not too tight. Alternatively, you connect banana plugs to the speaker wire and insert the plugs into the hole on top of the input. Be sure to connect the red wire to the red terminal and the black wire to the black terminal. If the wires are not color-coded, connect the wire with writing on it to the red terminal and the wire without writing to the black terminal.[3]
-
5Connect the subwoofer. Most subwoofers connect to the receiver via a standard set of AV cables.
- The subwoofer port on the receiver is typically labeled "sub out" or "sub pre-out".
- If your subwoofer has multiple inputs, connect to the one labeled "LFE in" or the far left input if there is no label.
-
6Plug your receiver into a power source. Your receiver will slowly power on after doing so, though it may take several minutes to completely come online if this is the first time you're setting it up.
-
7Connect peripheral items to the receiver (optional). In most cases, you can connect things like game consoles, DVD players, and streaming boxes to your TV. The audio will transfer to the reciever through the Audio Out input that connects to the receiver. In some cases, you may get better sound by connecting these devices to the receiver. You can connect them to the HDMI IN ports or use an optical cable.
- Most receivers have an "HDMI IN" and "HDMI OUT" series of ports (e.g., "IN 1", "OUT 1", etc.). For example, a device that is plugged into "HDMI IN 1" would have a separate HDMI cable plugged into the "HDMI OUT 1" port on the receiver. This cable would plug into an HDMI IN port on the TV.
- The same philosophy applies to older items that use AV cables or composite cables (the red, yellow, green, blue, and white sets of cables).
-
8Connect the receiver to the TV. For best results, use an HDMI connection to connect the TV to the HDMI Out port on the receiver.
- You can use older connectors (e.g., AV cables), but they will result in much lower quality. Most modern TVs support HDMI.
- If your TV has an ARC or eARC HDMI output, use this to connect to your receiver. This will allow you to control your receiver volume using your TV remote.
-
9Plug back in and turn on your TV. Once everything is connected, you can power on your TV to see how your efforts turned out.
-
10Test out your surround sound. Each TV will have a different way of configuring audio, but you can normally change your TV's audio preferences by pressing the Menu button on the remote, selecting Audio, and finding the default output area.
- There are many YouTube videos you can use to test your surround sound system. Just search "Surround Sound Test" in the YouTube app.
- If you have devices, such as game consoles connected to your TV, set your TV's Audio Out mode to "PCM." This allows the audio to pass through the TV without being altered or changed to a different format.
- Most newer surround sound systems have an automatic setup process that involves placing a connected microphone in the middle of the viewing area and allowing the speakers to read the ambient sound levels. If not, many receivers have an option in the Settings menu that allows you to set the exact distance each speaker is from the viewer.
- If your surround sound doesn't feel correct to you, try adjusting your TV's settings and the items to which the surround sound is connected before physically adjusting the speakers. You can also try adjusting the volume levels for each speaker. If the rear speakers sound too loud, try turning them down. If you want the center speaker to be a little louder, you can turn it up.
- If you experience any audio delay, there are ways you can troubleshoot this problem.


Expert Q&A
-
QuestionHow do I keep sound from echoing in my room?
 Jason WilliamsJason Williams is an AV & Security Specialist and the Owner of Williams AV & Security. With more than 35 years of experience, he specializes in home automation and home theater system installations. Jason is an AVIXA Certified Technology Specialist, a CEDIA Certified Cabling & Infrastructure Technician, a Pakedge Certified Network Administrator, and holds a Georgia Low Voltage Unrestricted License.
AV & Security SpecialistPut more soft, plush objects in your room to help absorb the sound and make it less echoey. -
QuestionWhat if my sound system sound track is slightly off from the TV?
 Justin ShafferCommunity AnswerIf you're using an A/V receiver as your source, go into the setup menu and check if there is a A/V -sync setting. If so, adjust the ms level up or down to match the sound of the screen. It's best to watch a person talking on the TV, and then set the A/V-sync level to the proper level to where the audio lines up to their talking.
 -
QuestionIs there a digital cable available with RCA plugs?
 Community AnswerYes, it is called "coax" and is usually an orange color. A coax cable has a single male RCA connector on each end.
Warnings
- Be extremely careful not to attach bare speaker wire to a plugged-in item, as doing so may result in a short or an electrical shock.⧼thumbs_response⧽


References
About This Article