This article was co-authored by Natasha Dikareva, MFA. Natasha Dikareva is a San Francisco, California based sculptor, and installation artist. With over 25 years of ceramics, sculpting, and installation experience, Natasha also teaches a ceramic sculpture workshop titled "Adventures in Clay" covering concept development, hand-building techniques, texture, and glazing techniques. Her work has been featured in solo and group exhibitions at the Beatrice Wood Center for the Arts, Abrams Claghorn Gallery, Bloomington Center for the Arts, Maria Kravetz Gallery, and the American Museum of Ceramic Art. She has taught at the University of Minnesota and the American Indian OIC School. She has been awarded the Excellence Award at the 1st World Teapot Competition, Best in Show at the 4th Clay & Glass Biennial Competition, and a Grand Prize at the American Museum of Ceramic Art. Natasha holds an MFA from the University of Minnesota and a BFA from Kiev Fine Arts College.
There are 12 references cited in this article, which can be found at the bottom of the page.
This article has been viewed 135,825 times.
Sculpture is a method of building up a clay in a shape that is artistic or functional, like a figurine, bust, bowl, or jar.[1] After choosing the kind of clay you’ll use, you’ll need to change into some work clothes, ready your work area, and settle on a design for your piece. Then you get to roll up your sleeves, sculpt the clay, and fire it so it holds shape.
Steps
Selecting Materials and Preparing
-
1Select oven bake, air dry, or polymer clay if you don’t have a kiln. These three varieties of non-kiln fired clay can be somewhat expensive. If you don’t have kiln access, one of these three may be the ideal starter for you. Small sculptures and items like ornaments and figurines work well with these clays.
- Even though oven bake, air dry, and polymer clays don’t require a kiln, when dry they should have a very similar appearance and quality as standard, kiln-fired ceramics.
- You can find polymer clay in a wide array of bright colors. When dry, this kind of clay takes on a plastic quality.
-
2Choose standard clay when hand-building your sculpture. In sculpture, the term “hand-building” refers to the use of hand-shaped coils, slabs, and balls of clay to create a design. These simple shapes are joined together and then manipulated with your fingers and tools to add fine details.
- Hand-building clay does require the use of a kiln. If you don’t have a kiln, you may need to contact a local university’s ceramics department or a ceramics studio and rent some kiln time.
- Most tools and supplies needed for hand-building are common household items. All you’ll need is a rolling pin, standard clay, and newspaper or a drop cloth.[2]
Advertisement -
3Learn wheel throwing in a classroom setting. Wheel throwing requires the use of a pottery wheel and a kiln. Learning to wheel throw on your own is certainly possible, but because the process is so touch-oriented, learning from books or videos can be difficult.
- Many community centers, community colleges, and universities offer wheel throwing classes. Try a keyword search online for "wheel throwing classes near me."
- Wheel throwing will produce work much faster than non-kiln methods or hand-building. Because of this, you’ll likely want access to a large kiln.
-
4Decide on a low-, mid-, or high-fire clay for kiln-fired clays. The temperature you fire your clay at will have a significant influence on the outcome of your sculpture’s appearance and quality. When determining a firing temperature, keep in mind:
- Low-fire is best for bright colors and pieces with fine details. Low-fire pieces should be used mostly for display, as they are generally more delicate and susceptible to chipping and water damage.
- Mid- and high-fire will produce sculptures that are strong and durable. Detailed designs may blur at these temps, but the heat can also cause neat speckling in the glaze.[3]
-
5Wear work clothes and lay out a surface cover. Sculpting clay is going to be messy, so you should dress in clothing you don’t mind getting stained. Fine clay particles may work deeply into fabric. Lay a tarp or a thick layer of newspaper on your work surface to prevent it from getting stained by the clay or the clay from getting contaminated.[4]
- If you have long hair, tie it back. Clay dust tends to coat hair, and clay coated hair falling into your eyes may sting.
-
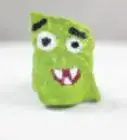
6Choose your design. First-time sculptors may want to start with something simple. Animals, simple shapes (spheres, boxes), simple structures (like a tiny house), and small decorative pots are all great choices. Mystical creatures, like gargoyles and dragons, tend to work well as intermediate level sculpting challenges.


Sculpting
-
1Knead the clay to remove air bubbles. Air bubbles occur naturally in clay, but if clay has these bubbles when fired in a kiln, it may crack or explode. Knead the clay by pressing the heel of your hand firmly into the clay and folding it back in on itself. Repeat this motion until all air bubbles are removed. Take your time and be thorough.
- To check the clay for air bubbles, use a piece of metal wire to cut your kneaded clay in half down the middle. Inspect the inside for bubbles. If you see none, your clay is ready to use.
- The amount of clay you use is a matter of preference. Most shapes can easily be modified by adjusting the amount of clay you use.
-
2Create an indentation in a clay sphere. Separate a lump of clay about the size of your fist. Roll the clay between your palms until it smooths into a sphere. Cradle the sphere in the palm of one hand, and use the thumb of your other hand to press into the top of the sphere until it is halfway to the sphere bottom.
- Clay spheres are important shapes in clay sculpture. Spheres represent heads, small spheres can be used as feet, and spheres can be contoured to make textured 3D shapes, like a face.
-
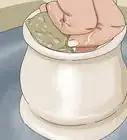
3Push out the walls of the sphere to make a pinch pot. Turn the sphere in your palm. As it turns, push the walls of the sphere up and out evenly by pinching your thumb to the fingers on the outside of the sphere. This will create a hollow area – the “pot” of the “pinch pot.”
- Pinch pots are a useful shape that can be modified in many ways. For example, with some detailing to make the outside look like stones, a gray pinch pot will look like a wishing well.[5]
-
4Create shapes and vessels with coils. Take a hefty chunk of clay and rub it back and forth between your hands. This motion should cause the clay to lengthen and thin. Stop rubbing the clay when the ropes are between 1⁄4 to 1⁄2 inch (0.6 to 1.3 cm) thick. Clay that is thicker or thinner may not survive being fired.
- Small segments of coils can be used to create detailed features on your sculpture. Simple eyebrows, for example, can be done with small segments of coils.
-
5Pile coiled clay on top of itself in a circle to create a pot. This is an easy way to make a useful item with a unique appearance. Coils can be blended together to create a flat surface. Use your fingers or a tool, like a popsicle stick, to press the coils together until they merge, then smooth the surface.[6]
-
6Connect separate pieces with scoring and clay water. Take the example of a pyramid shape on top of a box to make a simple house sculpture. The two pieces won’t join together well if you force them with your fingers. To join separate pieces of clay together, where the clay is joined, it must:
- Be scored in a pattern similar to a hashtag (#). Scoring can be done with a popsicle stick, toothpick, bristle brush, your fingernail, or clay shaping tools.
- Be moist or at least leather hard. Before the two pieces are joined together, sprinkle the scored areas with a little water that has had a few small balls of clay dissolved in it.[7]
-
7Hollow out shapes and thin walls before firing clay. Clay that is thinner than 1⁄4 inch (0.64 cm) or thicker than 1⁄2 inch (1.3 cm) will likely crack or explode when being fired.[8] Walls can be thinned with your fingers, but hollowing is a little trickier. To hollow:
- Create a small hole in the side of your sculpture with a tool, like a popsicle stick, toothpick, skewer, or utility knife. Remove clay from the hole until your tool is halfway deep in the sculpture.
- Remove clay from the inside of the sculpture with your tools. When removing large, solid hunks, use a knife or popsicle stick. For trimming, use a toothpick or skewer.
- Specialized ceramic trimming tools are ideal for hollowing. These are often angled to help you reach tricky spots and are sturdily made. Find these tools at hobby shops and art supply stores.[9]
-
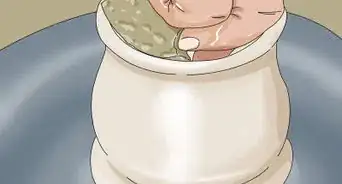
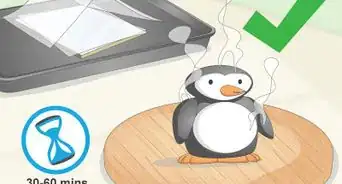
8Keep works in progress from drying out. Works in progress should be kept in plastic bags or covered in plastic sheets to prevent the clay from drying out. You’ll also need to rehydrate the clay regularly with sponges dampened with water.
- Certain clay may dry faster than others. Red clay, for example, tends to dry slowly.
- Avoid oversaturating the clay with water. It should be pliant and supple, but not so wet it loses shape.[10]
Firing and Glazing
-
1Bisque fire your sculpture. The bisque fire sets the shape in preparation for the main firing. Different brands of clay will have unique compositions, so you should check the label information of the clay to learn the ideal firing temperature and conditions. If you no longer have the label, look up the clay’s information online.[11]
- The kind of glaze you plan to apply could also influence the temperature you fire your kiln at. Many glazes recommend bisque firing to Cone 04 and then firing the glaze at Cone 06.
- Although the materials you use can influence the temperature you bisque fire at, generally Cone 06 through Cone 08 are the most common.
- There are many different kinds of kilns. Some are very simple, while others may be high tech. Always follow the kiln’s directions to prevent fires, damage, or broken pottery.[12]
-
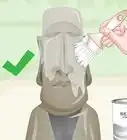
2Read the label warnings of your glaze carefully. The two most common kinds of glazes come as a liquid and powder. Many glazes contain potentially dangerous particles and require you to wear gloves and a breathing mask. You can purchase glaze at many hobby shops and art supply stores.[13]
- Glazing a sculpture is a bit of an art in itself. If you’re just getting started with glazing, ask a sales representative at a store which glaze would be best for your sculpture.[14]
-
3Use liquid glaze for a simple application. Liquid glaze generally goes on easily and with little hassle. Some liquid glazes may require an underglaze first. Paint the underglaze and glaze onto the surface of your sculpture according to the label directions of your glaze. When it dries, paint on the glaze.
-
4Get an even coating with a dry glaze. Put on the breathing mask and mix the dry glaze according to its package directions in the bucket with water. Use tongs to dip your sculpture into the mixture or use a paintbrush to apply the mixture to the sculpture.[17]
-
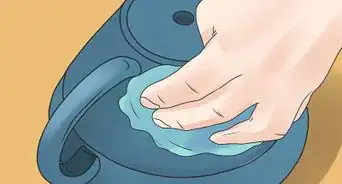
5Apply glaze with a sponge. Sponges can be used to apply an even layer of glaze, or they can spread the glaze in interesting patterns. Some commercial sponges are even cut into shapes. Mixing several different shapes together can create fun designs.[18]
- Sponges work well for applying liquid glaze or prepared dry glaze.
-
6Fire the sculpture to get the finished product. Check the packaging or label of your glaze to determine the firing temperature for the glaze. Insert it into your kiln and wait until the kiln is done firing. When the kiln is safe to open, remove your sculpture and show off your hard work.[19]
- Fire low-fire/earthenware sculptures with Cone 4 (1950°F/1100°C); mid-range glaze with Cone 6 (2192°F/1200°C); high-fire/stoneware with Cone 10 (2380°F/1300°C).[20]
- The main difference between non-kiln sculpture and kiln-fired sculpture is the firing process. If you’re using non-kiln clay, skip the firing process and follow your clay’s drying instructions.


Expert Q&A
-
QuestionCan you do ceramics without a kiln?
 Natasha Dikareva, MFANatasha Dikareva is a San Francisco, California based sculptor, and installation artist. With over 25 years of ceramics, sculpting, and installation experience, Natasha also teaches a ceramic sculpture workshop titled "Adventures in Clay" covering concept development, hand-building techniques, texture, and glazing techniques. Her work has been featured in solo and group exhibitions at the Beatrice Wood Center for the Arts, Abrams Claghorn Gallery, Bloomington Center for the Arts, Maria Kravetz Gallery, and the American Museum of Ceramic Art. She has taught at the University of Minnesota and the American Indian OIC School. She has been awarded the Excellence Award at the 1st World Teapot Competition, Best in Show at the 4th Clay & Glass Biennial Competition, and a Grand Prize at the American Museum of Ceramic Art. Natasha holds an MFA from the University of Minnesota and a BFA from Kiev Fine Arts College.
Ceramics & Sculpting InstructorYes, some plastic clays can just dry on their own and other polymer clays can be baked in an oven. -
QuestionHow do I make a clay airplane?
 Community AnswerDepending on the design, your biggest challenge would be the cantilever of wings. I would divide the plane into several parts that go into the kiln separately and then assemble them afterwards - hull, wings, and wheels. Wings and wheels get inserted into the hull. The hull must be reinforced in those places, but otherwise hollow. The wings should be solid. I'd put some holes in the hull facing ends, and then secure and reinforce the wings by inserting a metal or wooden cog into both wings and through the hollow hull. Then glue the wings carefully to the hull. You could even do a separate cockpit as a lid on the hull.
 -
QuestionI made a clay head of an old man. It is bisque and very white. Shall I stain it with underglaze?
 Community AnswerIf you feel it would look better that way, then yes.
Warnings
- Take weight and support into consideration when attaching two pieces of clay with scoring and clay water. Pieces that are too heavy or improperly balanced could tear free and do damage to the rest of your sculpture.⧼thumbs_response⧽
- Always use kilns according to their directions. Some models may have special procedures. Using a kiln incorrectly could cause serious damage or personal injury.⧼thumbs_response⧽
Things You’ll Need
- Breathing mask
- Bucket
- Ceramic trimming tools
- Glaze (liquid or dry)
- Kiln (optional)
- Latex gloves (or non-latex equivalent; optional)
- Oven bake clay (or air dry or polymer clay; no kiln required)
- Paintbrush
- Popsicle sticks
- Rolling pin
- Sponge (optional)
- Standard sculpting clay (requires the use of a kiln)
- Tarp (or newspaper)
- Tongs (for dipping sculpture into glaze)


References
- ↑ Natasha Dikareva, MFA. Ceramics & Sculpting Instructor. Expert Interview. 5 May 2020.
- ↑ http://www.lakesidepottery.com/HTML%20Text/Methods%20of%20Handbuilding.htm
- ↑ https://www.bellevuecollege.edu/artshum/materials/art/Husby/FiringTemperatures.pdf
- ↑ http://www.incredibleart.org/files/ceramics.htm
- ↑ http://www.lakesidepottery.com/HTML%20Text/Methods%20of%20Handbuilding.htm
- ↑ http://www.lakesidepottery.com/HTML%20Text/Methods%20of%20Handbuilding.htm
- ↑ https://www.youtube.com/watch?v=87IdebCT7fw&feature=youtu.be&t=59s
- ↑ http://www.incredibleart.org/files/ceramics.htm
- ↑ https://www.youtube.com/watch?v=ocAc--CQdPw&feature=youtu.be&t=4m33s
- ↑ http://www.incredibleart.org/files/ceramics.htm
- ↑ http://www.howtomakepottery.com/glazing_and_firing.html
- ↑ http://www.bigceramicstore.com/info/ceramics/tips/tip39_chose_bisque_temperature.html
- ↑ http://www.potterymakinginfo.com/news/mixing-pottery-glazes/
- ↑ https://www.youtube.com/watch?v=sHACmMQCP5Q&feature=youtu.be&t=11s
- ↑ http://www.lakesidepottery.com/HTML%20Text/Tips/Mixing%20and%20Using%20Glazes.htm
- ↑ Natasha Dikareva, MFA. Ceramics & Sculpting Instructor. Expert Interview. 5 May 2020.
- ↑ Natasha Dikareva, MFA. Ceramics & Sculpting Instructor. Expert Interview. 5 May 2020.
- ↑ Natasha Dikareva, MFA. Ceramics & Sculpting Instructor. Expert Interview. 5 May 2020.
- ↑ Natasha Dikareva, MFA. Ceramics & Sculpting Instructor. Expert Interview. 5 May 2020.
- ↑ http://lakesidepottery.com/HTML%20Text/Tips/Tempruturerange.htm
About This Article