This article was co-authored by Nicole Bolin. Nicole Bolin is a Crafting Specialist and the CEO of Stencil, a DIY Craft Studio in Phoenix, Arizona. Nicole specializes in interior design and various craft and DIY projects. Nicole holds a Certificate in Interior Design from the New York Institute of Art and Design. She opened Stencil in 2017 to teach others to create DIY projects that fit their home and lifestyle.
There are 7 references cited in this article, which can be found at the bottom of the page.
This article has been viewed 33,051 times.
From pill boxes to room organizers, plastic containers are an essential part of everyday life. Though they do their job well, these containers are generally designed with simplicity in mind, meaning there’s plenty of room to decorate. Using simple materials like paper, stickers, paint, and ribbon, you can turn any plastic container into something truly fabulous.
Steps
Covering with Patterns and Colors
-
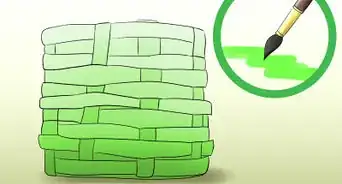
1Use patterned cloth to cover the container. Find a cloth pattern that matches your style and cut out enough to cover the container. Use a paintbrush to apply a layer of mod podge to both the back of the cloth and the plastic, then press your cloth into it. As it sets, apply another layer of mod podge over the top and let it dry.[1]
- Try to tie the patterned cloth into the room itself, such as using polka-dotted fabric in a room with polka-dotted wallpaper or zebra-striped cloth in a room with black and white furniture.
-
2Use patterned paper to line the container. Patterned paper works great for containers that are translucent. Find a pattern you like and cut out enough to line the plastic. Smooth out the paper and apply a layer of mod podge to both it and the inside of the container. Stick it to the plastic and apply another coat on top, making sure the paper remains smooth.[2]
- Try to use colors that match the container’s environment, like bright pastels for a baby room or light, muted colors for a kitchen.
Advertisement -
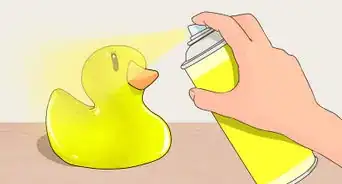
3Use paint to add color to your container. Wash your container with dish soap and warm water. When dry, gently sand the surface with 220 to 300-grit sandpaper, then wipe it down with rubbing alcohol. Use painter’s tape to cover areas you don’t want to paint, then apply a coat of primer to the container. Once it has dried, you will be able to paint the plastic with spray, acrylic, or enamel paint.[3]
- Use stencils to paint or spray specific designs onto your container, such as zig-zags or checkerboards.
-
4Use patterned duct tape as a simple decoration. Duct tape is an incredibly versatile tool, and since it comes in many different colors and patterns, it provides a quick solution for spicing up drab plastic. Find a pattern of duct tape you like and simply press it onto the container. For small and portable containers, a small amount of duct tape will add personality without bulk.[4]


Using Creative Labels
-
1Cut out labels to create a simple organizing system. Sometimes, the best way to decorate a container is to simply label it, especially if you need to use it in a professional environment. Cut a piece of single-colored construction paper into a thin strip, then write a label on it in clear, bold letters. Fix the label to your container using tape or glue.
- To make your labels pop, glue them to a slightly larger piece of colored paper before putting them on the container.
-
2Add lettering to create labels and messages. For larger containers, craft lettering may be a good option. If your letters come with adhesive backs, apply them as is. If they don’t, use a small amount of glue to keep them in place. Along with names and standard labels, letters can be used to write:
- A motivational message for containers holding school supplies.
- A favorite quote or book passage for a media box.
- A joke label, like the word ‘Zoo’ for a container filled with stuffed animals.
-
3Print labels from a computer. Creating labels on a computer allows you to add anything from photos and graphics to small and instructional text. Programs like Word and Pages can create simple labels with borders, while more advanced programs like Adobe InDesign may be appropriate for specialized labels. When you have a design made, print it on thick paper, cut it out, and glue or tape it to your container.[5]
-
4Label your container with objects from inside it. If your container will be holding craft items, toys, or other small, non-perishable objects, use them to create a unique label. Instead of writing “LEGOs” on a plastic box, glue a couple bricks to the front. Instead of writing “Office Supplies,” glue a binder clip or marker.


Accessorizing
-
1Add ribbon to your container. Ribbon and similar trims can give your container a more elegant feel. They can be applied using mod podge, hot glue, or tape, and some ribbon can simply be tied around the plastic. Look for ribbon designs that match the contents of the box, such as silver ribbon for keepsakes or colorful ribbon for candy.
-
2Add stickers to your container. Stickers are a great, fast way to cover a plastic container. Simple stickers, like those found in dollar stores and craft books, are perfect and come in a variety of styles. Avoid bubble and 3D stickers if you plan on storing your container in tight spaces.
- If your container holds a collection, put down a new sticker every time it grows.
-
3Use hot glue to create glitter designs. When handled right, hot glue can be a fun alternative to traditional paint. Use a small marker to draw a design on your container. With a hot glue gun, carefully trace over it. Before the glue sets, pour glitter over it and let the whole thing dry. Shake off excess glitter and enjoy the shiny, fun design.[6]
- This method can also be used to label your container. Simply spell out a word, pour glitter on it, and let it set.
-
4Use ink stamps to press patterns into the plastic. To give your container an old school feel, use ink stamps to create unique patterns and designs. Make sure to press your stamp firmly onto the container, that way the ink sets evenly. Stamps are available at craft stores like Hobby Lobby and Michael’s, and specialty or custom stamps can be ordered online.
- Common stamp designs include hearts, religious symbols, fruits, and simple animals. Try to find one that matches the container’s environment.
-
5Add craft jewels, flowers, and other items. Craft jewels, fake flowers, and other small objects are an easy way to add some fabulous flair to your container. Use hot glue or a bedazzling gun to apply the objects to the plastic. If you don’t have enough to make a uniform pattern, try arranging them in small shapes or designs, such as a heart or smiley face.
-
6Create a collage on the container. If your container will be holding something particularly special, use its surface for a collage. This will make your container beautiful while clearly showing what it contains. Cut out portions of photos, magazines, newspapers, and similar printed materials. Using either hot glue or mod podge, paste individual items to the box, making sure they are flat and smooth. Some potential arrangements include:[7]
- Photos of your family or best friends, especially if your container is a keepsake box.
- Pictures of book covers, movie posters, or album artwork, especially if your container is a media box.
- Pictures of your favorite celebrities and characters.


Expert Q&A
Did you know you can get expert answers for this article?
Unlock expert answers by supporting wikiHow
-
QuestionHow can I cover a clear plastic container?
 Nicole BolinNicole Bolin is a Crafting Specialist and the CEO of Stencil, a DIY Craft Studio in Phoenix, Arizona. Nicole specializes in interior design and various craft and DIY projects. Nicole holds a Certificate in Interior Design from the New York Institute of Art and Design. She opened Stencil in 2017 to teach others to create DIY projects that fit their home and lifestyle.
Crafts & DIY SpecialistTake cupcake liners, like the kind you'd use for baking, and flatten them out onto the container. Then, decoupage the liners onto the container using Mod Podge.
Support wikiHow by unlocking this expert answer.
-
QuestionCan I draw on a plastic container?Nicole BolinNicole Bolin is a Crafting Specialist and the CEO of Stencil, a DIY Craft Studio in Phoenix, Arizona. Nicole specializes in interior design and various craft and DIY projects. Nicole holds a Certificate in Interior Design from the New York Institute of Art and Design. She opened Stencil in 2017 to teach others to create DIY projects that fit their home and lifestyle.
Crafts & DIY SpecialistUse colored permanent markers if you want to decorate your container with different designs by hand.Support wikiHow by unlocking this expert answer.


References
- ↑ https://modpodgerocksblog.com/learn-how-to-mod-podge
- ↑ Nicole Bolin. Crafts & DIY Specialist. Expert Interview. 8 February 2021.
- ↑ https://craftsbyamanda.com/tips-for-painting-on-plastic/
- ↑ http://www.apartmenttherapy.com/design-on-a-dime-duct-tape-152774
- ↑ https://www.onlinelabels.com/Articles/how-to-create-a-microsoft-word-label-template.htm
- ↑ https://www.galileo-camps.com/blog/entry/diy-hot-glue-glitter-ornaments
- ↑ http://www.auntannie.com/DecorativeCrafts/Decoupage/
About This Article