This article was co-authored by Angela Justice and by wikiHow staff writer, Hannah Madden. Angela Justice is a Master Hair Stylist and the Owner of Payton Place Salon based in North Little Rock, Arkansas. With over 33 years of experience, she specializes in styling and cutting hair, coloring hair, providing hair repair and strengthening services, and installing tape-in hair extensions.
There are 10 references cited in this article, which can be found at the bottom of the page.
This article has been viewed 109,065 times.
The Instyler is a rotating curling iron that can give your hair a ton of volume and lift without a lot of work. Curling your hair with the Instyler is super easy, and you can choose between tight ringlets or soft, beachy waves. Always keep the heat guard on your Instyler or wear a heat protectant glove to avoid burning your fingers.
Steps
Heating up the Instyler
-
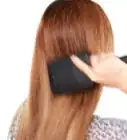
1Snap the plastic heat guard onto the barrel of the Instyler. The plastic heat guard is a thin rectangle of plastic that’s detachable from the tool itself. If you took it off or it came without the guard attached, snap the guard onto the barrel facing away from the bristles with the wide end of the guard just below the bristles.[1]
- The heat guard protects your hands from getting burned while you use your Instyler.
Alternative: If you don’t have a heat guard or you lost yours, wear a heat protective glove instead.
-
2Plug the Instyler into a power outlet. Grab the end of the cord on the Instyler and plug it into an outlet nearby. Make sure the outlet is right next to where you’ll be doing your hair so you don’t have to reach very far.[2]Advertisement
-
3Slide the power switch once for low heat and twice for high heat. To turn the Instyler on, find the power switch on the bottom of the handle and slide it upwards. For low heat, or 285 °F (141 °C) slide it once, and for high heat, or 410 °F (210 °C), slide it twice.[3]
- If you have thick, coarse, or curly hair, you should use high heat.
- For normal, medium, or fine hair, use low heat.
- Newer models of the Instyler may have a medium heat option which heats up to 315 °F (157 °C). Use this setting if you have thin or medium texture hair.
-
4Wait for the light to flash twice. It takes about 3 minutes for the Instyler to heat up. When it’s ready, the light on the power button will flash 2 times to let you know that it’s ready.[4]
- If you start curling your hair before your Instyler heats up, it’ll take you a lot longer since the tool won’t be hot enough to manipulate your hair.
- While you’re waiting, you can get started on sectioning your hair.


Making Tight Curls
-
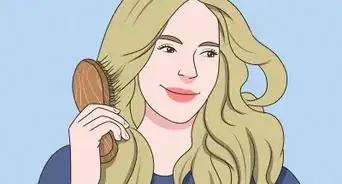
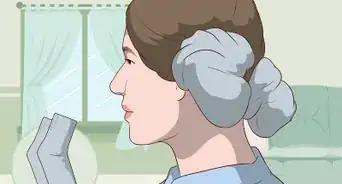
1Pull the top layer of your hair up into a clip. Start with dry, detangled hair so your Instyler doesn’t get caught in any knots.[5] Pull all of the hair from the top of your ears up into a large clip on the top of your head. This will make it easier to curl all of your hair, and you can make sure that you don’t miss any spots along the way.[6]
- You can also use a scrunchie or a hair tie to put your hair up.
- To protect your hair even more, spray a heat protectant spray all over your hair and let it dry for about 10 seconds before you start curling it.
-
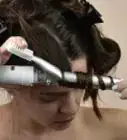
2Wrap a 1 in (2.5 cm) wide section of hair around the barrel. Pick out a vertical length of your hair on one side that’s about 1 in (2.5 cm) wide, and make sure it’s free of any knots or tangles. Put the Instyler up against your roots and wrap the section from root to tip along the barrel.[7]
- If the heat guard on the Instyler makes this too difficult, you can pop it off. Just make sure you put on a heat protective glove to avoid burning your fingers.[8]
- If your hair is too long to fit around the barrel once, you can overlap the ends a little bit.
-
3Close the barrel of the Instyler around your hair for 3 to 5 seconds. Shut the Instyler so that the bristles close on top of the barrel over your hair. Leave it shut for 3 to 5 seconds to lock the curl into place.[9]
- You’ll hear the barrel start to spin, which will help curl your hair even more.
Warning: Try not to leave the Instyler closed for much longer than that, or you could damage your hair.
-
4
-
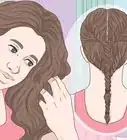
5Curl the bottom section of your hair completely. Now you can continue around the rest of your hair, curling it all in 1 in (2.5 cm) wide sections. Move systematically from one side, around to the back, then to the other side to make sure you don’t miss any spots.[12]
- Set up 1 mirror in front of you and 1 mirror behind you so you can see the back of your head as you curl.
- Keeping all the curls the same size will make them look more even and balanced.
-
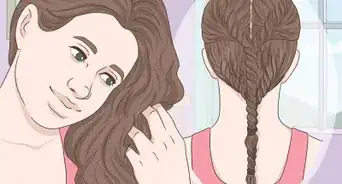
6Unclip the top section of your hair, then curl it. Let down the top section of your hair and shake your head so it falls naturally. Start on one side of your face, then move around to the back and the other side. Keep working in 1 in (2.5 cm) wide sections the entire time.[13]
- Curl the layers of hair surrounding your face away from your face to open up your features.
-
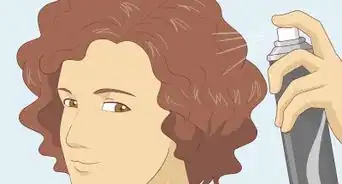
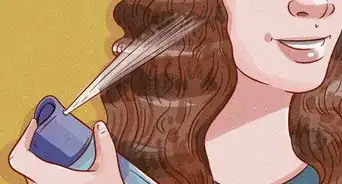
7Spray your hair with a thin layer of hairspray.[14] Hold a can of hairspray about 6 inches (15 cm) away from your head and lightly press down on the nozzle. Spritz a thin layer of hairspray all over your hair to lock your curls into place.[15]
- If your curls are a little too tight for your liking, run your fingers through your hair to soften up the curls.
- Try using some curl cream or a frizz serum to keep your curls in place without the frizz.


Creating Loose Waves
-
1Put the top half of your hair up. Dry your hair completely and brush it out so the Instyler can curl your hair smoothly. Gather the hair from the top of your ears upwards in a clip or a hair tie at the top of your head. Quickly run a brush through the bottom layer of your hair to make sure it’s tangle and knot free.[16]
- Sectioning your hair will make the curling process much faster and easier.
- To protect your hair more, spray a heat protectant product onto your hair and let it dry before you start using the Instyler.
-
2Close the Instyler around a 1 in (2.5 cm) wide section of hair at the roots. Grab a section of your loose hair about 0.5 in (1.3 cm) from your roots. Close the Instyler around it so that it’s trapped in between the barrel and the bristles.[17]
-
3Hold the barrel closed for 3 to 5 seconds. As you hold the Instyler closed, you’ll hear the barrel start to rotate. This will help to volumize your curls at the roots for extra height.[18]
- Try not to leave the barrel in one area for longer than 5 seconds to avoid damaging your hair.
-
4Glide the Instyler down to the end of your hair. Keeping the barrel closed, pull the Instyler down the entire length of your hair until it reaches the end. Then, open the Instyler so the barrel stops rotating and your hair falls out.[19]
- You’ll be left with a voluminous, soft wave.
-
5Continue curling the bottom section of your hair. Now, you can go through the bottom section of your hair from one side, around to the back, and then to the other side. Keep working in 1 in (2.5 cm) sections so your waves look even.[20]
- If you’re having trouble seeing the back of your head, stand in front of a mirror and put another mirror in front of you.
-
6Let the top section of your hair down, then curl it. Unclip your hair and shake your head so it falls naturally over your waves. When you get to your face-framing layers, curl them outwards away from your face to open up your features.[21]
- You can go over an area one or two times if you feel like it isn’t curly enough.
-
7Spray a thin layer of hairspray all over your waves. Hold a can of hairspray about 6 inches (15 cm) away from the top of your head. Spray a thin layer of it all over your waves to keep them in place for the next few hours.[22]
Tip: If you want some extra volume at the roots, spray a little bit of dry shampoo into your roots. Let it dry for about 10 seconds, then rub your fingers on top of it to disperse the product throughout your hair.


Community Q&A
-
QuestionWhat is the clear, plastic guard around the heating barrel, and can it be removed?
 Community AnswerThe clear, plastic guard is a heat guard. It keeps you from accidentally burning yourself. It is removable, and it should come off with a slight push.
Warnings
- If you have thin, dry, or damaged hair, use a low heat setting.⧼thumbs_response⧽
- Try not to leave the Instyler closed on your hair for more than 5 seconds to avoid damaging your hair.⧼thumbs_response⧽
Things You’ll Need
Heating up the Instyler
- Heat guard
- Instyler
Making Tight Curls
- Brush
- Clip
- Instyler
- Heat protectant glove (optional)
Creating Loose Waves
- Brush
- Clip
- Instyler
-Step-12-Version-4.webp)

References
- ↑ https://images-na.ssl-images-amazon.com/images/I/B1BVROms9FS.pdf
- ↑ https://images-na.ssl-images-amazon.com/images/I/B1BVROms9FS.pdf
- ↑ https://images-na.ssl-images-amazon.com/images/I/B1BVROms9FS.pdf
- ↑ https://images-na.ssl-images-amazon.com/images/I/B1BVROms9FS.pdf
- ↑ Angela Justice. Master Hair Stylist. Expert Interview. 5 November 2021.
- ↑ https://www.youtube.com/watch?v=ovgebeCo3vU&feature=youtu.be&t=120
- ↑ Angela Justice. Master Hair Stylist. Expert Interview. 5 November 2021.
- ↑ https://www.youtube.com/watch?v=ovgebeCo3vU&feature=youtu.be&t=138
- ↑ https://www.youtube.com/watch?v=uPDhiKGInSw&feature=youtu.be&t=154
- ↑ Angela Justice. Master Hair Stylist. Expert Interview. 5 November 2021.
- ↑ https://www.youtube.com/watch?v=uPDhiKGInSw&feature=youtu.be&t=159
- ↑ https://www.youtube.com/watch?v=uPDhiKGInSw&feature=youtu.be&t=228
- ↑ https://www.youtube.com/watch?v=uPDhiKGInSw&feature=youtu.be&t=228
- ↑ Angela Justice. Master Hair Stylist. Expert Interview. 5 November 2021.
- ↑ https://images-na.ssl-images-amazon.com/images/I/B1BVROms9FS.pdf
- ↑ https://www.youtube.com/watch?v=HyZX2ZaOtNU&feature=youtu.be&t=65
- ↑ https://www.youtube.com/watch?v=HyZX2ZaOtNU&feature=youtu.be&t=83
- ↑ https://images-na.ssl-images-amazon.com/images/I/B1BVROms9FS.pdf
- ↑ https://images-na.ssl-images-amazon.com/images/I/B1BVROms9FS.pdf
- ↑ https://www.youtube.com/watch?v=apwKgYXLUUc&feature=youtu.be&t=291
- ↑ https://www.youtube.com/watch?v=apwKgYXLUUc&feature=youtu.be&t=291
- ↑ https://images-na.ssl-images-amazon.com/images/I/B1BVROms9FS.pdf
About This Article