Make an icon with Paint or photo editing software
This article was co-authored by Yaffet Meshesha and by wikiHow staff writer, Kyle Smith. Yaffet Meshesha is a Computer Specialist and the Founder of Techy, a full-service computer pickup, repair, and delivery service. With over eight years of experience, Yaffet specializes in computer repairs and technical support. Techy has been featured on TechCrunch and Time.
The wikiHow Tech Team also followed the article's instructions and verified that they work.
This article has been viewed 1,387,542 times.
This wikiHow teaches you how to create simple desktop icons for your Microsoft Window apps. You can start with an image and convert it to an icon in a program like GIMP or Photoshop, or draw your icon icon from scratch in an illustration app like Microsoft Paint. Either way, it's simple to create custom icons in Windows. Microsoft Paint allows you to create a simple icon without a transparent background, while GIMP allows for greater customization and transparency. We'll show you two simple ways to make icons in Windows, and explain how you can apply them to shortcuts for any program on your PC.
Things You Should Know
- If you want to make an icon from a picture, you can convert the image to an .ICO in GIMP, Photoshop, or other layer-based photo editing software.
- You can draw a simple icon in Microsoft Paint and save it as a .ICO file.
- To use your new icon, right-click a shortcut, go to Properties > Change Icon… > Browse…, select your icon, and apply the changes.
Steps
Using Photo Editing Software
-
1Find or make a square image. You can use any image file to make the icon in a photo editing software — this can be a preexisting image or one you draw yourself. This method will go over how to use GIMP to make the image into an icon, but these steps apply to any photo editing software with layers.
- This method will go over the basic steps. For more details, see the full guide on how to create icons here.
- A square image has the same width and height lengths. You can make the image square later in the photo editing software if needed.
- There are a variety of places to find an image for your icon:
- Google search a description of the image you’re looking for and check the Images results.
- Browse stock image websites like Pexels or Shutterstock.
- Take a photo. You can turn anything into an icon. Some ideas to get you started: your pet, houseplants, a painting, your favorite brand of oat milk.
-
2Open the image in your photo editing software. There are a variety of photo editing programs available, but you'll need one that has a layers function for this method. We recommend GIMP, as it's a free, open-source alternative to Adobe Photoshop. You can download GIMP from https://www.gimp.org.
- If you have Adobe Photoshop, you can use that app to create a Windows icon.
- We'll focus our steps on GIMP, since it's a free program, but the process will be similar in Photoshop.
Advertisement -
3Add an alpha channel. This is a layer of transparency that will allow your icon to have a transparent background.
- Right-click the image layer.
- Select Add Alpha Channel.
-
4Remove the background (optional). If you want to make the background transparent, leaving only the subject, follow these steps:
- Press Shift + Q to insert a Quick Mask.
- Use the Eraser tool to erase the mask over the parts you want to keep.
- Press Shift + Q to turn off the mask, leaving the parts you erased selected.
- Press Ctrl + I to invert the selection.
- Press Del to delete the selection, leaving only the subject.
-
5Make sure the image is square. The icon file needs to be square. Follow these steps to adjust the canvas size:
- Go to Image > Canvas Size.
- Click the chain icon to unlink width and height.
- Set the width and height to the same number.
- Use the Offset values to center the image.
- Click Resize.
- Right-click the layer.
- Select Layer to Image Size.
-
6Create different icon sizes. This will allow the icon to scale when it appears in different areas of Windows. Each icon size will be a newly added layer.
- Duplicate the layer 5 times by right-clicking the original layer and selecting Duplicate Layer. Repeat this until you have 4 copies plus the original layer, 5 total.
- Scale the original layer to 256 X 256 px by right-clicking it and selecting Scale Layer.
- Click Image > Fit Canvas to Layers.
- Scale the 4 copies to:
- 128 X 128
- 48 X 48
- 32 X 32
- 16 X 16
-
7Save the image as an icon. Follow these steps to do so:
- Click File > Export As.
- Change the extension to .ico.
- Save the icon to a location where you can find it again.
- Choose to compress the two biggest layers.
- You’re done! Now you can now apply the icon to a shortcut on your desktop.
Using Paint
-
1Open Paint. You can use Microsoft Paint to create a simple Windows icon. To open Paint, type paint into the Windows Search bar, then click Paint in the search results.
- While MS Paint can be used to create a basic icon, it won’t retain any transparency — this means that some colors won't show up in your icon and it won’t have a transparent background. For best results, use black and white colors.
-
2Enable gridlines. Click the View tab at the top of the Paint window, then check the "Gridlines" box at the top of the window. After you've done this, make sure you click the Home tab to return to the main Paint interface.
-
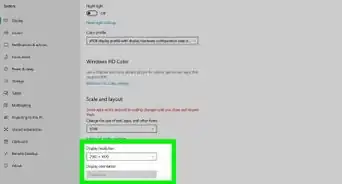
3Resize your canvas to an icon size. On the Home tab, do the following:
- Click Resize
- Check the "Pixels" box.
- Uncheck the "Maintain aspect ratio" box.
- Type 32 into both the "Horizontal" and "Vertical" text boxes to create a 32x32 canvas.
- 96x96 is another commonly used icon size.
- Click OK
-
4Zoom in. Since your canvas is relatively tiny, click the + icon in the bottom-right corner of the window until your canvas is large enough for you to work freely.
- For a 32x32 canvas, you'll probably need to zoom all the way in (800 percent) to work.
-
5Draw your icon. Once your canvas is the proper size and scale, you're free to begin drawing your icon in Paint as you please.
- Design experts recommend making icons simple, vibrant, and easy to read. Remember that your icon will be much smaller when it's on your desktop, so try not to add too many tiny words or details.[1]
- You will most likely have to resize the brush you're using. You can do this by clicking the list of horizontal lines at the top of the Home tab and then selecting a thinner line in the resulting drop-down menu.
- Drawing an icon with a mouse can be a frustrating and inefficient process. If possible, use a drawing tablet to create your icon.
-
6Click the File menu and choose Save as. The File menu is at the top of the window.
-
7Click Other formats. It's at the bottom of the pop-out menu. Doing so opens a new window.
-
8Enter a file name ending with ".ico."In the "File name" text box near the bottom of the window, you'll type in whatever you want to name your icon file, followed by .ico to indicate that the file should be saved as an icon.
- For example, to name your icon file "Minecraft", you would type in Minecraft.ico here.
-
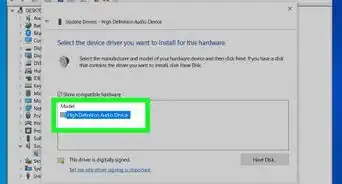
9Select 256 Color Bitmap from the "Save as type" menu. It's at the bottom of the window.
-
10Select a save location and save your icon. On the left side of the window, click a folder in which you want to save the icon file (e.g., Pictures), and then click Save. Your new Windows icon is now saved to the selected location. You can now apply it to a shortcut.
- It's best to save your icon file in a location where you know it won't move or accidentally be deleted, as moving or deleting the icon file will cause any shortcut using the file to lose its icon.
Applying the Icon to a Shortcut
-
1Understand where you can use your icon. Icons can be applied to any shortcut. Shortcuts, which are links to EXE files, are typically found on the desktop, though you can apply an icon to any shortcut.
- The one exception to the shortcut rule is the "This PC" app icon on the desktop. While you can create a shortcut of This PC and then edit its icon, the This PC icon on the desktop cannot be edited.
- If you don't have a shortcut for a program, you can make one before proceeding.
-
2Right-click a shortcut's icon. Doing so will prompt a drop-down menu.
-
3Click Properties. It's at the bottom of the drop-down menu.
- If you instead see Personalize at the bottom of the list, click once the icon and then right-click it again.
-
4Click Change Icon…. You'll see this option at the bottom of the window.
- If you don't see this option, first click the Shortcut tab at the top of the window.
-
5Click Browse…. It's in the upper-right corner of the pop-up window. Doing so opens a File Explorer window.
-
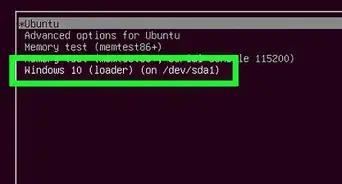
6Select your icon file. Go to the icon file's location, then click the icon file you want to use.
-
7Click Open. It's in the bottom-right corner of the window.
-
8Click OK. This is at the bottom of the window.
-
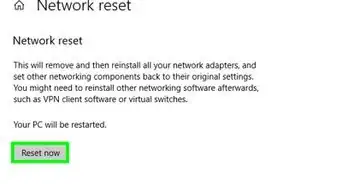
9Click Apply, then click OK. Doing so closes the open windows and applies your icon to the selected shortcut.
- To create a shortcut with your icon, left-click on the item you want to create a shortcut for, then right-click on that item and click "Create Shortcut."[2]
Expert Q&A
Did you know you can get expert answers for this article?
Unlock expert answers by supporting wikiHow
-
QuestionHow do I create a shortcut icon?
 Yaffet MesheshaYaffet Meshesha is a Computer Specialist and the Founder of Techy, a full-service computer pickup, repair, and delivery service. With over eight years of experience, Yaffet specializes in computer repairs and technical support. Techy has been featured on TechCrunch and Time.
Computer SpecialistTo create a shortcut to any program or file, left-click on that item, then right-click on it and click "Create Shortcut." A shortcut of that file or program will be made in the same file path that can then be moved to anywhere on your computer.
Support wikiHow by unlocking this expert answer.
-
QuestionHow can I switch back to the traditional Excel icon?
 Community AnswerDo the same procedure, but when selecting an icon just select the Excel.exe file and it will extract the icon from the application.
 -
QuestionWhy do Windows 10 icons shrink and expand on their own?
 Community AnswerIt might be that you held CTRL and scrolled. That changes the icon size, like zooming on a web browser.
Warnings
- Download any software or images at your own risk. Always use antivirus and anti-malware software to protect your PC.⧼thumbs_response⧽


References
- ↑ https://designshack.net/articles/graphics/10-tips-for-designing-icons-that-dont-suck/
- ↑ Yaffet Meshesha. Computer Specialist. Expert Interview. 22 September 2020.
- ↑ https://stackoverflow.com/questions/3236115/which-icon-sizes-should-my-windows-applications-icon-include
About This Article

1. Find or draw an image.
2. Go to https://icoconvert.com.
3. Click Choose File.
4. Select the image and click Open.
5. Click Upload.
6. Crop the image.
7. Click Select None.
8. Select ICO for Windows.
9. Click Convert ICO.
10. Click Download your icon(s).