This article was co-authored by wikiHow staff writer, Jack Lloyd. Jack Lloyd is a Technology Writer and Editor for wikiHow. He has over two years of experience writing and editing technology-related articles. He is technology enthusiast and an English teacher.
The wikiHow Tech Team also followed the article's instructions and verified that they work.
This article has been viewed 1,091,288 times.
Learn more...
This wikiHow teaches you how to convert a protected audio file into a regular MP3 file. While it's possible to use iTunes for Apple's protected (M4P) files, you'll need Windows Media Player—which was discontinued with the release of Windows 10—to convert protected Windows Media Player purchases into MP3 files. If you don't have Windows Media Player on your Windows computer, you won't be able to convert the protected music files.
Steps
Converting Protected iTunes Purchases
-
1Make sure that you have an iTunes Match subscription. iTunes Match, a subscription that stores all of your music in iCloud and allows you to re-download deleted songs, costs $24.99 per year.[1]
- Open iTunes.
- Click the Store tab.
- Click the iTunes Match link on the right side.
- Click the blue Subscribe button.
- Enter your Apple ID information.
- Enter payment information if prompted.
- Click Subscribe
-
2Open iTunes. If you didn't already open iTunes to sign up for an iTunes Match subscription, open it now.Advertisement
-
3Make sure that you're signed in. Click Account in the upper-left side of the iTunes window (Windows) or the screen (Mac), then look for your account name in the drop-down menu. If it isn't there, click Sign In... in the drop-down menu and enter your Apple ID credentials.
-
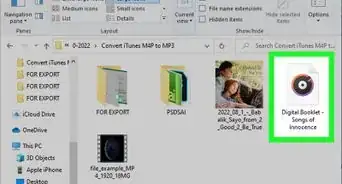
4Find the song or album that you want to convert. In order to "convert" music from protected audio to MP3, you'll first need to delete the protected audio from your iTunes library.
- Keep in mind that this must be music that you purchased from iTunes.
-
5Delete the song or album. Click the song or album to select it, then press Del (Windows) or click Edit and then click Move to Trash (Mac). This will remove the protected audio file from your iTunes library.
-
6Click Store (Windows) or iTunes Store (Mac). It's a tab near the top of the iTunes window.
-
7Click the Purchased link. You'll find this on the right side of the window.
-
8Find the song or album that you deleted. If you purchased the song or album from iTunes, you should find it on this page.
- You can click the Not in My Library tab at the top of the window to show only purchased music that isn't in your iTunes library.
-
9
-
10Convert the unprotected song(s) to MP3. To create MP3 versions of the song(s) in question, simply select a song, click File, select Convert, and click Create MP3 Version in the pop-out menu. If this option doesn't appear, first do the following:
- Click the Edit (Windows) or iTunes (Mac) menu item.
- Click Preferences... in the drop-down menu.
- Click Import Settings on the General tab.
- Click the "Import Using" drop-down box.
- Click MP3 Encoding in the drop-down menu.
- Click OK on both windows.


Converting Protected Songs in iTunes
-
1Understand how this method works. While iTunes can play most protected audio files, you will be unable to recover unprotected versions through iTunes Match if the music is old enough or if you didn't purchase it to begin with. You can use a work-around by burning the protected music to a CD and then ripping the CD to MP3 in iTunes. There are a few caveats, however:
- You'll need to be authorized to play the protected M4P files in iTunes in the first place in order to burn it to a CD.
- There will be a small drop in quality.
- You'll want to use a CD-RW if possible if you have a lot of files to convert, otherwise you'll need a lot of blank CD-Rs. You can reuse a CD-RW up to 1000 times, which can be a lifesaver for large libraries.
-
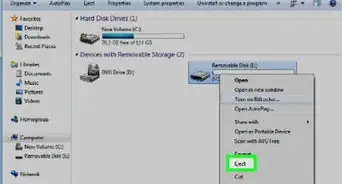
2Insert a CD into your computer. Make sure that this is a new, blank, CD-RW-type CD.
- If you're using a computer without a DVD drive, you'll need to buy an external USB DVD drive for your computer before you can proceed.
-
3Open iTunes. Its app icon resembles a multicolored musical note on a white background.
-
4Sort your music by Kind. Click the Kind tab above your music library list to do so. If you don't see the Kind tab, do the following to make it appear:
- Right-click the sorting options bar at the top of your iTunes library.
- Check the Kind option.
-
5Find protected audio files. Look for files with "M4P" listed in the Kind column; any M4P file is a protected iTunes file.
-
6Select up to 80 minutes of music. Hold down Ctrl (or ⌘ Command on a Mac) while clicking each song that you want to convert.
-
7Create a new playlist for the files. Right-click one of the selected songs, select Add to Playlist in the drop-down menu, click New Playlist, and type in a name for the playlist.
-
8Click ⋯. It's in the upper-right side of the playlist's page. A drop-down menu will appear.
-
9Click Burn Playlist to Disc. It's in the drop-down menu. Doing so prompts a pop-up window to appear.
-
10Create the MP3 disc. Check the "MP3 CD" box, then click Burn at the bottom of the window. Your playlist's music will begin burning onto the CD.
-
11Wait for the CD to finish burning. This may take several minutes. Once the CD finishes burning, you can proceed with converting the music.
-
12Rip the CD's music to MP3. Once you've created the CD, you should be able to open the CD inside of iTunes, select the contents of the CD, and create MP3 versions of the music on the CD by clicking File, selecting Convert in the drop-down menu, and clicking Create MP3 Version in the pop-out menu.
- Once you've created MP3 versions of your music, you'll be able to delete the protected versions of the music from your computer.
-
13Format the CD before burning more music onto it. If you want to convert another 80 minutes of music, make sure that you wipe clean the CD before burning the music in question onto it.


Converting Protected Windows Media Player Purchases
-
1Insert a CD into your computer. Make sure that this is a new, blank, CD-RW-type CD.
- If you're using a computer without a DVD drive, you'll need to buy an external USB DVD drive for your computer before you can proceed.
-
2
-
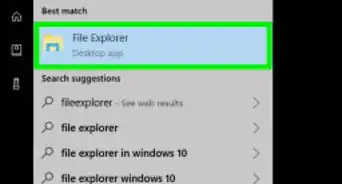
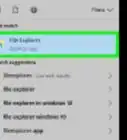
3Type windows media player into Start. This will search your computer for the Windows Media Player app.
-
4Click Windows Media Player. It's the blue box with an orange-and-white "Play" button on it. You'll find this at the top of the Start window.
- If you don't see Windows Media Player here, your computer doesn't have Windows Media Player on it and you won't be able to convert your protected music.
-
5Open your music library. Click the Library tab in the upper-left side of the Windows Media Player window, double-click Music on the resulting page, and double-click All Music on the final page.
-
6Find protected songs. Right-click the sorting options bar near the top of the window, click Choose columns... in the drop-down menu, scroll down and check the "Protected" box, click OK, and click the Protected tab in the sorting bar. This will sort your Windows Media Player library into protected and non-protected files.
- You may have to scroll left or right to see the Protected tab.
-
7Click the Burn tab. It's in the upper-right side of the window. Doing so opens the Burn pane on the right side of the window.
-
8Select up to 80 minutes of protected music. While holding down Ctrl, click each song that you want to convert.
-
9Click and drag the music into the Burn pane. This pane is on the right side of the window. You should see the music appear in the Burn pane.
-
10Click Start burn. It's in the upper-left side of the Burn pane. Your music will begin burning onto the CD.
-
11Wait for the CD to finish burning. This may take several minutes. Once the CD finishes burning, you can proceed with converting the music.
-
12Rip the CD's music to MP3. Once you've burned the protected audio onto the CD, you can rip the CD back into Media Player using the "Rip CD" feature.
-
13Format the CD before burning more music onto it. If you want to convert another 80 minutes of music, make sure that you wipe clean the CD before burning the music in question onto it.


Warnings
- Circumventing DRM on digital music may be illegal in your area.⧼thumbs_response⧽
- There are multiple programs that claim to remove audio protection, but these programs are almost always malicious software.⧼thumbs_response⧽