This article was co-authored by Raymond Chiu. Raymond Chiu is the Director of Operations for MaidSailors.com, a residential and commercial cleaning service based in New York City that provides home and office cleaning services at affordable prices. He has a Bachelors in Business Administration and Management from Baruch College.
wikiHow marks an article as reader-approved once it receives enough positive feedback. This article has 11 testimonials from our readers, earning it our reader-approved status.
This article has been viewed 859,552 times.
Grout, the mixture of water, sand, and cement that keeps tiles in place, can be difficult to keep clean. Grout lines easily pick up dirt and stains, and before you know it they turn from white to black. Learn how to clean your grout so it's sparkling white again and maintain it so you don't have to clean it as often.
Steps
Using Vinegar
-
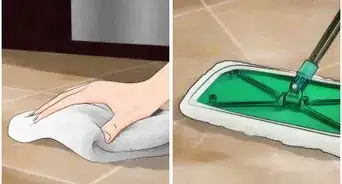
1Do a preliminary clean. Before you get down to the deep cleaning methods, it is necessary to do a regular clean up of your tile. Follow your regular cleaning process of wiping down counters or sweeping and mopping floors. This will get all the top layer of scum off, and make your work a bit easier.
-
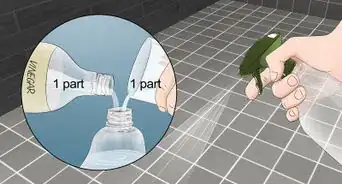
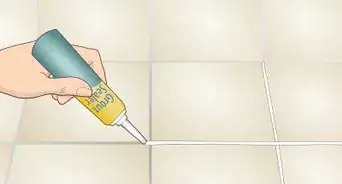
2Create your solution. In a bucket or large bowl, mix together 2 to 4 parts water and 1 part distilled white vinegar. For extra cleaning power, you can also mix in 1/2 tsp of liquid detergent.[1]
- Always dilute vinegar before using it on grout; otherwise, it can eat away the grout along with the grime.
- Never use vinegar around marble tiles.
Advertisement -
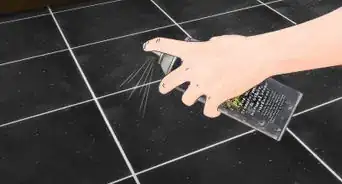
3Pour the mixture in a spray bottle. Keeping this in a spray bottle will make it easy to mist the dirtiest areas specifically, and for storage. Fill your spray bottle completely, and then shake the solution well.
-
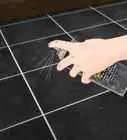
4Spray the grout. Start on a small area, only as large as 1-2 square feet total. Spray your cleaning solution over the grout so it is dampened. Allow the mixture to set for 3-5 minutes to work into the grout.
-
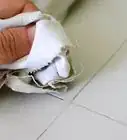
5Begin scrubbing. Use a scrubbing brush of your choice. A soft-bristled cleaning brush, a toothbrush, or a magic eraser are all good options. Put some hard work into your scrubbing to get the ground-in dirt out from between your tiles.[2]
-
6Clean up the dirty liquid. All your scrubbing has probably created little pools of dirty liquid on your tiles. Use a damp cloth to wipe this up, and wring it out into a separate container. This will keep your tiles cleaner in the end.
-
7Complete your grout cleaning. Use the above process to move onto the rest of your grout, giving all it a thorough cleaning. Focus on simply getting the dirt and dark areas out of your grout, exposing the natural white underneath.
-
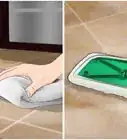
8Do a final wipe-down. When you are convinced your grout cleaning is finished, do a second clean up of the entire area. If you were working on counters or in a bathroom, use a generic cleaning spray and rag to wipe down your tiles. For floors, go ahead, mop your tiles again, and towel dry.


Using Hydrogen Peroxide and Baking Soda
-
1Clean up your tiles. Before getting down and scrubbing your grout, you need to do a basic once-over with your favorite cleaner. If you cleaning floor grout, sweep and mop. For bathroom and kitchen counter grout, spray, and wipe it down with your favorite cleaner.[3]
-
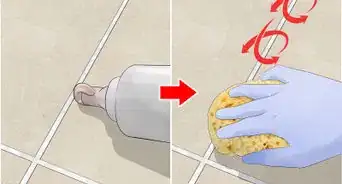
2Create your paste. In a small bowl, mix hydrogen peroxide and baking soda to form a thick paste. The parts of each may vary depending on the consistency and thickness you prefer to work with.[4]
-
3Spread your mixture. Use your finger or a toothbrush to spread the paste onto your grout. Start in a small area only, no larger than 1-2 square feet. Keep the solution thick and completely the coat the grout. Allow it to set for 5-10 minutes.
-
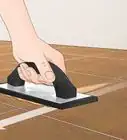
4Begin scrubbing. Use a small brush such as a toothbrush (electric preferably) for scrubbing at the grout. Apply firm pressure over a small area to lift dirt and stains. If the grout is still dirty, add more of your paste and scrub again after letting it set for a few minutes.[5]
-
5Finish your space. Continue adding the cleaning mixture to the grout and scrubbing it off. Work slowly to ensure that you have gotten all your grout cleaned up.
-
6Wipe up your tile. Use a damp rag to wipe off the remaining paste on your tile. Finish by cleaning your tiles as usual with a spray cleaner for counters or a mop and soap for floors.

Using an Oxygen Bleach
-
1Wipe down your tile. Get rid of all surface dirt and crumbs that might make cleaning your grout more tedious by wiping down your tile before getting to the grout cleaning. Follow your regular cleaning regimen by sweeping and mopping floors or using a spray cleaner to wipe down countertops.
-
2Create your solution. Oxygen bleach is a safe bleach compound, which works to dissolve bacteria and grime while whitening grout. Mix equal parts of oxygen bleach with warm water and allow the mixture to dissolve.[6]
-
3Apply your cleaner. Choose your starting area, no larger than 1-2 square feet at a time, and pour on your bleach. Make sure the grout is thoroughly coated with the liquid; you can use a spray bottle if it makes it easier to do so. Leave the solution to work on the grout for 15-20 minutes.
-
4Begin scrubbing. When the bleach has had time to set, you can begin scrubbing at the grout to work out the dirt and stains. Use a small brush, like a toothbrush, to rub the grout. You can add more bleach as you scrub to keep the area moist and expedite the cleaning process.
-
5Mop up the excess liquid. Grab a dry towel and mop up the dirty bleach-water that pools on the tile when you finish scrubbing. If you get enough, wring the towel out between uses. Doing this, will make it easier to finish cleaning in the end.
-
6Continue washing your grout. Repeat the process of applying bleach to the grout and scrubbing it out until you have finished all your tiled area. For particularly tough stains in the grout, you can apply the bleach for an hour or longer. The longer you let it soak, the easier it will be to scrub out the stain.
-
7Finish cleaning your tile. Do a final mop-up of your tile before cleaning it again as you usually would. A final wipe-down will remove any remaining bleach and dirt, and leave your grout shiny and good-as-new.


Maintaining Clean Grout
-
1Clean up spills right away. Letting cranberry juice or orange juice sit on grout for a few hours is a sure way to get a new stain. As soon as something is spilled on your floor, wipe it up with a wet rag, removing every last trace.
- If a stain is left behind, pour a bit of hydrogen peroxide over it. Let it sit for a minute before wiping it away with a clean cloth.
- Dry spills can also stain grout if they are left to be ground into the floor. Sweep up coffee grounds, clumps of dirt, and other solids soon after they are dropped.
-
2Treat small stains regularly. To avoid having to do a deep cleaning too often, treat small stains as they come. Use the same cleaning solution you would use for a deep cleaning, but employ a spray bottle to treat the small area you want to clean. You could also try an alternative small stain-cleaning methods:
- Use a baking soda paste. Mix baking soda with a little water to make a paste, and then rub it into the stained section of grout. Let it sit for a few minutes, then use an old toothbrush to scrub it away.
- Use white toothpaste. Squirt some toothpaste directly onto the grout in question, then rub it in using your finger. After a few minutes, use an old toothbrush to scrub the area. Wipe it up with a clean wet rag.
- Use a pencil eraser. For the smallest stains, a pencil eraser does a surprisingly good job. Choose an eraser that is white, rather than stained a different color, or you may end dyeing your grout the color of the eraser.[7]
-
3Keep the area ventilated. Mold and mildew often affect grout in bathrooms, which tend to stay wet and steamy for hours at a time. Use an exhaust fan after taking a shower or bath, and wipe up wet tile to keep your grout from getting moldy.
-
4Apply grout sealer. Once a year, applying a commercial grout sealer can help prevent spills from quickly seeping into the pores in the grout, and it helps with bathroom mold and mildew. Choose a grout sealer from your hardware store and apply it according to the manufacturer's instructions.
-
5Dye it a different color. Sometimes keeping grout white just isn't practical. If you dye your hair, have kids who like to use paints in the kitchen, or just don't want to deal with keeping it sparkling white, consider getting a grout stain and using it to dye the grout a different color. You can choose a color that matches your tile or something completely different for a contrasting effect.
-
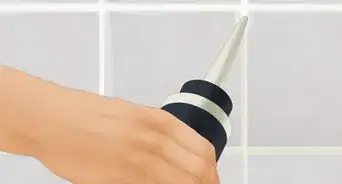
6Know when to replace your grout. Older grout starts to crack and crumble, and it gets worse as moisture seeps in and degrades the floor underneath over time. Replacing your grout when necessary is worth the trouble because it makes it easier to clean and prevents mold and mildew from taking hold as often.[8]


Expert Q&A
Did you know you can get expert answers for this article?
Unlock expert answers by supporting wikiHow
-
QuestionWhat cleans grout the best?
 Raymond ChiuRaymond Chiu is the Director of Operations for MaidSailors.com, a residential and commercial cleaning service based in New York City that provides home and office cleaning services at affordable prices. He has a Bachelors in Business Administration and Management from Baruch College.
House Cleaning ProfessionalHydrogen peroxide mixed with a little bit of baking soda will lift out extremely deep stains. That's a really strong option. Using a water and vinegar mixture is another really good choice. Steam cleaning is another good option if you have the right machinery. There probably isn't a single "best" option, though; all of these options will work.
Support wikiHow by unlocking this expert answer.
-
QuestionHow much of the old grout needs to be removed to re-grout?
 Community AnswerThat depends on the type of tile/grout. For thin grout lines, buy a grout removal tool (at any hardware store) and dig out enough so the stains are removed and there is a channel deep enough for the new grout to fill & adhere. For larger grout lines, the channel will need to be wider & deeper.
 -
QuestionMy bathroom wall tiles are cement. Will these methods work on cement?
 Community AnswerYes, these methods will work on cement.


References
- ↑ Raymond Chiu. House Cleaning Professional. Expert Interview. 15 October 2019.
- ↑ Raymond Chiu. House Cleaning Professional. Expert Interview. 15 October 2019.
- ↑ https://www.bobvila.com/articles/cleaning-grout/
- ↑ Raymond Chiu. House Cleaning Professional. Expert Interview. 15 October 2019.
- ↑ Raymond Chiu. House Cleaning Professional. Expert Interview. 15 October 2019.
- ↑ https://www.bobvila.com/articles/cleaning-grout/
- ↑ http://www.thehomefixitpage.com/clean-grout-the-easy-way
- ↑ https://www.bobvila.com/articles/how-to-remove-grout-regrouting-tile/
About This Article

Before you clean your grout, start by cleaning the tile to remove any surface dirt. Mix hydrogen peroxide and baking soda in a small bowl to form a thick paste, then spread the mixture on the grout with a toothbrush, working in small areas of about 1 to 2 square feet. Allow the mixture to sit for 5-10 minutes, then scrub the grout with the toothbrush to remove dirt and stains. Use a damp rag to wipe the remaining paste from the tile, then clean the tiles as usual. For more advice from our General Contractor reviewer, including how to maintain your grout after you've cleaned it, read on!