This article was co-authored by Art Fricke. Art Fricke is a home renovation and repair specialist and the owner of Art Tile & Renovation based in Austin, Texas. With over 10 years of experience, he specializes in bathroom and kitchen renovations. Art focuses on a single contractor approach to customized renovation work, and performs projects such as installing custom tile showers, fixing tiled shower leaks, replacing cracked tiles, and installing floor and wall tile.
wikiHow marks an article as reader-approved once it receives enough positive feedback. In this case, several readers have written to tell us that this article was helpful to them, earning it our reader-approved status.
This article has been viewed 511,943 times.
Regrouting your tile is a simple task that can be done in a small amount of time. The only aspect that takes some time in this process is the curing of the grout. All you need is some grout mix and a couple easy to use tools.
Steps
Preparing to Grout
-
1Decide what type of grout you will be using. This is dependent on the size of your grout's joint (the space between the tiles where the grout lies). There are two types of grout for regrouting tile: sanded and unsanded.[1] If your grout joints are larger than 1/8 inch (.3175 cm) use sanded grout to fill in the space; if your joints are going to be less than 1/8 inch (.3175 cm) use non sanded grout to fill in your joints as it is more compact.
- A good rule of thumb is to use unsanded grout if your grout lines are 1⁄8 in (0.32 cm) or less, because it's better for getting into smaller spaces. Use sanded grout for grout lines wider than 1⁄8 in (0.32 cm), because the sand will provide some reinforcement.[2]
- If you're only replacing some of your grout, try to color-match your existing grout as closely as possible. However, keep in mind that there may still be some variation, even if you buy the exact same brand and color of grout that was used before. That's because grout will change color over time as it oxidizes and absorbs dirt and grime.[3]
-
2Remove existing grout. If necessary, remove the existing grout before preparing to lay down new grout. This will keep the appearance clean and even, as well as prevent mold contamination.
- Tools for removing grout include a utility knife, a ceramic chisel, a hammer and a small scraper with a retractable blade.
Advertisement -
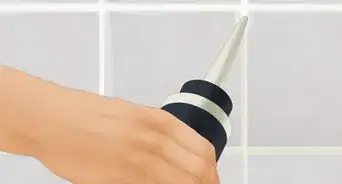
3Apply tile sealant. Apply a tile sealant over the surface of your tiles if they have become porous so the grout does not sink underneath the surface when regrouting your tile. Do this by using a tile sponge, a roller, or simply wipe the tiles with a coat of sealant and allow to dry for 24 hours.

Laying Down the Grout
-
1Mix the grout. Mix the grout in one of the 5 gallon (19 L) buckets using a drill with a mixing attachment or paddle mixer. Do an initial mix and then let it sit for a couple of minutes, and then mix the grout again. You may not want to mix it all at once. Just mix up a few cups at a time.[4]
-
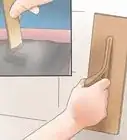
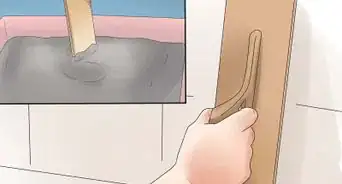
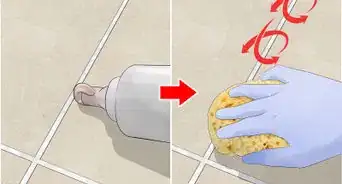
2Apply the grout. Apply a generous amount of grout to your grout joints along your tile floor using the rubber grout float. Be sure to distribute extra grout into the grout joints in order to fill them completely. Grout all areas of your tile floor except the expansion joints; these are the areas between the floor tile and bathtub, wall, door, and cabinet or sink area.
- The rubber grout float is a rectangular, flat tool with a steel handle and rubber surface used to distribute grout. Hold the rubber grout float at a 30 degree angle and distribute grout across the surface of the tile floor.
- Keep in mind that it is important to work quickly because the grout will harden in a short amount of time.[5]
-
3Remove excess. Remove the excess grout from the tile floor once every grout joint has been filled. Do this by going over the tile with the rubber grout float, only this time use it at a sharp angle and move it diagonally across the tile floor in order to scrap the excess grouting material off.[6]
- Moving diagonally avoids detaching recently laid grout from the grout joints.
-
4Let the grout set and prepare bucket. Let grout set for approximately 10 to 15 minutes. While the grout is setting, fill your second 5 gallon (19 L) bucket with water and grab your tile sponge to clean the tile floor.
Cleaning Up
-
1Prepare your sponge. Dip the tile sponge in the bucket of water and wring out any excess water leaving a damp tile sponge.[7]
-
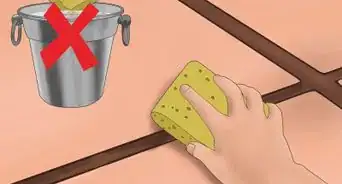
2Clean the surface. Wipe all grout residue off of the tile using the damp tile sponge in a diagonal motion. Clean the excess grout from the expansion areas using the margin trowel to leave those areas completely clean for caulking.
-
3Rinse and repeat. Rinse tile sponge and repeat the previous step until all of the grout residue is removed and tile is completely clean of grout haze. Make sure to wring out as much water as possible each time you rinse the sponge.[8]
Finishing Up
-
1Cure grout. Allow grout to cure for 24 to 48 hours before stepping on it to ensure its stability and to make sure that it is completely dry.
-
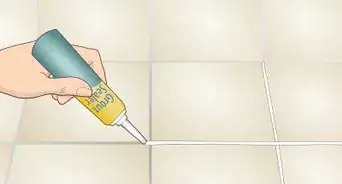
2Finish expansion joints. Caulk the expansion joints using a grout caulk in a color that matches your grout. Completely fill these expansion joints then smooth and concave using your finger.
- You can find grout caulk at large home improvement stores.
-
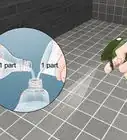
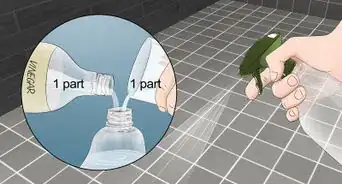
3Apply final sealer.[9] Apply a penetrating sealer using either a sponge or spray bottle to the grout joints once the grout has completely cured. Wipe off excess sealer from the tile according to the label, as it will stain the tile otherwise.
- While it won't make your grout completely waterproof, using a penetrating sealer will help keep water from penetrating as deeply into the grout as it normally would.[10]

Expert Q&A
Did you know you can get expert answers for this article?
Unlock expert answers by supporting wikiHow
-
QuestionWhat is the best way to remove grout residue?
 Art FrickeArt Fricke is a home renovation and repair specialist and the owner of Art Tile & Renovation based in Austin, Texas. With over 10 years of experience, he specializes in bathroom and kitchen renovations. Art focuses on a single contractor approach to customized renovation work, and performs projects such as installing custom tile showers, fixing tiled shower leaks, replacing cracked tiles, and installing floor and wall tile.
Home Renovation & Repair SpecialistIt depends on your tile. If you're grouting tile made of a smooth material like porcelain or ceramic, it will be relatively easy to scrape away the grout, even if it hardens. However, if you're grouting a porous or rough tile, like one made from natural stone, clean the grout residue as quickly as possible, because it's very difficult to remove once it starts to dry.
Support wikiHow by unlocking this expert answer.
-
QuestionCan I regrout just one area of tile?Art FrickeArt Fricke is a home renovation and repair specialist and the owner of Art Tile & Renovation based in Austin, Texas. With over 10 years of experience, he specializes in bathroom and kitchen renovations. Art focuses on a single contractor approach to customized renovation work, and performs projects such as installing custom tile showers, fixing tiled shower leaks, replacing cracked tiles, and installing floor and wall tile.
Home Renovation & Repair SpecialistYes, but keep in mind that it can be very difficult to color-match your existing grout, because grout changes color over time as it oxidizes and absorbs dirt and grime.Support wikiHow by unlocking this expert answer.
Things You'll Need
- Tile sealant
- Grout mixture
- 2 - 5 gallon (19 L) buckets
- Drill with a mixer attachment
- Rubber grout float
- Tile sponge
- Grout sponge
- Knee pads
- Caulk


References
- ↑ https://www.familyhandyman.com/tiling/grouting/regrout-wall-tile/view-all
- ↑ Art Fricke. Home Renovation & Repair Specialist. Expert Interview. 1 July 2020.
- ↑ Art Fricke. Home Renovation & Repair Specialist. Expert Interview. 1 July 2020.
- ↑ https://www.familyhandyman.com/tiling/grouting/regrout-wall-tile/view-all
- ↑ https://www.familyhandyman.com/tiling/grouting/regrout-wall-tile/view-all
- ↑ https://www.familyhandyman.com/tiling/grouting/regrout-wall-tile/view-all
- ↑ https://www.familyhandyman.com/tiling/grouting/regrout-wall-tile/view-all
- ↑ https://www.familyhandyman.com/tiling/grouting/regrout-wall-tile/view-all
- ↑ http://www.popularmechanics.com/home/interior-projects/how-to/a6631/tips-and-tools-to-regrout-your-bathroom/
- ↑ Art Fricke. Home Renovation & Repair Specialist. Expert Interview. 1 July 2020.
About This Article

Before regrouting your tiles, remove any remaining grout with a utility knife or chisel to prevent mold and maintain a neat appearance. Next, mix your grout in a bucket, then apply it to the gaps between your tiles with a rubber float. Once you've filled every joint, remove excess grout from the floor by holding the float at a sharper angle so it scrapes up the excess grout but leaves the rest in place. To finish, let the grout dry for 15 minutes, fill a bucket with water, and clean the floor with a sponge. For tips on how to cure grout and how to finish off expansion joints, which you install after grouting, read on!