This article was co-authored by Duston Maynes and by wikiHow staff writer, Hannah Madden. Duston Maynes is an Automotive Repair Specialist at RepairSmith. Duston specializes in leading a team that handles a variety of automotive repairs including replacing spark plugs, front and rear brake pads, fuel pumps, car batteries, alternators, timing belts, and starter motors. Duston holds an Associate’s degree in Automotive/Diesel Technology from The Universal Technical Institute of Arizona and is a Certified Diagnostic Technician and Automobile Mechanics Technician through BMW STEP. RepairSmith received The 2020 Big Innovation Award by Business Intelligence Group and The Startup of the Year by the American Business Awards. RepairSmith was also included in Built in LA’s 50 Startups to Watch and The Business Intelligence Group’s 52 Names Leading the Way in Customer Service. RepairSmith offers in-home services to provide car owners convenient and complete auto repair everywhere.
There are 12 references cited in this article, which can be found at the bottom of the page.
wikiHow marks an article as reader-approved once it receives enough positive feedback. This article received 12 testimonials and 80% of readers who voted found it helpful, earning it our reader-approved status.
This article has been viewed 1,309,173 times.
Got an electric motor that just won’t start? Or, maybe it starts up but is underpowered or sounds like it’s struggling. No matter what your electric motor is powering, there are easy ways to test it, both with a multimeter and visually. To see why your electric motor isn’t working, read on.
Things You Should Know
- Use a multimeter or an ohmmeter to test the voltage of the electric motor. If there is no resistance or the resistance is uneven, the motor is likely faulty.
- Check the bearings to make sure they can spin freely. If they can’t, lubricate them.
- Look on the outside of the motor for other potential problems, like holes or smoke points.
Steps
Checking the Motor with a Multimeter
-
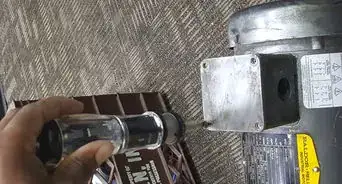
1Set your multimeter to a DCV setting. A multimeter is similar to an ohmmeter, and either of them will work for this test. Plug your tool in and set it to a voltage in the DCV (direct current voltage) section. Pick a voltage that’s similar to the voltage your tool normally uses.[1]
- For most electric motors, you can set the DCV to 20.
- For an ohmmeter, use the “Resistance or Ohms” setting.
- When you turn the tool on, make sure the numbers are set to 0. If the display doesn’t read 0, touch the probes against each other to 0 it out. If yours is a digital multimeter, it will automatically 0 out on its own.
-
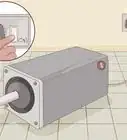
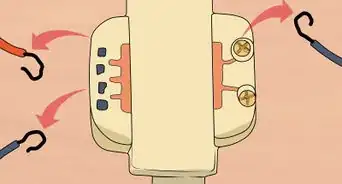
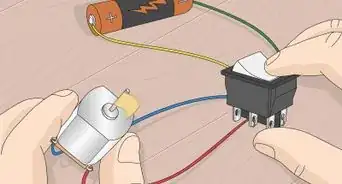
2Press the probes to the positive and negative parts of the motor. Turn your electric motor off and make sure it’s unplugged. Electric motors come in different formats: some might have positive and negative probes, while others might use a grounding probe and motor leads. Connect the 2 wires from your tool onto your electric motor in one of the following ways:[2]
- Locate a ground screw (often a green, hex head type) or any metal part of the frame (scrape away paint if needed to make good contact with metal) and press a test probe to this spot and the other test probe to each of the motor leads, one at a time.
- Find the positive (red) and negative (black) wires. Connect 1 probe from your tool to each of the wires.
Advertisement -
3Watch the readout for a resistance value. Ideally, the meter should barely move off the highest resistance indication, but should still show numbers indicating a resistance. Make sure your hands are not touching the metal probe tips, as doing so will cause the reading to be inaccurate.[3]
- If the numbers do not move at all, it likely means that your electric motor has an electrical problem. Keep reading to diagnose what might be wrong.
- It depends on the type of motor you're testing, but most motors will have little resistance.[4]
-
4Check the windings for short circuiting to the frame. Most household appliance motors with a shorted winding will not run and will probably open the fuse or trip the circuit breaker instantly (600 volt systems are "ungrounded," so a 600 volt motor with a shorted winding may run and not trip a fuse or circuit breaker).[5]
-
5Check that the windings are not open or blown. Many simple "across the line" single-phase and 3-phase motors (used in household appliances and industry respectively) can be checked simply by changing the range of the ohm meter to the lowest offered (R X 1), zeroing the meter again, and measuring the resistance between the leads of the motor. In this case, consult the wiring diagram of the motor to be sure that the meter is measuring across each winding.[6]
- Expect to see a very low value of resistance in ohms. Low, single digit resistance values are expected. Make sure your hands are not touching the metal probe tips, as doing so will cause the reading to be inaccurate. Values greater than this indicate a potential problem and values significantly greater than this indicate the winding has failed opened. A motor with high resistance will not run - or not run with speed control (as is the case when a 3-phase motor winding opens while running).


Inspecting the Bearings
-
1Look at both ends of the motor. Many electric motor failures are caused by bearing failures. The bearings allow the shaft or rotor assembly to turn freely and smoothly in the frame. Bearings are located at both ends of the motor which are sometimes called "bell housings" or "end bells".[7]
- There are several types of bearings used. 2 popular types are brass sleeve bearings and steel ball bearings. Many have fittings for lubrication while others are permanently lubricated or "maintenance free."
-
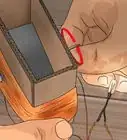
2Spin the shaft or rotor. To perform a cursory check of the bearings, place the motor on a solid surface and place one hand on the top of the motor, spin the shaft/rotor with the other hand. Closely watch, feel, and listen for any indication of rubbing, scraping, or unevenness of the spinning rotor. The rotor should spin quietly, freely and evenly.[8]
- If the bearings are not spinning freely, try lubricating them. They may be gummed up and unable to spin.
-
3Push and pull the shaft in and out of the frame. A small amount of movement in and out (most household fractional horsepower types should be less than 1/8" or so) is permitted, but the closer to "none" the better. A motor that has bearing-related issues when run will be loud, overheat the bearings, and potentially fail catastrophically.[9]
- Lubricate the bearings if they are stuck or jammed.


Troubleshooting Other Potential Problems
-
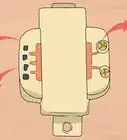
1Check the start or run capacitor. Most capacitors are protected from damage by a metal cover on the exterior of the motor. Remove the cover to access the capacitor, then check it for leaking oil, bulges in the container, holes in the container, or smoke residue.[10]
- Or, check the capacitor electrically with an ohmmeter. Place the test probes on the capacitor terminals, then make sure the resistance starts low and gradually increases. If it stays shorted or does not rise, there is probably an issue with the capacitor and may need to be replaced.
-
2Inspect the rear bell housing of the motor. Some motors have centrifugal switches used to switch the start / run capacitor (or other windings) "in" and "out" of the circuit at a specific RPM. Check the switch contacts are not welded closed or are contaminated with dirt and grease that could prevent a good connection. Use a screwdriver to see if the switch mechanism and any spring can be operated freely.[11]
-
3Look at the fan. A "TEFC" type motor is a "Totally Enclosed, Fan Cooled" type. The fan blades are behind a metal guard on the back of the motor. Make sure it is securely fastened to the frame and is not clogged with dirt and other debris. The openings in the rear metal guard need to have full and free air movement; otherwise, the motor will overheat and eventually fail.[12]
-
4Choose the right motor for the conditions in which it will be run. Check that drip-proof motors are exposed to directed water spray or moisture, and that open motors aren't exposed to any water or moisture at all.[13]
- Drip-proof motors can be installed in damp or wet locations, so long as they are installed in such a way that water (and other liquids) can not enter due to gravity and must not be subjected to a stream of water (or other liquids) directed at or in it.
- Open motors are, as the name implies, completely open. The ends of the motor have rather large openings and the windings in the stator windings are plainly visible. These motors should not have these openings blocked or restricted and should not be installed in wet, dirty or dusty areas.
- TEFC motors on the other hand, can be used in all the previously mentioned areas but must not be submerged unless designed specifically for the purpose.
-
5Check the outside of the motor. If the motor has any of the following issues on the outside, they may be problems that can shorten the life of the motor because of previous overloading, wrong application, or both. Look for:[14]
- Broken mounting holes or feet
- Darkened paint in the middle of the motor (indicating excessive heat)
- Evidence of dirt and other foreign matter having been pulled into the motor windings through openings in the housing


Expert Q&A
-
QuestionHow do you check motor continuity?
 Duston MaynesDuston Maynes is an Automotive Repair Specialist at RepairSmith. Duston specializes in leading a team that handles a variety of automotive repairs including replacing spark plugs, front and rear brake pads, fuel pumps, car batteries, alternators, timing belts, and starter motors. Duston holds an Associate’s degree in Automotive/Diesel Technology from The Universal Technical Institute of Arizona and is a Certified Diagnostic Technician and Automobile Mechanics Technician through BMW STEP. RepairSmith received The 2020 Big Innovation Award by Business Intelligence Group and The Startup of the Year by the American Business Awards. RepairSmith was also included in Built in LA’s 50 Startups to Watch and The Business Intelligence Group’s 52 Names Leading the Way in Customer Service. RepairSmith offers in-home services to provide car owners convenient and complete auto repair everywhere.
Automotive Repair SpecialistSet a Digital Volt Ohm Meter (DVOM) to the ohm setting and test the motor while the power is shut off. On average, most motors will have little resistance. -
QuestionHow do I check and find out with a multi-meter whether a motor is faulty or not?
 Community AnswerYou can find that by checking the ohms between the motor terminals, if shorted or not .
 -
QuestionMy electric chainsaw motor still runs, but sparks and heat are coming from the brushes and commutator. What could be the problem?
 Community AnswerCheck that the brush springs still have enough tension to hold them securely to the commutator. If not, they could be skipping across high spots on the commutator.
Warning
- Always read your owner’s manual before testing an electric motor.
- Use caution, as dealing with a faulty electric motor can be dangerous.


References
- ↑ https://www.youtube.com/watch?v=lzA9sYhkqaw&t=48s
- ↑ https://www.youtube.com/watch?v=lzA9sYhkqaw&t=93s
- ↑ https://www.youtube.com/watch?v=WvALVu9if1Y&t=163s
- ↑ Duston Maynes. Automotive Repair Specialist. Expert Interview. 11 June 2021.
- ↑ https://www.accelix.com/community/preventive-maintenance/typical-causes-of-electric-motor-winding-failures-and-how-to-prevent-them/
- ↑ http://www.tigertek.com/servo-motor-resources/check-spindle-motor-windings.html
- ↑ https://globalbearings.com.au/electric-motor-bearings-how-to-check-if-theyve-gone-bad/
- ↑ https://globalbearings.com.au/electric-motor-bearings-how-to-check-if-theyve-gone-bad/
- ↑ https://globalbearings.com.au/electric-motor-bearings-how-to-check-if-theyve-gone-bad/
- ↑ https://sciencing.com/troubleshoot-electric-motor-capacitor-problem-8001821.html
- ↑ https://motorimpex.ua/files/downloads/MPFiltri_LMG.pdf
- ↑ https://www.powertransmissionworld.com/is-your-electric-motor-trying-to-tell-you-something/
- ↑ https://electrical-engineering-portal.com/7-most-common-motor-enclosure-types-defined-by-nema-standards
- ↑ http://www.uesystems.com/news/the-50-failure-modes-of-electric-motors
About This Article

To check an electric motor to see why it failed, look at the outside for signs of debris that has been sucked into the motor windings, as well as broken mounting holes or feet, and darkened paint that could indicate excessive heat. Turn the rotors and push and pull the shaft to test the bearings; if the rotors move smoothly and there is little to no movement in the shaft, the bearings are probably fine. If the problem seems to be electrical, use an ohmmeter to check resistance value. For information on how to check the fan and the bell housing, read on!