This article was co-authored by wikiHow Staff. Our trained team of editors and researchers validate articles for accuracy and comprehensiveness. wikiHow's Content Management Team carefully monitors the work from our editorial staff to ensure that each article is backed by trusted research and meets our high quality standards.
wikiHow marks an article as reader-approved once it receives enough positive feedback. This article received 26 testimonials and 83% of readers who voted found it helpful, earning it our reader-approved status.
This article has been viewed 1,941,511 times.
Learn more...
Electric generators are devices that use alternating magnetic fields to create a current through a wire circuit. While full scale models can be complex and expensive to build, you can create a simple electric generator easily. All you need to do is create a simple frame to hold the wire and magnet, wind the wire, connect it to an electrical device, and glue the magnet onto a spinning shaft. This even works well to teach electromagnetic properties, or display as a science project.
Steps
Building the Frame
-
1Cut the cardboard. Cardboard will serve as the frame and support for your simple generator. Use a ruler to measure a cardboard strip that is 8 centimetres (3.1 in) by 30.4 centimetres (12.0 in). Cut this strip out with scissors or a utility knife. This single piece will be folded to form the frame.[1]
-
2Mark the cardboard. Use a ruler to measure along the length of the cardboard. Make your first mark at 8 centimetres (3.1 in). Your second mark should be at 11.5 centimetres (4.5 in), and your third mark should be at 19.5 centimetres (7.7 in). The final mark will be at 22.7 centimetres (8.9 in).[2]
- This creates segments of 8 centimetres (3.1 in), 3.5 centimetres (1.4 in), 8 centimetres (3.1 in), 3.2 centimetres (1.3 in), and 7.7 centimetres (3.0 in). Do not cut these segments.
Advertisement -
3Fold the cardboard. Fold the cardboard along each mark. This will make your flat piece of cardboard into a rectangular frame. This frame will house the components of your electric motor.[3]
-
4Slide the metal shaft through the support frame. Push a nail through the center of the cardboard frame. Make sure you go through all three pieces of cardboard that are folded into the center. This will create the hole for your shaft. You can now insert a metal shaft, or use the nail as your shaft.[4]
- The metal shaft does not have to be anything in particular. Any piece of metal that will fit through the hole and come all the way out the other side of the frame is acceptable. The nail you use to make the hole will work perfectly.


Creating the Circuit
-
1Wind the copper wire. Make several turns around the cardboard box with enamel coated copper wire (#30 magnet wire). Wind 200 feet (61 m) of wire as tight as you can. Leave about 16 to 18 inches (40.6 to 45.7 cm) of wire loose on each end to connect to your meter, light bulb, or other electronic device. The more "turns" or winds you make around the cardboard frame, the more power your generator should produce.[5]
-
2Strip the ends of the wire. Use a knife or a wire stripper to remove the insulation from each end of the wire. Remove about 2.54 centimetres (1.00 in) of insulation from each side. This will allow you to connect the wire to an electronic device.[6]
-
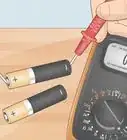
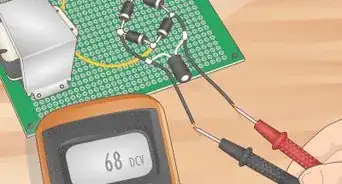
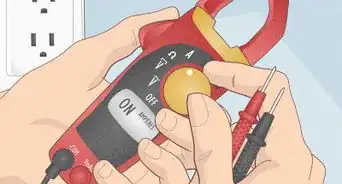
3Connect the wires to an electronic device. Attach the two wires you have loose at the ends of the windings to a red LED, #49 miniature bulb, or a 1.5V grain-of-wheat lamp. Or, connect the test leads from an AC voltmeter or multimeter to them. Keep in mind that you are producing a very low voltage, and larger devices (e.g. a regular light bulb) will not be powered by this generator.[7]


Setting the Magnets
-
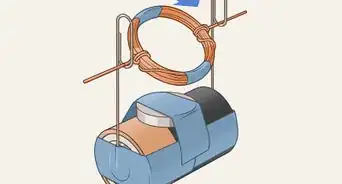
1Glue the magnets to the shaft. Use a high strength hot melt glue or epoxy to glue four ceramic magnets to the shaft. You want the magnet to be stationary with respect to the shaft. The magnets should be glued onto the shaft after the shaft has been inserted into the frame. Allow the glue to dry for several minutes (the instructions on the container can tell you exact drying times for your type of glue).[8]
- For best results, use 1x2x5 cm ceramic magnets (these can be found online for a reasonable price). Glue them so that two magnets are facing the coil with their north side, and two are facing the coil with their south side.
-
2Turn the shaft with your fingers. This allows you to see if the ends of the magnets hit the inside of the frame. The magnets must turn freely, but as close as possible to the walls of the frame. Again, having the magnet's ends as close the copper wire windings as possible will increase the "exciting" action of the magnetic fields the magnet produces.[9]
-
3Spin the shaft as fast as possible. You may want to wind a string around the end of the shaft, then pull it sharply to turn the magnets. You could even just spin it with your fingers. As the shaft turns, you should get a small voltage (enough to light a 1.5 volt light bulb).[10]
- You could improve the power output by putting a pinwheel on the end of the shaft and connecting it to an electric fan to turn the wheel. Keep in mind that this is only good to demonstrate the operation of the generator since you use more electricity turning it than you create.


Community Q&A
-
QuestionCan the wires overlap?
 Community AnswerYes, they can, but your generator might not be quite as efficient. It would be better to not let the wires overlap.
 -
QuestionCould I possibly add more copper wire and another magnet to produce more power?
 Community AnswerYes, increasing the number of turns of copper wire or increasing the magnetic field by adding another magnet would produce more power.
 -
QuestionWhat is the concept of simple electric generator?Community AnswerThe magnet applies a magnetic field to the coil. While applying a magnet field, this is combined with constant movement of the magnet, and an electric charge is created.
Things You'll Need
- #30 Magnet wire
- Four 1x2x5 cm ceramic magnets
- Thick nail or shaft
- Cardboard box
- Multimeter or electrical device


References
- ↑ https://www.youtube.com/watch?v=k7Sz8oT8ou0
- ↑ https://www.youtube.com/watch?v=k7Sz8oT8ou0
- ↑ http://amasci.com/coilgen/generator_1.html
- ↑ https://www.youtube.com/watch?v=k7Sz8oT8ou0
- ↑ https://www.youtube.com/watch?v=k7Sz8oT8ou0
- ↑ http://amasci.com/coilgen/generator_1.html
- ↑ https://van.physics.illinois.edu/qa/listing.php?id=574&t=powering-a-light-bulb-with-a-battery
- ↑ http://amasci.com/coilgen/generator_1.html
- ↑ http://amasci.com/coilgen/generator_1.html
About This Article

To make a simple electric generator, start by building a small frame out of cardboard. Next, wind the copper wire tightly around the cardboard several times, leaving 16-18 inches of wire loose on each end. Strip 1 inch of insulation off the ends of the wire and connect the wires to an electronic device. Then, glue the magnets to the shaft, turn the shaft until you see the ends of the magnets hit the frame, and spin the shaft as fast as possible to power the generator! For more tips on building your cardboard frame, read on!