X
wikiHow is a “wiki,” similar to Wikipedia, which means that many of our articles are co-written by multiple authors. To create this article, 9 people, some anonymous, worked to edit and improve it over time.
This article has been viewed 98,012 times.
Learn more...
Footnotes are text references that occur at the bottom of a page and are noted with a superscript number within the body of your document. Footnotes are very useful for providing additional information about a piece of text or referencing a source. Knowing how to add footnotes in InDesign is a useful skill for designing print documents such as research papers, magazines or books.
Steps
-
1Purchase Adobe InDesign if you do not already own it.
-
2Install InDesign on your computer according to the instructions provided and restart your computer if necessary.Advertisement
-
3Familiarize yourself with InDesign's workspace and resources that are available to InDesign users.
-
4Open InDesign.
-
5Open the InDesign document you will be working from. Do this by selecting File>Open from InDesign's Control panel, which is located at the top of your workspace. If you do not have an existing InDesign document to work from, create a new document by selecting File>New>Document and specifying the settings for your new document.
-
6If you need to import text, you can do so by selecting File>Place from your Control panel. Navigate to the file you wish to place and double click the file name. You may need to add additional text frames on additional pages if you import a large amount of text.
-
7Locate the portion of your text that requires a footnote. Select the Type tool from the Tools palette and click the point where you would like to insert the footnote's in-text reference.
-
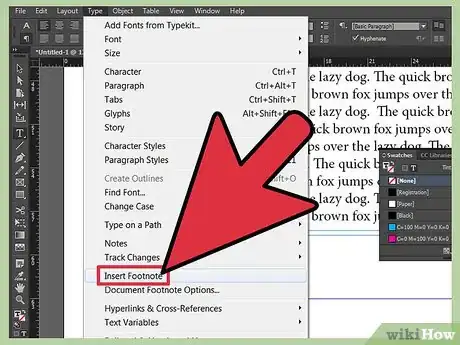
8Select Type>Insert Footnote from your Control panel. Enter your footnote's text. The area on the page where your footnote appears will automatically expand upward to accommodate your footnote until it reaches the line InDesign places to divide your text from your footnote. If your footnote expands beyond this point, it will flow to the following text frame or column.
- Select Type>Document Footnote Options from your Control panel. In the box that appears, click on the Numbering and Formatting tab to modify the numbering and format of your footnote's in-text reference and text.
- Select a numbering style for your footnote's in-text reference, the starting number for your footnote and if and where you want footnote numbers to restart.
- Specify the position of your footnote's in-text reference if you prefer to use something other than a superscript number and set paragraph and character styles for your footnote's in-text reference.
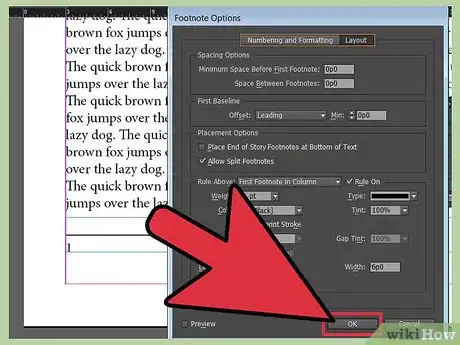
- Specify the amount of white space that appears between the footnote's reference number and the footnote text. lick the Layout tab in the Footnote Options box to modify your footnote's appearance.
-
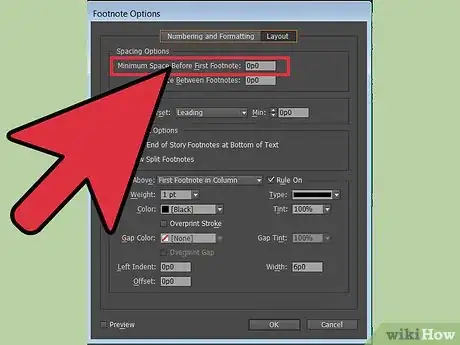
9Set the minimum amount of space you want to appear between the bottom of your text frame and your footnote.
-
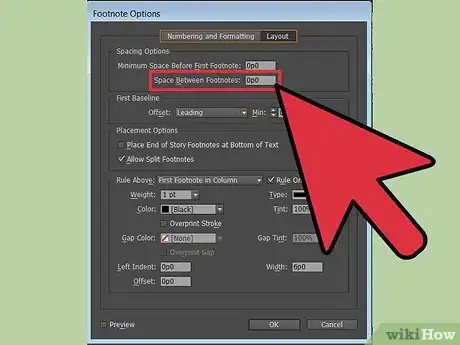
10Set the amount of space you want to appear between each footnote.
-
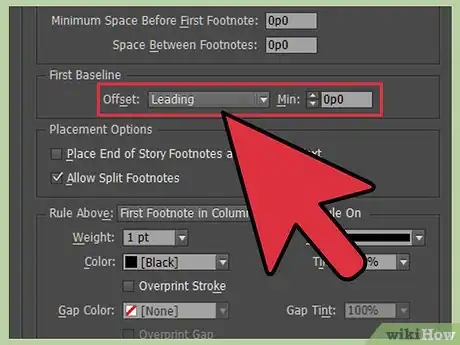
11Set the amount of space you want to appear between the line that separates your footnote from your text frame and your footnote.
-
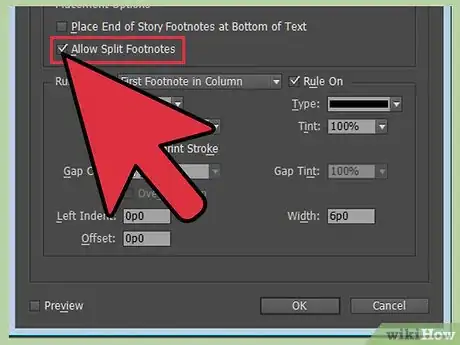
12If you want to allow footnotes to be split across multiple pages, select this option.
-
13Click okay once you have made your desired changes.
Advertisement
Things You'll Need
- Computer
References
About This Article
Advertisement


