This article was co-authored by Ryaan Tuttle. Ryaan Tuttle is a Home Improvement Specialist and the CEO of Best Handyman, Inc. in Boston, Massachusetts. With over 17 years of experience, he specializes in building home service businesses, focusing on creating scalable and efficient brands. With the help of his global team, the companies have achieved over 10+ million in sales and received recognition through magazine features, and enjoy partnerships with wikiHow and Jobber field service software. Boston Magazine and LocalBest.com have named Best Handyman Boston the Best Handyman in Boston. Ryaan holds Construction Supervisor and Home Improvement Contractor Licenses.
There are 11 references cited in this article, which can be found at the bottom of the page.
This article has been viewed 424,895 times.
You can use a tap to cut threads in a hole drilled in metal, such as steel or aluminum, so you can screw in a bolt or screw. The process of tapping a hole is actually pretty simple and straightforward, but it’s important that you do it right so your threads and hole are even and consistent. Choose a drill bit and a tap that fits the screw or bolt you want to use by making sure they’re the same size. For safety, it’s also important that you steady the item you’re drilling and you use the right drill bits.
Steps
Drilling the Hole for the Threads
-
1Choose a tap and drill set in the size you need. Tap and drill sets include drill bits and taps that match each other so you can drill a hole with the bit, then use the tap that corresponds to it to add threads. Look for a set that includes both taps and drill bits at your local hardware or home improvement store.[1]
- You can also order tap and drill sets online.
-
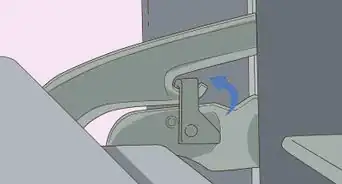
2Clamp the metal in place with a vise or C-clamp so it doesn’t move. If the metal that you’re drilling moves, it could cause the drill bit to slip off, which could potentially cause an injury. Place the metal in a vise and tighten it so it’s secure, or attach a C-clamp on it to hold it in place.[2]
- Keeping the metal steady also helps the drill penetrate it more easily.
Advertisement -
3Use a center punch to make a divot where you plan to drill. A center punch is a tool that’s used to knock a divot into a surface, allowing a drill to grip and penetrate the surface more effectively. Use an automatic center punch by placing the tip against the metal and pressing down until it knocks a divot. For a regular center punch, place the tip against the metal and use a hammer to tap the end and create a divot.[3]
- If you plan on drilling multiple holes, use your center punch to make divots where you want to drill them.
-
4Insert the drill bit into the end of your drill. Put the drill bit into the chuck, which is the end of your drill. Tighten the chuck around the bit so it’s held securely in place.[4]
-
5Apply drilling oil into the divot. Drilling oil, also known as cutting oil or cutting fluid, is a lubricant that helps prevent the drill bit from overheating and makes it easier to cut through the metal. Squeeze a drop of the oil directly into the divot.[5]
- It’s really important that you lubricate the metal to reduce friction and heat. If the metal gets too hot, it can harden and make it difficult to use your tap.
- If you don’t have drilling oil, use basic 3-in-1 oil as a lubricant.
- You can find drilling oil at your local hardware store and by ordering it online.
-
6Place the end of the drill bit into the divot and start drilling slowly. Take your drill and hold it over the divot so the bit is pointing straight down. Press the end of the bit into the divot, apply pressure, and start drilling slowly to begin penetrating the surface.[6]
- It’s important that you start drilling slowly so the bit is able to grip and pierce the metal.
- Be sure to keep the drill bit pointing straight down so the hole is straight for your tap.
- If you have a drilling machine, also known as a drill press, use that to drill your hole.
-
7Bring the drill up to medium speed and apply consistent pressure. As the bit cuts into the metal, slowly increase the speed of the drill. Keep the drill at slow to medium speed and apply gentle but consistent pressure against it.[7]
- Don’t push too hard on the drill or the bit could bend or snap.
- Once you get to medium speed, keep the speed constant.
-
8Remove the drill every 1 inch (2.5 cm) to blow out flakes. Metal flakes and shavings will create more friction and cause your drill bit to heat up. It can also make the hole uneven and rough. As you’re drilling through the metal, remove the bit every now and then to blow out the metal flakes and shavings. Then, replace the drill and continue cutting until you pierce through the metal.[8]
- If your drill is struggling to cut through the metal or the bit is getting hot, apply more drilling oil into the hole.


Threading the Hole
-
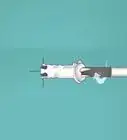
1Insert the tap that matches the hole into a T-handle. A T-handle is a device that allows you to manually tap a drilled hole and create threads for screws and bolts. Insert the tap into the end of the T-handle and tighten the jaws around the tap so it’s held securely.[9]
- You can find T-handles at your local hardware store, home improvement store, or by ordering them online.
-
2Apply drilling oil into the hole to lubricate it. Squeeze a drop or 2 of the drilling oil directly into the hole to help make it easier for your T-handle to tap it and create threads. Wipe away any excess oil that drips through the other side of the hole with a clean towel.[10]
- You can also apply some drilling oil directly to the threads of your tap.
-
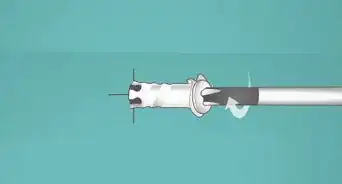
3Fit the end of the tap into the hole so it’s straight. Align the tap so it’s pointing straight down and lines up with the hole you drilled. Stick the end of the tap into the hole and double-check that it’s lined up straight so the threads you create will be in the right alignment.[11]
- Once you thread a hole, it will be difficult to re-thread it, so make sure it’s lined up right!
-
4Rotate the T-handle to thread your hole with the tap. Turn the T-handle clockwise to start tapping the hole and creating threads. Keep turning the handle in the same direction using smooth rotations. Avoid putting too much pressure on the T-handle and allow the tap the thread the hole on its own so they’re even and consistent.[12]
- Applying pressure while you rotate can cause the threads to be uneven, which means your screws or bolts may not fit into them.
-
5Turn the T-handle the opposite direction to remove the tap. Keep turning the T-handle until it sticks out of the other side of the hole. Then, gently rotate it counterclockwise to start moving it back out of the hole. Keep turning the handle until you’re able to remove the tap from the hole.[13]


Community Q&A
-
QuestionWhich checks should I perform before using a tap?
 Community AnswerMake sure that the hole and tap are lubricated and the hole is free of debris. Check for chips on the tap itself, and check the working conditions of your tools before and during use. The last thing you need on a job like this is to have a tap sheared off inside the hole.
 -
QuestionWhat should I do if my tap won't turn?
 Community AnswerYou should ask for help from a plumber.
 -
QuestionHow do I apply hand threading with hand and tap set?
 Community AnswerSame guidelines as outlined above: check size of screw you want, obtain appropriate tap, pre-drill, use tap with tap handle and turn counterclockwise 1/3 for every full turn so that tap does not get stuck with debris.
Warnings
- Make sure you use a metal cutting drill bit to avoid potential injuries.⧼thumbs_response⧽
Things You’ll Need
- Power drill
- Tap and drill set
- T-handle
- Drilling oil
- Automatic center punch
- Vise or C-clamp


References
- ↑ https://youtu.be/U5QU_3qUigk?t=34
- ↑ https://www.bobvila.com/articles/479-drilling-with-care/
- ↑ https://youtu.be/X9VhONdGFFg?t=162
- ↑ https://youtu.be/X9VhONdGFFg?t=299
- ↑ https://youtu.be/X9VhONdGFFg?t=317
- ↑ https://youtu.be/PqV-rVZjIH8?t=46
- ↑ https://www.bobvila.com/articles/479-drilling-with-care/
- ↑ https://www.bobvila.com/articles/479-drilling-with-care/
- ↑ https://youtu.be/H9G9NLJ87as?t=78
About This Article