This article was written by Dave Jones and by wikiHow staff writer, Christopher M. Osborne, PhD. Dave Jones is a Professional Plumber and the Midwest Regional Vice President at Roto-Rooter Plumbing & Water Cleanup. In 1992, Jones joined Roto-Rooter as a drain service technician at the age of 18. Since then, he has risen through the ranks into positions of increasing authority. Dave served as general manager of Roto-Rooter’s Charlotte, North Carolina, and Atlanta, Georgia branches before being promoted to Contractor Area Manager and later to Regional Vice President. Dave holds Master Plumber Licenses in Pennsylvania, North Carolina, and Georgia.
This article has been viewed 19,517 times.
While the brand has a good reputation, you might find yourself having to fix a leaky Delta bathroom sink faucet. Delta makes a wide range of faucets, so this article focuses on two popular types: a double-handled faucet that relies on internal cartridges, and a single-handled faucet that uses a ball bearing to control water flow. In either case, this is nearly always a DIY-friendly repair job that doesn’t require calling in a plumber.
This article is based on an interview with our professional plumber, Dave Jones. Check out the full interview here.
Steps
Fixing a Two-Handle Delta Faucet
-
1Confirm that the leak is at either the handle or spout. If your two-handled cartridge-style faucet is dripping from the spout, it’s likely due to faulty rubber O-rings. If the leak is coming from the base of one or both handles, one or both of the internal cartridges is likely to blame.[1]
- Because you have to pull out the cartridge to fix the leak in any case, you may opt to just replace the entire internal setup regardless of the type of leak.[2]
-
2Close one supply line to see if it’s a hot or cold water leak. For instance, close only the hot water supply by turning the shutoff valve in the sink cabinet clockwise. If the leak stops, you know the hot water is the culprit. If it’s still leaking, open the hot and close the cold to confirm that you don’t have both hot and cold water leaks.[3]Advertisement
-
3Shut off both supply lines and open both taps to drain them. Close both the hot and cold supply lines under the sink cabinet, then open both the hot and cold taps until all the water in the lines has drained out. If the water doesn’t stop completely within a few seconds, you likely have a faulty shutoff valve that needs repaired—but you can continue with the faucet repair for the time being.[4]
-
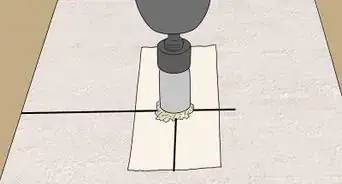
4Lay a towel in the sink to cover the drain and protect the basin. This simple measure can save you from losing a set-screw or other small part down the drain, or from scratching up your sink basin with one of your tools. So don’t skip it![5]
-
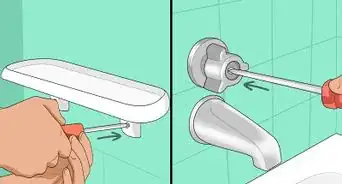
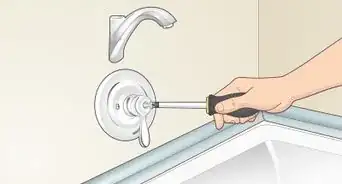
5Remove the leaky tap’s handle via its cap or hex screw. If the handles have decorative caps (often labeled with “H” and “C”) on top, pry off the relevant cap with the flat edge of a screwdriver. Unscrew the set-screw beneath the cap and lift off the handle.[6] If the handle doesn’t have a decorative cap, look for a small notch that accepts a thin Allen wrench (hex wrench). Loosen the small screw in the notch until you can lift off the handle.[7]
- If you need an Allen wrench (hex wrench), Delta faucets usually require the 1⁄8 in (3.2 mm) diameter size.
-
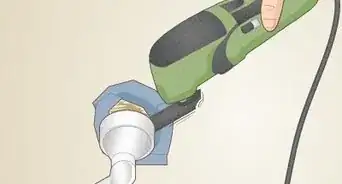
6Loosen the threaded collar with an adjustable wrench or pliers. Adjustable joint pliers (also known as slip-joint pliers or the brand name Channellocks) are ideal for this task. Grip the octagonal collar firmly and rotate it counterclockwise with a series of short turns until it comes loose and can be removed.[8]
- If the collar is already loose, there’s a small chance that you may be able to quickly fix the leak right here and now. Use your wrench or pliers to tighten the collar fully (stopping when you feel moderate resistance). Then put the handle back on, turn on the water, and check to see if the leak is fixed. If so, you’re all done![9]
-
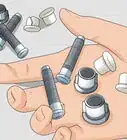
7Grip the cartridge stem with pliers and pull straight up. The cylindrical white plastic cartridge will have a thinner metal or plastic stem at the top. Clench the stem firmly with needle-nose pliers, wiggle the cartridge back and forth a few times, then pull straight up to remove it.[10]
- You might want to snap a photo of the cartridge before and right after you pull it out to give yourself a visual record of its correct orientation when installed.
-
8Pick any debris out of the opening with your pliers. Once the cartridge is out, grab a flashlight and take a good look into the opening. Remove any bits of plastic, rubber, or other debris that might end up blocking the proper flow of water.[11]
-
9Decide if you’ll replace the O-rings or the whole cartridge. If the cartridge appears to be in good condition, you might consider replacing the cartridge’s black rubber O-rings—especially if your leak is a dripping spout. Cartridges often have two O-rings, one at the bottom and one closer to the top, and they can be removed with needle-nose pliers. Alternatively—and perhaps preferably—just replace the entire cartridge at this point since you’ve already removed it.[12]
- If an O-ring is brittle, frayed, torn, misshapen, or discolored, always replace it. Similarly, replace the cartridge if it shows any signs of excessive wear or damage, such as cracks or heavy discoloration.
- If the leak is coming from the base of the faucet handle, definitely replace the entire cartridge instead of just the O-rings.
-
10Take the old parts to a hardware store to get replacements. Faucet cartridges have subtle differences, even among Delta models, so use the old parts to get exact matches. Delta replacement parts are widely available at home improvement retailers, so you shouldn’t have trouble finding them at your local store.[13]
- If you have the model name and/or number for your Delta faucet, write it down and bring it along as well.
- If you’re just buying new O-rings instead of a complete cartridge, make sure the replacements are an exact size and shape match. Alternatively, buy an O-ring “variety pack” for around $10-$15 USD.
- Delta replacement cartridges typically cost around $15-$30 USD. You may be able to find cheaper non-Delta-approved cartridges for $10-$15, but these may void Delta’s warranty for your faucet.
-
11Press the new cartridge down into place by hand. If you’re replacing only the O-rings, stretch and slide these into place on the old cartridge. Then, line up the cartridge in the same orientation as before—if you took photos during the removal, use them as a guide. Press down firmly to seat the cartridge in the opening.[14]
- Here’s a frustrating fact about faucet cartridges: they’ll often fit into place even when oriented incorrectly, which will lead to another leak or a lack of water flow.
-
12Tighten the threaded collar over the new cartridge. Slide the collar over the cartridge and onto the threads on the fixture. Turn it clockwise by hand until it’s snug, then use your adjustable pliers or wrench until you feel moderate resistance. Don’t over-tighten the collar—if you do, you may not be able to get it off next time you do repairs.[15]
-
13Reinstall the handle based on how you removed it. For a ball-shaped handle, set the handle on top of the cartridge, thread the set-screw into the opening and tighten it until you feel moderate resistance, then snap the top cap back into place. For a lever-like handle, set the handle in place and then tighten the small hex screw in the notch with your Allen wrench (hex wrench) until you feel moderate resistance.[16]
-
14Turn on the water and check for leaks. Open both water supply valves in the under-sink cabinet and watch for leaks at the faucet. If it passes this test, turn on both the hot and cold taps and watch for leaks at the base of the handle, then turn off both taps and look for dripping from the spout. If you have no leaks and no drips, your work here is done![17]


Fixing a Single-Handle Delta Faucet
-
1Pinpoint the leak at either the spout or handle. Since you’re dealing with a one-handled faucet with an internal ball bearing, the ball bearing itself is the likely culprit if the leak is coming from under the handle. If, however, you’re dealing with a drip from the spout, the problem may be the round rubber gaskets inside the handle that are known as “seats.”[18]
- Since you need to remove the ball bearing to fix either type of leak, consider replacing the entire ball bearing mechanism (including gaskets, washers, etc.) no matter which leak you’re dealing with.[19]
-
2Turn off the supply lines and drain the hot and cold taps. Reach into the under-sink cabinet and turn both the hot and cold supply line valves clockwise to close them. After that, turn on the faucet until water stops coming out of the spout. If you continue to have a slow drip, you can still do the faucet handle repair now—but be sure to get your shutoff valves fixed sooner rather than later![20]
-
3Cover the sink basin and drain with a work towel or rag. Sure, this little step doesn’t seem important—until, that is, you scratch up your sink by dropping your wrench or lose a set screw down the drain! So take the few extra seconds now to save yourself from the potential for lots of aggravation later.[21]
-
4Remove the handle via its decorative cap or hex screw. If you see a small notch with a hexagonal screw head in it, insert an Allen wrench (hex wrench)—likely 1⁄8 in (3.2 mm) in diameter for Delta faucets—into the notch and loosen the screw until the handle comes free.[22] Otherwise, look for a decorative cap (which might be labeled “Delta”) on top of the handle and pop it off with the blade of a screwdriver. Loosen the set-screw underneath to free the handle.[23]
- Lift off the handle once you’ve loosened either the hex screw or set-screw.
-
5Unscrew and remove the collar and the dome-shaped cap. Start by loosening and removing the hexagonal holding collar with an adjustable wrench or adjustable pliers (e.g., Channellocks). Then do the same to remove the dome-shaped cap. Turn counterclockwise in short bursts to loosen the components, especially if they don’t want to budge at first.[24]
- If you’re lucky, there’s a small chance your repair can end right here! If the collar or cap is already loose, try tightening both with your wrench or pliers until you feel moderate resistance. Then put the handle back on and turn on the water. If you still have a leak, undo everything again and resume the more complete repair.
-
6Lift out the cam, washer, ball, seats, and springs as they appear. The stem of the ball bearing comes up through the openings in the disc-shaped cam and the flexible washer (packing washer) beneath the cam, so use the stem to pull out all these parts at once. Look in the opening, locate two small rubber seats (round gaskets), and pull these out with needle-nose pliers. Do the same with the pair of springs underneath the seats.[25]
- As an insurance policy when it comes time to put everything back, take some photos (or a video) showing how the parts fit together.
-
7Get matching replacement parts. Ordering replacement parts from Delta is a great option, but it’s also easy to take everything you removed with you to the hardware store. Consider getting only new seats and springs, or play it safe and buy a matching kit with the entire ball bearing setup.[26]
- Delta-branded ball bearing replacement kits cost around $25-$35 USD, while Delta-compatible (but possibly not warranty-approved) kits typically cost around $15-$25 USD. A set of replacement seats and springs costs around $5-$10 USD.
-
8Install the new parts in reverse order of removal. Start by sliding one of the seats, flat side first, onto the long end of your Allen wrench (hex wrench), then slide on one of the springs, narrow side first. Dip the wrench tip down to one of the notches at the base of the opening and slide the parts into place, then repeat with the other seat and spring. Continue as follows:[27]
- Slip the packing washer and then the cam onto the stem of the ball bearing.
- Grasp the stem with your fingers and set the ball bearing down into the opening.
-
9Screw on the cap, tighten the collar, and install the handle. Slip the dome-shaped cap over the stem and tighten it by hand and then with your wrench or pliers until you feel moderate resistance. Slide the collar over the cap and tighten it up the same way.[28]
- Don’t over-tighten these parts or you may damage the ball bearing or make future removal extremely difficult.[29]
-
10Put the water back on and test your repair job. Reach into the sink cabinet and open the hot and cold shutoff valves, then watch for leaks at the faucet. Turn on the faucet, check for leaks again, then close the tap and check one last time for leaks.[30] If, at this point, you’re still dealing with a leak, it may be time to call in a plumber.[31]


Things You’ll Need
- Work towel or rag
- Slip-joint pliers or adjustable wrench
- Delta-approved replacement parts
- Screwdriver
- Allen (hex) wrench
- Needle-nose pliers


References
- ↑ https://www.deltafaucet.com/design-innovation/inspiredliving/how-to-fix-a-leaky-faucet
- ↑ https://www.thisoldhouse.com/kitchens/21097141/how-to-stop-kitchen-faucet-leaks
- ↑ Dave Jones. Master Plumber, Roto-Rooter Plumbing & Water Cleanup. Expert Interview. 29 March 2021.
- ↑ https://youtu.be/T5DImWddq5w?t=2
- ↑ Dave Jones. Master Plumber, Roto-Rooter Plumbing & Water Cleanup. Expert Interview. 29 March 2021.
- ↑ Dave Jones. Master Plumber, Roto-Rooter Plumbing & Water Cleanup. Expert Interview. 29 March 2021.
- ↑ https://www.deltafaucet.com/design-innovation/inspiredliving/how-to-fix-a-leaky-faucet
- ↑ Dave Jones. Master Plumber, Roto-Rooter Plumbing & Water Cleanup. Expert Interview. 29 March 2021.
- ↑ https://www.deltafaucet.com/design-innovation/inspiredliving/how-to-fix-a-leaky-faucet
- ↑ Dave Jones. Master Plumber, Roto-Rooter Plumbing & Water Cleanup. Expert Interview. 29 March 2021.
- ↑ Dave Jones. Master Plumber, Roto-Rooter Plumbing & Water Cleanup. Expert Interview. 29 March 2021.
- ↑ https://youtu.be/T5DImWddq5w?t=48
- ↑ https://youtu.be/T5DImWddq5w?t=48
- ↑ Dave Jones. Master Plumber, Roto-Rooter Plumbing & Water Cleanup. Expert Interview. 29 March 2021.
- ↑ Dave Jones. Master Plumber, Roto-Rooter Plumbing & Water Cleanup. Expert Interview. 29 March 2021.
- ↑ Dave Jones. Master Plumber, Roto-Rooter Plumbing & Water Cleanup. Expert Interview. 29 March 2021.
- ↑ Dave Jones. Master Plumber, Roto-Rooter Plumbing & Water Cleanup. Expert Interview. 29 March 2021.
- ↑ https://www.deltafaucet.com/design-innovation/inspiredliving/how-to-fix-a-leaky-faucet
- ↑ https://www.thisoldhouse.com/kitchens/21097141/how-to-stop-kitchen-faucet-leaks
- ↑ https://youtu.be/T5DImWddq5w?t=2
- ↑ Dave Jones. Master Plumber, Roto-Rooter Plumbing & Water Cleanup. Expert Interview. 29 March 2021.
- ↑ https://www.deltafaucet.com/design-innovation/inspiredliving/how-to-fix-a-leaky-faucet
- ↑ Dave Jones. Master Plumber, Roto-Rooter Plumbing & Water Cleanup. Expert Interview. 29 March 2021.
- ↑ https://www.deltafaucet.com/design-innovation/inspiredliving/how-to-fix-a-leaky-faucet
- ↑ https://www.deltafaucet.com/design-innovation/inspiredliving/how-to-fix-a-leaky-faucet
- ↑ https://www.deltafaucet.com/design-innovation/inspiredliving/how-to-fix-a-leaky-faucet
- ↑ https://www.deltafaucet.com/design-innovation/inspiredliving/how-to-fix-a-leaky-faucet
- ↑ https://www.deltafaucet.com/design-innovation/inspiredliving/how-to-fix-a-leaky-faucet
- ↑ Dave Jones. Master Plumber, Roto-Rooter Plumbing & Water Cleanup. Expert Interview. 29 March 2021.
- ↑ Dave Jones. Master Plumber, Roto-Rooter Plumbing & Water Cleanup. Expert Interview. 29 March 2021.
- ↑ https://youtu.be/T5DImWddq5w?t=79
About This Article