This article was co-authored by Kevin Snow. Kevin Snow is a Commercial Painting Professional and the Owner of Ridge Painting Company. With over 12 years of experience, he specializes in painting commercial facilities and new build constructions. Kevin and his team are fully licensed and insured.
There are 11 references cited in this article, which can be found at the bottom of the page.
This article has been viewed 13,501 times.
If your shower is looking a little worn out or you’re just ready for a change, you might think you have to replace the whole thing. Not so fast! You can actually re-paint the shower, and the tub if you have one, for a fresh new look. Whether your shower is made of tile, stone, or fiberglass, these tricks should help. You'll have to go through a few extra cleaning and prep steps, but overall it’s not any harder than painting a wall. If you’re ready to update your bathroom, get started now!
Steps
Cleaning the Surface
-
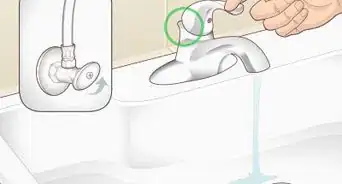
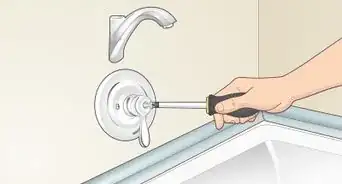
1Remove the hardware around the shower and tub. The shower probably has knobs, a shower and bath head, drain coverings, and maybe handles to help get in and out. Remove the screws holding all of this hardware on by turning them counterclockwise. Take each piece off carefully so it’s not in the way while you paint.[1]
- If the shower has a door instead of a curtain, it’ll be a lot easier to paint if you take this off too. However, you can also paint around it.
- Keep all of these pieces in a safe spot so you don’t lose them. Storing everything in a bucket or plastic bag is helpful.
-
2Scrape off any old caulk around the shower and tub. Check all around the shower and tub for leftover caulk. Scrape this off with a razor blade or putty knife, and be careful not to scratch the shower. Then sand the spot down with sandpaper to get rid of any remnants.[2]
- Wear gloves while you’re using a razor blade so you don’t get cut.
- If the caulking won't budge, soak it with some caulk remover first. You can get this at any hardware store.
- You don’t have to remove caulking around the border of the shower if you’re only painting it. Only look for spots where caulk is on the tile or fiberglass shell.
Advertisement -
3Clean the shower with bleach and water to kill mildew. Regular cleaning won’t get rid of mildew, and this could prevent the paint from sticking. Mix 1 part of bleach with 9 parts of water in a bucket. Then use a sponge and scrub the entire interior of the shower and tub. Make sure to focus on dark spots where mildew is growing.[3]
- Wear rubber gloves while you’re handling bleach so your skin doesn’t get irritated.
- Mildew especially likes to grow in corners and along edges.
- Keep the window open while you’re cleaning the shower. Some of these chemicals are pretty harsh. If you don’t have a window, run the fan in the bathroom.
-
4Scrub the shower with a bathroom cleaner. Leftover soap scum will ruin the paint, so the shower has to be totally clean.[4] Any standard bathroom cleaner like Comet will work. Wet the shower and spray or sprinkle the cleaner all over the shower and tub. Then use a rough sponge and scrub the entire shower with firm pressure.[5]
- It’s best to use an abrasive cleaner in powder form to really scrub off any soap scum.
- Don’t worry about scrubbing too hard. You’ll be sanding the shower anyway, and you really need to get rid of any leftover soap scum.
-
5Wipe the shower down with acetone to get rid of leftover suds. The cleaner could leave behind soap scum, so you’ll need to get rid of all of it. Wet a rag or sponge with acetone and wipe the entire shower and tub to remove any leftover suds.[6]
- Wear rubber gloves while you're handling acetone and be careful not to splash any on your skin or in your eyes. Keep the bathroom window open so the room is ventilated.[7]
- You could also use a different solvent like paint thinner or mineral spirits.
- Don’t rinse the shower with water. This could leave behind soap scum and suds and ruin the paint.
-
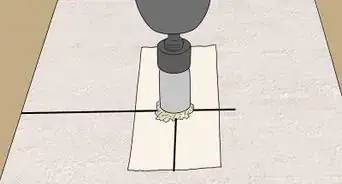
6Repair any holes or cracks with epoxy putty. If there is any damage to the tiles, fixing that is easy. Squeeze a dab of epoxy putty designed for bathroom repairs into a mixing tray and stir it for 15-20 seconds. Then scoop the epoxy into the hole and scrape the top so it’s flat. Wait about an hour for the epoxy to dry, then sand it smooth with 600-grit sandpaper.[8] Repeat this for any holes or cracks in the shower.
- You can find epoxy at any hardware store or online.


Sanding and Masking
-
1Sand the entire shower with 120-grit sandpaper. Hold the sandpaper tightly and rub the shower with a firm, back-and-forth motion. Repeat this over the entire shower and tub surface so the paint sticks better.[9]
- If the shower is wet, then a wet/dry sandpaper will work best.
- If the shower is fiberglass, that doesn't make a difference. Sand it the same way.[10]
- Sandpaper is rough, so it's best to wear gloves to protect yourself.
-
2Rinse the shower with water. Sanding can leave some dust around the shower and tub, and you don’t want that trapped under the paint. Spray some water and rinse everything down thoroughly to get rid of any debris.[11]
- If you still see some dust around the shower, wipe it off with a wet towel.
-
3Let the shower dry completely. The shower needs to be totally dry or the paint won’t stick. Wipe the shower down with dry towels. Then wait a few hours for everything to air-dry.[12]
-
4Tape off the border of the shower and tub. Use painters tape and place strips on the wall along the border of the shower. Also put tape on any of the fixtures and hardware you weren’t able to remove. This way, all the paint will stay exactly where you want it.[13]
- If the tub runs along the floor, remember to tape this spot off too.
- If the shower is even with the wall, like with a surround shell, just tape along the border where the shower ends.
- Masking tape could also work, but don’t use a sticky tape like duct tape for this.


Priming and Painting
-
1Get paint and primer designed for tile or fiberglass. It’s very important to get paint designed for the material you’re painting. Shower tiles are usually ceramic or porcelain, but they could also be natural stone or fiberglass. Get paint and primer designed for the material you’re painting.[14]
- For ceramic and porcelain, epoxy paint and primer are good to use.
- Polyurethane and epoxy work best for fiberglass.
- If you’re not sure what type of paint is best, ask an employee at the hardware store.
-
2Roll primer onto the shower and tub. Pour some primer into a painting tray and dip your paint roller in. Wet the roller lightly on all sides with the primer. Let the roller drip over the pan to get rid of excess primer. Then roll the primer around the shower with a smooth, up-and-down motion. Work your way from one side of the shower to the other until you’ve covered it all.[15]
- You could use a brush instead of a roller.[16] But this will take a lot longer.
- If any of the primer is dripping as you apply it, then the roller is probably too wet. Add a bit less primer the next time you wet it.
- There are also spray primers that might make the job faster. However, this isn’t safe to use in a place that isn’t well-ventilated. If you do want to use this, wear a respirator so you don’t breathe in any fumes.[17]
-
3Let the primer dry for 24-48 hours. Primer might take a little longer to dry on tile. Give it 24-48 hours to cure entirely before you start painting.[18]
- The drying time might be different for the type of primer you use. Always check the can for the drying instructions.
-
4Apply the first coat of paint. Use the same motion and technique that you used to apply the primer. Pour some paint into the tray and wet your roller lightly. Roll the paint onto the shower and tub, working side to side until you’ve covered everything in an even coat. Re-wet the roller as needed.[19]
- You might need to use a brush if there are any ridges or uneven parts in your shower.
- It’s okay if this coat doesn’t look perfect. This is only the first coat and it’ll look better when you’re done.
-
5Roll on the second coat after 24-48 hours. Let the paint dry for 24-48 hours before moving on. After it’s dry, apply a second coat the same way that you applied the first.[20]
- Remember to check the paint you’re using for the correct drying time.
-
6Let the paint cure for 3 days. Don’t touch the paint or get any water on it. Just wait and let it dry and cure entirely. In the meantime, you can remove the tape around the shower and clean everything up.[21]
-
7Seal the paint if your shower is tile. In a wet environment like your shower, the paint could start peeling before too long. That's where sealing comes in. Use a clear sealer designed for tile. Pour some into a cup, then brush it on all of the painted surfaces in the shower. Let it sit for 5 minutes, then wipe over it with a damp sponge to get rid of excess sealer.[22]
- The specific directions might vary depending on the brand of sealer you're using, so always follow those instructions.
-
8Replace the hardware that you removed from the shower and tub. Once the paint is all dried, cured, and sealed, you can use the shower again. Screw all of the hardware and fixtures back into place. Now enjoy your new shower!


Expert Q&A
-
QuestionHow do you paint a shower with epoxy paint?
 Kevin SnowKevin Snow is a Commercial Painting Professional and the Owner of Ridge Painting Company. With over 12 years of experience, he specializes in painting commercial facilities and new build constructions. Kevin and his team are fully licensed and insured.
Commercial Painting ProfessionalGive the shower a good cleaning and caulk any areas that might be open. Then, give it a good coat of epoxy paint—it's really simple to apply, though it does smell a lot stronger than most paints. Slip on a respirator so you don't breathe in any fumes, and use a brush or roller to apply the paint.
Things You’ll Need
- Gloves
- Paint
- Primer
- Sealer
- Rollers
- Brushes
- Sandpaper
- Bleach
- Water
- Bathroom cleaner
- Sponges
- Rags
- Painters tape
Warnings
- Always wear rubber gloves when you’re working with cleaning chemicals.⧼thumbs_response⧽


References
- ↑ https://www.bobvila.com/articles/how-to-paint-a-bathtub/
- ↑ https://youtu.be/QCNRIsgZ3hA?t=173
- ↑ https://www.bobvila.com/articles/how-to-paint-a-bathtub/
- ↑ Kevin Snow. Commercial Painting Professional. Expert Interview. 23 March 2022.
- ↑ https://todayshomeowner.com/how-to-paint-over-ceramic-tile-in-a-bathroom/
- ↑ https://www.bobvila.com/articles/how-to-paint-a-bathtub/
- ↑ https://www.nhsggc.org.uk/media/236208/msds-acetone.pdf
- ↑ https://youtu.be/mNxwrn_brJ0?t=57
- ↑ https://youtu.be/9qkssyahu0U?t=334
- ↑ https://youtu.be/QCNRIsgZ3hA?t=201
- ↑ https://todayshomeowner.com/how-to-paint-over-ceramic-tile-in-a-bathroom/
- ↑ https://todayshomeowner.com/how-to-paint-over-ceramic-tile-in-a-bathroom/
- ↑ https://www.bobvila.com/articles/how-to-paint-a-bathtub/
- ↑ https://www.bobvila.com/articles/painting-bathroom-tile/
- ↑ https://www.bobvila.com/articles/painting-bathroom-tile/
- ↑ Kevin Snow. Commercial Painting Professional. Expert Interview. 23 March 2022.
- ↑ Kevin Snow. Commercial Painting Professional. Expert Interview. 23 March 2022.
- ↑ https://makingprettyspaces.com/2019/04/25/complete-guide-to-painting-tile/
- ↑ https://www.bobvila.com/articles/how-to-paint-a-bathtub/
- ↑ https://www.bobvila.com/articles/how-to-paint-a-bathtub/
- ↑ https://www.bobvila.com/articles/how-to-paint-a-bathtub/
- ↑ https://youtu.be/YkmErGLH1DY?t=465
About This Article