This article was co-authored by wikiHow Staff. Our trained team of editors and researchers validate articles for accuracy and comprehensiveness. wikiHow's Content Management Team carefully monitors the work from our editorial staff to ensure that each article is backed by trusted research and meets our high quality standards.
This article has been viewed 28,188 times.
Learn more...
Ruling pens are an effective tool for creating beautiful drawings and calligraphy. Using the pen requires a bottle of ink to dip the tip into. Then you can create a variety of marks by turning the screw to adjust the prongs or holding the pen at a different angle. With some experimentation and perhaps a ruler for guidance, a ruling pen will provide your work with its own unique flair..
Steps
Filling the Pen with Ink
-
1Get a bottle of ink. Go to the arts and crafts store and find bottled ink. India ink is a strong, black ink commonly used with ruling pens, but feel free to try other colors as you please. At home, you can dip the pen directly into the ink bottle or pour out the ink into a container.[1]
- Oil paint also can be used with ruling pens. You’ll need to mix the paint with mineral spirits and a medium such as linseed oil to make it more fluid first.
-
2Dip the pen into the ink. Dip the pen tip about .5 inches (1.3 cm) into the ink. When you draw it back, you should see a bead of ink between the prongs. Dipping the pen means you’ll also get unwanted ink on the outside of the prongs, but this can be fixed before drawing.Advertisement
-
3Scrape ink between the prongs with a paintbrush for control. Roll a paintbrush in the ink, then scrape it against the inside of the prongs. It’ll give you more accuracy when filling the pen, so you won’t get any ink on its outside. That means there's no need to wipe down the pen with a paper towel or worry about smearing.[2]
-
4Blot the outside of the pen with a paper towel. If you notice ink on the outside of the prongs, wipe it off before drawing, unless you want some unintentional smears. Fold up a square of paper towel and dab the prongs. Be careful not to disturb the ink between the prongs!


Drawing and Writing Calligraphy
-
1Get thick paper to hold the ink. Ruling pens put down a lot of ink, so you’ll need special paper to absorb it. The best paper for your project has tooth, which means it feels rough. Cold press watercolor paper and paper made with more than 25% cotton handles ruling pens well.[3]
-
2Hold the pen upright for thinner letters. Hold the pen as you normally would between your thumb and index finger. For thinner lines, tilt the the pen upwards so that only the prong tips touch the paper. The pen will leave behind thin but dark lines for detailed drawings and smaller letters.[4]
-
3Use the pen’s broad edge to create thicker letters. Relax the pen so that the rest of the metal touches the paper. This causes the pen to put down more ink, producing thicker, more dramatic shapes and letters. The size of these marks depends on how long the edges of the prongs are.[5]
-
4Change your hand angle to vary your writing. As you draw, you’ll notice that how you hold your hand changes the marks the pen leaves. Raising your hand makes thinner characters and lowering your hand makes thicker ones. By altering your positioning as you draw, you can make your work appear more dynamic by changing the thickness of the lines.[6]
-
5Practice on scrap paper first. To develop familiarity with the pen, try drawing on scrap paper before attempting to ink your official artwork. With practice, you’ll get used to adjusting the pen to achieve the kind of shapes you want and how to achieve your desired effects.
-
6Refill your ink often. Soon enough you’ll notice that what you draw looks a little dim. Letters and shapes take up a lot of ink. Be ready to dip the pen back into the ink after you finish writing a letter or two. It’ll keep your letters and shapes looking evenly-colored throughout your work.


Drawing Lines
-
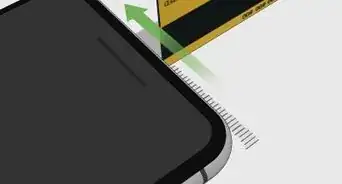
1Twist the pen’s screw to adjust the line width. Above the pen’s prongs, you’ll see a screw that you can use to adjust the prongs. Turn the screw to change the size of your lines. Moving the prongs closer together means you’ll get a thinner line.[7]
-
2Rest the pen body against a straight edge. Any standard straight edge or ruler you have on hand can be used here, but you’ll need to be careful. Lean the pen against the straight edge, keeping the prongs away from it. Angle the pen so the tips hit the area you wish to color.[8]
- The pen’s point must not be up against your straight edge. When you do this, the ink travels under the edge and smears.
- You can buy rulers or French curves that have beveled or elevated edges. The raised edge means that the pen won’t smear even if you hold it flat against the implement. Find these at office supply stores.
-
3Move the pen across the paper to draw the line. Hold the pen so that the flat parts of the prongs face to the right and left. Touch the pen’s tips to the paper. Now all you have to do is drag the pen across the page. As long as your hand doesn’t slip, you’ll have a crisp, thin line.
-
4Let the lines dry in air. Ruling pens put down a lot of ink or paint, so your lines can take a while to dry. It’s not uncommon for paint to take up to 30 minutes to dry. Be careful and avoid working too close to your lines until you’re certain they’re dry.


Drawing Circles
-
1Get a compass with a ruling pen attached. Compasses are often used in mathematics and drafting to draw perfect circles. You can typically find ones with ruling pens at a low price in office supply stores. If you order an old drafting tool set, you’ll probably find one of these in there too.
-
2Fill the prongs with ink. Fill the ruling pen with ink as you normally would. You can dip it in ink or brush on the ink with a paintbrush. Make sure you wipe off any ink outside the prongs with a paper towel.
-
3Adjust the compass screw for circle size. In addition to adjusting the pen’s screw for line width, you’ll need to adjust the compass to make it work properly. Look under the head of the compass for a screw that shortens and widens the gap between the legs. A larger gap means your circle will be bigger.
-
4Mark the center of the circle. Some compasses come with a pencil tip. If yours doesn’t, get a pencil or similar implement to note where the center of your circle will be. To get an even circle, you’ll need to keep the compass rooted to this point.
-
5Spin the compass to create the circle. Place the free end of the compass on the center mark, then gently rest the ruling pen on the paper. Make sure the ruling pen always touches the page. Hold the compass still as you spin it in place. When finished, you’ll have the perfect circle.


Community Q&A
-
QuestionCan I draw curved lines with a ruling pen?
 Community AnswerRuling pens are used for calligraphy, so yes, you can draw curved lines with a ruling pen.
Things You’ll Need
- Ruling pen
- Ink
- Paper towel or paintbrush
- Paper


References
- ↑ https://www.britannica.com/art/India-ink
- ↑ http://www.designsinkart.com/library/E-GouacheAnUntappedResource199203.htm
- ↑ http://calligrafile.com/blog/folded-pen-friday-part-2
- ↑ https://www.penaddict.com/blog/2017/6/20/handwritmic-brody-neuenschwander-ruling-pen-a-review
- ↑ http://calligrafile.com/blog/folded-pen-friday-part-2
- ↑ http://calligraphyforbeginners.com/
- ↑ https://www.penaddict.com/blog/2017/6/20/handwritmic-brody-neuenschwander-ruling-pen-a-review
- ↑ http://draftingmanuals.tpub.com/14064/css/Ruling-Pens-Cont-95.htm
About This Article