This article was co-authored by wikiHow Staff. Our trained team of editors and researchers validate articles for accuracy and comprehensiveness. wikiHow's Content Management Team carefully monitors the work from our editorial staff to ensure that each article is backed by trusted research and meets our high quality standards.
wikiHow marks an article as reader-approved once it receives enough positive feedback. In this case, several readers have written to tell us that this article was helpful to them, earning it our reader-approved status.
This article has been viewed 371,249 times.
Learn more...
Water levels are a great way to find a level spot on items like posts or stakes, so you can build structures that are even and correct. The simple construction and easy setup make a water level a popular tool to have on-hand for a variety of projects. Making a water level is easy with a few household items like tubing and water. You can then use the water level as needed so you have a level, even structure or item every time.
Steps
Setting up the Water Level
-
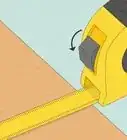
1Use 50 to 100 feet (15 to 30 m) of tubing with a 5⁄16 in (0.79 cm) diameter. A water level is easy to make at home with plastic tubing and a few other supplies. If you plan to level items that are a far distance from each other, you may opt for a longer tube. Keep in mind the longer the tube, the more water you will need to use.[1]
-
2Attach 1 end of the tubing to the flat side of a stake or dowel. Put the stake in the ground or clamp the stake to the end of a work table. Use nails or tape to attach the tube to the stake, making sure the open end of the tube is facing upward.[2]
- Make sure there are no kinks or knots in the tube so the water can flow easily through the tube.
Advertisement -
3Hold the other end of the tubing and fill it with water. Keep the end at the same height as the attached end of the tube, filling the tube until the water sits 2 to 3 inches (5.1 to 7.6 cm) below the attached end of the tube.[3]
- Check that there are no air bubbles in the water once you have filled the tube, as this can throw off the level.
-
4Put 1-2 drops of food coloring in the water to make it easier to see. This will make it easier to spot the level of the water in the tube.[4]
- Another option is to use windshield wiper fluid in the tube instead of water so the liquid is colored and easy to see.
-
5Use your thumbs or a cap on the ends to prevent the water from spilling. You can then move the water level to another spot so you can use it.[5]


Using the Water Level
-
1Bring the water level to the items you want to measure. The water level is often used to determine the level spot on 2 items that are at a distance from each other, such as posts or stakes in the ground. Make sure the items are in the ground or set up on a clamp attached to a work table so they are stable and firm.[6]
- You can also use the water level for construction projects where you need to find 2 level areas on different items that are close to one another.
-
2Hold 1 end of the level against 1 of the posts. Make sure the open end faces upward. Place 2 nails on either side of the end of the tube to keep it in place. The nails should be just wide enough to catch the tube but not pinch it. [7]
- You can also use a clamp on the top of the end of the tube if you do not want to put holes in the post or if the item is not made of wood and cannot be nailed into.
-
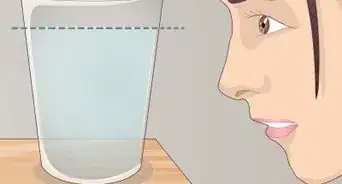
3Place the other end of the level against the other post. Keep your thumb over the open end of the tube so no water splashes out. Then, stand back and see where the water sits in either end of the tube. Notice if the water appears higher or lower in 1 end. This means the spots are not level and you need to adjust where the level sits on the posts so the water levels match.[8]
-
4Slide the free end of the tube up or down until the level on both ends match. Continue to check the levels as you slide the free end of the tube. The water should settle so that it hits the same level on both ends of the tube.[9]
- If you are levelling items that are more than an arm's distance away from each other, you may need someone to hold the free end of the tube and move it for you so you can ensure the water levels are correct on both ends.
-
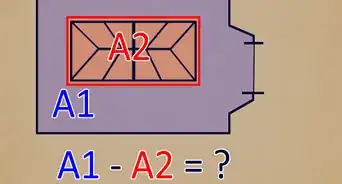
5Mark the items at the level spot. Once the meniscus, or water line, is level on both ends of the tube, use chalk or a pencil to mark the spot on both posts or items.[10]
- You can then release the attached end of the tube and use the water level on a different area, setting it up again with nails or a clamp.


Maintaining the Water Level
-
1Make sure there are no kinks or knots in the tubing. Kinks and knots can throw off the level and result in an incorrect reading. Slide your hand over the entire length of the tube before you use it so you can be sure there are no kinks or knots.[11]
- A tube that is old or worn may be more prone to knots and kinks so you may want to replace it over time.
-
2Empty the water level after each use to prevent air bubbles. Leaving water in the tube for a long period of time can allow air bubbles to form, which can then throw off the water levels in the tube. You should also empty and refill the water level before you use it to ensure the measurements are correct.[12]
-
3Keep the water level in a shaded, cool spot to prevent liquid expansion. Exposure to heat and direct sunlight can cause the tube to get too hot, causing the liquid to expand once it touches the tube. This can then throw off your water levels and result in an incorrect reading. Store the tube for the water level in a cool spot indoors in your garage or home so it does not overheat.[13]


Community Q&A
-
QuestionCan I use it this way when leveling stumps?
 Community AnswerYes. The water level gives you level from one location to another, so it does not matter if you are marking stumps, posts or grade elevations.
 -
QuestionWhen the tube ends are even and the water evens out, should I mark a water line on tube?Community AnswerNo. The top of the water gives the level, not some point on the tube.
-
QuestionHow do I use a water level?
 Drew Hawkins1Community AnswerA water level is actually pretty easy to make yourself. Take 50 to 100 feet (15 to 30 m) of tubing with a 5⁄16 in (0.79 cm) diameter and attach 1 end to the flat side of a stake. Put the stake in the ground, hold the other end of the tubing and fill it with water. Add a few drops of food coloring to make it easier to see. Take the water level to the items you want to measure and hold 1 end of the level against 1 of the posts. Place the other end against the other post. Raise and lower the free end of the tube up and down until the water levels on both ends match and mark the items at the level spot.
Things You'll Need
- Clear plastic tubing
- Water
- Food coloring (optional)
- Windshield wiper fluid (optional)
- Nails
- Clamp
- Chalk or pencil


References
- ↑ https://www.todayshomeowner.com/how-to-make-a-homemade-water-level/
- ↑ https://www.todayshomeowner.com/how-to-make-a-homemade-water-level/
- ↑ https://www.todayshomeowner.com/how-to-make-a-homemade-water-level/
- ↑ https://www.todayshomeowner.com/how-to-make-a-homemade-water-level/
- ↑ http://www.deckmagazine.com/products/tools-equipment/making-and-using-a-water-level_o
- ↑ https://www.todayshomeowner.com/how-to-make-a-homemade-water-level/
- ↑ https://www.youtube.com/watch?v=U-r12l904ow&feature=youtu.be&t=43
- ↑ https://www.youtube.com/watch?v=U-r12l904ow&feature=youtu.be&t=60
- ↑ https://www.youtube.com/watch?v=U-r12l904ow&feature=youtu.be&t=63
- ↑ https://www.youtube.com/watch?v=U-r12l904ow&feature=youtu.be&t=69
- ↑ http://www.deckmagazine.com/products/tools-equipment/making-and-using-a-water-level_o
- ↑ http://www.deckmagazine.com/products/tools-equipment/making-and-using-a-water-level_o
- ↑ http://www.deckmagazine.com/products/tools-equipment/making-and-using-a-water-level_o
About This Article

To use a water level, get 50 to 100 feet of tubing with a 5/15 inch diameter. Next, attach 1 end of the tubing to the flat side of a stake and fill the other end of the tube with water until it sits 2 to 3 inches below the attached end of the tube. Then, put 1 to 2 drops of food coloring in the water to make is easier to see. In order to use your water level, bring it to items you want to measure, hold 1 end against 1 of the posts, place the other end against the other post, and slide the free end up and down until the level on both ends match. To learn how to properly store your water level, keep reading!