This article was co-authored by Catherine Palomino, MS. Catherine Palomino is a former Childcare Center Director in New York. She received her MS in Elementary Education from CUNY Brooklyn College in 2010.
This article has been viewed 195,896 times.
Learning how to manage your baby’s dirty diapers involves a bit of trial and error—how often should you take your child’s dirty diapers to the trash? What is the best way to mask the smell in between trips to the garbage? Luckily, products like the Diaper Genie® can help. The Diaper Genie® gives you a place to dispose of your baby’s dirty diapers that will help eliminate the odor for a substantial period of time.
Steps
Assembling a Diaper Genie®
-
1Take inventory of the pieces that came with your Diaper Genie®. Read over the instruction manual that came with your Diaper Genie® to make sure you understand all the parts in the package and how each one functions. Before you start the assembly process, make sure you have all the parts listed in the instruction manual. If you are missing anything, wait to assemble the unit until you get the missing pieces.
- If you find you are missing any pieces, call the customer support line listed in the manual and request replacement parts be sent to you.
-
2Attach the top and bottom at the hinge. The first step in assembling your Diaper Genie® is to attach the top (piece A) and bottom (piece B) of the genie together. There is a hinge on the bottom of piece A and a bar at the top of piece B. While holding the top at a 45 degree angle, place the bar from piece B into the hinge and press down until they click together.
- You don't need to force the hinge into place. Just push it until you hear a click.
Advertisement -
3Flip the top over and click it into place. After securing the hinge between the top and bottom of your Diaper Genie®, flip the top over the bottom of the genie and press down until they click together. At this point, your genie should look like a tall, slim cylinder.
-
4Prepare a liner refill for your Diaper Genie®. You will need to place the plastic liner in your genie in order to use it. To add a new refill, pull the tab on the refill to remove the plastic seal. Then, pull downwards until you’ve released about 18 inches of film (or enough to fill the bottom of the Diaper Genie®). Tie a knot in the bottom of the liner.[1]
- An overhand knot works best for securing the bottom of your liner.[2]
-
5Place the liner in the genie. Finally, place your liner refill in the top of your Diaper Genie® and push the knot you’ve tied down, through the clamp. Close the lid on your Diaper Genie®. You’re now ready to start using it.[3]


Disposing of Diapers
-
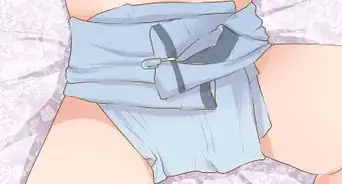
1Roll diapers into a tight ball. After you’ve changed your baby, roll their diaper up tightly, securing it with the adhesive tape on the diaper. It is best to roll your diaper into an oblong shape or a small, round bundle.[4]
- The tighter you can wrap your dirty diapers, the more the Diaper Genie® will hold before needing to empty it.
- Do not leave the adhesive tape unsecured because this can attach to the liner in your genie, causing it to rip.
- Generally, the Diaper Genie® will hold approximately 34 newborn diapers at one time. This number will decrease as your child ages.[5]
-
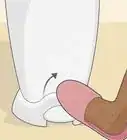
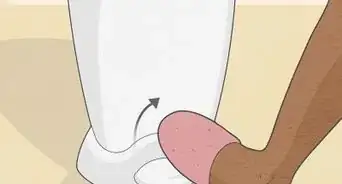
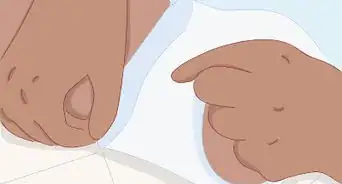
2Insert the dirty diaper. Once you have rolled your dirty diaper, lift the lid of the Diaper Genie® and insert the diaper. Push the dirty diaper all the way down through the clamp. Ensure that the clamp closes again after you have inserted the diaper. Once you have done this, close the lid.[6]
- Once the clamp closes, the Diaper Genie® twists the film directly under the clamp, sealing the dirty diaper at the top.
-
3Remove the top of the pail. Once your Diaper Genie® is full, unhinge the top from the bottom by pushing the button located in the middle of the genie (where the top and bottom parts meet). Flip the top part over, revealing the built-in cutter mechanism on the inside.[7]
-
4Cut the liner at the top. After you have unhinged the top and revealed the childproof cutter on the genie, pull the liner into the cutter mechanism and press down until it severs the liner. Tie a knot at the top to enclose your diapers in the liner.
- Ensure you leave enough room at the top of your diaper roll to tie a knot—usually three or four inches.
-
5Remove the full liner. Once you have tied the top of your liner, lift the full bag out and dispose of the dirty diapers wherever you dispose of your garbage outside.


Refilling and Maintaining the Diaper Genie®
-
1Tie a knot in the liner. Once you have removed the full liner, be sure to tie a knot at the start of the new liner. If you fail to do so, the dirty diapers you place in the genie will fall out the bottom of the liner when you go to remove the next full load.
-
2Pull out about 18 inches of liner. After tying a knot at the end of the liner you have just cut, pull out about 18 inches of liner, like you did when you were preparing to use your Diaper Genie® for the first time. Ensure that the amount you pull out is enough to fill the bottom of the pail.[8]
-
3Secure the top back onto the bottom. Finally, flip the top of the Diaper Genie® back over so it is sitting atop the bottom of the genie. Press down until the two parts click back into place.[9]
-
4Clean your Diaper Genie® weekly. As you can imagine, you will need to clean your Diaper Genie® routinely to keep germs and any lingering smell from your child’s dirty diapers to a minimum. The best way to do this is to clean your genie at least once a week. To do so, take the Diaper Genie® apart and wipe down both the inside and outside with a bleach-based solution.
- If you’d like to be more thorough, wipe the genie down with an anti-bacterial cleaning wipe several times throughout the week.
- Furthermore, whenever you change the liner in your Diaper Genie®, spray the inside with a disinfecting and odor-neutralizing spray.[10]
-
5Invest in a deodorizing filter. The Diaper Genie® doesn’t come with a built-in deodorizer, but investing in one is a good way to help reduce the daily odor from your child’s dirty diapers. You can find deodorizing carbon filters for your Diaper Genie® at nearly all general merchandise retailers, like Walmart or Target. These filters come with a case that attaches to the lid of your Diaper Genie® and several individual carbon filters. To use, simply unlatch the top of the case, place a filter inside, and snap the case closed.
- Filters should be replaced at least every 90 days for the best results.[11]


Expert Q&A
-
QuestionThe lid came unhinged. Is there a trick to getting it back in without breaking it?
 Catherine Palomino, MSCatherine Palomino is a former Childcare Center Director in New York. She received her MS in Elementary Education from CUNY Brooklyn College in 2010.
Master's Degree, Elementary Education, CUNY Brooklyn CollegeWhile holding the top at a 45-degree angle, place the bar from piece B into the hinge and press down until they click together. If this cannot be done with ease, then do not force it and instead contact the manufacturer for assistance. -
QuestionDoes it take batteries?
 ChristopherTop AnswererDiaper Genies neither needs nor uses batteries. It is a manual push that will propel the diaper into the bag inside the machine.
 -
QuestionHow do you know when it is full?
 JoannaISRCommunity AnswerIt is full when you cannot comfortably fit more diapers into it.
Warnings
- Although your Diaper Genie® will help contain a great amount of the odor emitted from your child’s dirty diapers, there will likely be some smell coming from the genie. Empty your Diaper Genie more frequently to cut down on this smell.⧼thumbs_response⧽
- There are several models of the Diaper Genie® available, so some features may differ from model to model. The basic assembly and operation should remain the same, however.⧼thumbs_response⧽
Things You'll Need
- Diaper Genie® diaper pail
- Diaper Genie® liners
- dirty/used disposable diaper(s)


References
- ↑ https://images-na.ssl-images-amazon.com/images/G/01/00/00/11/76/30/27/1176302770.pdf
- ↑ http://howtoadult.com/diaper-genie-instructions-5304887.html
- ↑ https://images-na.ssl-images-amazon.com/images/G/01/00/00/11/76/30/27/1176302770.pdf
- ↑ http://howtoadult.com/diaper-genie-instructions-5304887.html
- ↑ http://howtoadult.com/diaper-genie-instructions-5304887.html
- ↑ http://howtoadult.com/diaper-genie-instructions-5304887.html
- ↑ https://images-na.ssl-images-amazon.com/images/G/01/00/00/11/76/30/27/1176302770.pdf
- ↑ https://images-na.ssl-images-amazon.com/images/G/01/00/00/11/76/30/27/1176302770.pdf
- ↑ https://images-na.ssl-images-amazon.com/images/G/01/00/00/11/76/30/27/1176302770.pdf
About This Article

To use a Diaper Genie, roll a diaper into a tight ball and secure it with the adhesive tape on the diaper. Next, lift the lid of the Diaper Genie and push the diaper down through the clamp to seal it in the bag. Then, close the lid. Once the bag is full of dirty diapers, unhinge the top of the Diaper Genie and use the built-in cutter mechanism to cut the bag. Finally, tie a knot in the tope of the bag and put it in an outside garbage can. For tips from our Childcare reviewer on how to clean your Diaper Genie to get rid of lingering smells, read on!