This article was co-authored by wikiHow staff writer, Travis Boylls. Travis Boylls is a Technology Writer and Editor for wikiHow. Travis has experience writing technology-related articles, providing software customer service, and in graphic design. He specializes in Windows, macOS, Android, iOS, and Linux platforms. He studied graphic design at Pikes Peak Community College.
The wikiHow Tech Team also followed the article's instructions and verified that they work.
This article has been viewed 210,665 times.
Learn more...
The iCloud for Windows app is a great way to interface with your iCloud account on a Windows PC. If you need to uninstall it for any reason, you can easily do so using the Windows Control Panel. You should back up the local data to iCloud first. While it's pretty easy to uninstall iCloud with Control Panel, it does leave behind some residual files. You can do a more thorough uninstall using an uninstaller program like Revo Uninstaller. This wikiHow teaches you how to uninstall iCloud for Windows using Control Panel and Revo Uninstaller.[1]
Steps
Backing Up Local Data to iCloud
-
1
-
2Type iCloud. This searches for the iCloud app in the Windows Start menu. The iCloud icon will be displayed at the top of the Windows Start menu. It has a blue logo that resembles a white cloud.Advertisement
-
3Click on iCloud. It appears at the top of the Windows Start menu when type "iCloud." Click this icon to launch iCloud.
-
4Select the data to back up. Do so by checking the boxes next to "iCloud Drive," "Photos," "Mail, Contacts, Calendars, and Tasks," and/or "Bookmarks."
-
5Click on Apply. It's in the lower-right corner of the dialog box. This saves all the data you selected to your iCloud account.
-
6Click on Sign out. When your data has finished uploading, sign out with the button in the lower-left corner of the screen.


Uninstalling using Windows Control Panel
-
1Click the Windows Start button . It's typically in the lower-left corner of the screen in the taskbar. This opens the Windows Start menu. Using the Control Panel to uninstall iCloud will remove the bulk of the program. However, some residual files may still be left behind. Using a program like Revo Uninstaller will uninstall the program and search for residual files and registry items left behind.
- Uninstalling iCloud requires an admin password. If you're not logged into your PC as an admin, log out and log back in as an admin.
-
2Type Control Panel. This searches for the Windows Control Panel in the Start menu.
-
3Click Control Panel. It appears at the top of the Windows Start menu when you type "Control Panel." It has an icon that resembles a computer screen with a pie chart.
-
4Click Uninstall a program. It's in the "Programs" section of the Control Panel dialog box.
- On Windows 7 or XP, click on Programs and then click on Program and Features.[2]
-
5Check the "iCloud" box. All programs are listed alphabetically.
-
6Click on Change. It's above the pane that contains the list of programs. It's at the top of the list of programs in the center.
- On Windows 7 or XP, click on Uninstall.
-
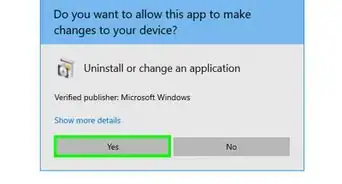
7Click on Ok. This dialog box confirms you want to make a change to iCloud.
-
8Click on the "Remove" radio button. It's the second option in the dialog box.
-
9Click on Next. It's in the lower-right of the dialog box.
-
10Click on Yes. Doing so confirms that you want to uninstall iCloud from your PC.
-
11Click on Finish. iCloud for Windows has now been uninstalled and deleted from your PC.[3]


Uninstalling with Revo Uninstaller
-
1Download and install Revo Uninstaller. Revo Uninstaller is a free program that uninstalls programs and searches for residual files and registry items left behind after a program is uninstalled. There is a free version and a Pro version of Revo Uninstaller. You can try the Pro version free for 30 days. The Pro version allows you to search for residual files from programs that have already been uninstalled as well as create a back-up of your system before uninstalling anything in case anything goes wrong. Use the following steps to download and install the free version:
- Go to https://www.revouninstaller.com/ in a web browser.
- Click Free Downloads.
- Click Free Download in the "Freeware" column or click Free Trial in the "Pro" column.
- Select your language and click Ok.
- Read and click the radio option next to I accept the agreement. Then click Next.
- Select and install location and click Next.
- Check or uncheck "Create a desktop shortcut" and click Next.
- Click Install.
-
2Create a System Restore Point. Since Revo Uninstaller will search your system files and registry for residual files left behind, it's a good idea to create a system restore point before doing an uninstall using Revo Uninstaller. This allows you to return to your current system configuration if Revo accidentally uninstalls any critical files or registry items. The Pro version of Revo Uninstaller lets you create a restore point using the app. If you are using the free version, go ahead and use the following steps to create a system restore point:
- Click the Windows Start menu.
- Type "Create a Restore Point."
- Click Create a Restore Point in the Windows Start menu.
- Click the hard drive Windows is installed on.
- Click Create.
- Type a name for the restore point.
- Click Create.
-
3Close all programs and apps that are running. It's a good idea to close all apps that are running before you uninstalling any programs with Revo Uninstaller. Click any programs running in the taskbar and click the "X" icon, or click the option to close the program in the File menu.
-
4Open Revo Uninstaller. To open Revo Uninstaller, click the Windows Start menu and type "Revo." You should see Revo Uninstaller appear at the top of the Windows Start menu. Click Revo Uninstaller to open it. It has an icon that resembles the contents of a box going into a trash bin with an "R" on it.
-
5Click Windows Apps. It has an icon that resembles the Windows logo. It's the second option in the Panel at the top. This will load a list of Windows apps installed on your computer. Allow a few minutes for it to load.
-
6Scroll down and click iCloud. All programs are listed in alphabetical order. Scroll down and click the iCloud app to select it.
-
7Click Uninstall. It's the button that resembles a Window with an "X" on it at the panel at the top. Click this icon to uninstall the program.
-
8Click Continue. It's the button in the lower-right corner. This will launch a PowerShell window that will automatically run the command to uninstall iCloud.
- If Revo Uninstaller launches an uninstaller app, follow the instructions to finish the install process.
-
9Click Scan. This option is displayed at the bottom of Revo Scanner once iCloud is finished installing. Click this option to scan for residual files left over. Allow a few minutes for Revo Scanner to finish scanning your system.
-
10Uncheck any items you don't want to delete. Look over the list of leftover files and registry items that Revo Uninstaller lists. Uncheck any items that you don't want to uninstall.
-
11Click Delete. This deletes all the leftover registry items found by Revo Uninstaller.
-
12Click Finish. This closes Revo Uninstaller. You have successfully uninstalled iCloud and deleted any residual files leftover.


Community Q&A
-
QuestionWill removing iCloud from Windows 10 remove photos, notes, etc. from my computer?
 Community AnswerIt will only remove information stored in your iCloud account. Information stored on your computer will be safe.


References
About This Article

1. Open iCloud and Back up all your local data.
2. Click Sign Out at the bottom.
3. Click the Windows Start button.
4. Type "Control Panel" and click Control Panel to open it.
5. Click Uninstall a program.
6. Scroll down and click iCloud.
7. Click Change at the top of the screen.
8. Select "Remove" and click Next.
9. Click Yes to confirm you want to uninstall iCloud.
10. Click Finish.