This article was co-authored by Alterations Express. Alterations Express is a salon-style alteration and tailoring house with walk-in service, spacious dressing rooms, fitting specialists, and an extraordinary team of tailors and seamstresses at 13 storefront locations. With over 70 years of experience, they specialize in guiding individuals through a professional fitting, evaluating an alteration project on the spot, express alterations, and immediately providing pricing for any alteration. Alterations Express has been featured on multiple websites such as TheKnot.com.
This article has been viewed 38,260 times.
Sweetheart necklines are flirty and alluring, so they are great for feminine designs like halter tops, dresses, and fitted tops. You can make a sweetheart neckline without using a pattern, but you will need to take some careful measurements and use them to draft the design onto your fabric. After you create the necessary pieces for your sweetheart neckline bodice, you will need to pin and sew them together to complete it. After your bodice is finished, you can use the piece to complete your garment as desired.
Steps
Measuring and Marking Your Fabric
-
1Take your measurements. Before you begin, you will need to measure yourself or the person who will be wearing the garment in a few different places. Measure around your bust, the distance across your chest, the desired length of the bodice extending from your armpit, and from the center of your collarbone (at the base of your neck) to the desired depth of the neckline at the center of your chest.[1]
- Record each of these measurements.
- Keep in mind that a deeper neckline will result in more cleavage. If you want a less revealing look, then do not make your neckline too deep.
-
2Mark the length of your bodice. With your fabric folded in half twice (four layers total), mark the area where you want your bodice piece to begin and end. This will be the height or length of the bodice extending from your armpit to an area on your waist.[2]
- You can make the bodice any length you like. For example, if you want to use the bodice to complete an empire waist dress, then you would want a shorter bodice. If you want a fitted waist, then you would need a longer bodice.
Advertisement -
3Mark the width of your neckline. Determine how wide you would like the neckline to be and then divide this number in half. Measure from the edge of the fold in your fabric to the number you have identified. Mark the fabric at the top and bottom of the bodice length to indicate this measurement, and then connect the two dots in a straight line going from the top to the bottom of the bodice piece.[3]
- For example, if you want the neckline to be a total of 10” (25 cm) wide, then your number would be 5” (12.5 cm) and you would mark the fabric at this distance from the fold. Make sure to mark at the top and bottom of your bodice piece and then connect the dots to create a straight line.
- A wider neckline will result in a long curve, and a narrower neckline will result in a shorter, sharper curve.
-
4Measure and mark the depth of your neckline. Using your depth measurement, measure from the top of the bodice to the depth you have identified. Then, mark this location on the fold.[4]
- For example, if the depth you want for your neckline is 3” (7.5 cm), then measure this distance from the top of your bodice and make a chalk mark on the fold.
-
5Draw a curve from the top of your bodice piece to the center of the neckline. Next, you will need to create the curve extending from the center mark on your folded fabric to the top corner of your bodice. This curve should resemble the inner part of a lowercase letter “m.”[5]
- If you find it hard to draw the curve freehand, then you might want to use a curved object, such as a bowl.
- You can make the curve as pronounced or as subtle as you like.
-
6Cut along the lines. When you have completed your measurements and markings on the fabric, you will need to cut out the pieces. Cut along the curve and the straight lines you have drawn. However, do not cut along the fold.[6] After you finish cutting along the lines, you will have two bodice pieces, which you will need to sew together.
-
7Fold one of the pieces in half and trace it. Next, you will need to trace one of your folded bodice pieces to create the side pieces for your bodice. Make sure that your fabric is double folded and you have four layers to work with. Then, fold one of the bodice pieces in half and trace around the edges of it to create an outline on the top layer of your folded fabric. Cut along the lines to create four side pieces.


Sewing Your Pieces Together
-
1Pin the side front pieces to the edges of your front pieces. Next, you will need to assemble your bodice and front pieces. Pin the side front pieces to the bodice piece so that the flat edges and curves are lined up. The right sides of the fabric should be facing each other.[7]
- Remember that you will need to do this twice. One of the completed pieces will be the outside of the neckline and the other will be the lining.
-
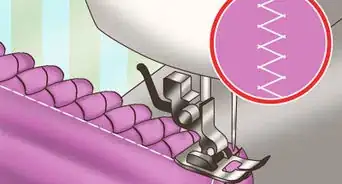
2Sew along the pinned areas. After you have pinned the pieces together, sew along the pinned edges to connect them. Remove the pins as you go.[8]
- Do this for both sets of bodice and front pieces.
-
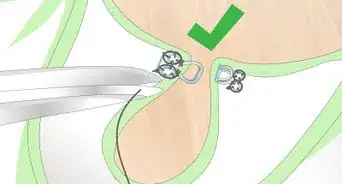
3Pin and sew the two pieces together. After you have connected all of your bodice and front pieces, pin them to each other so that the neckline areas are lined up and the right sides are facing each other. Then, sew along the pinned edges and remove the pins as you go.[9]
-
4Invert the completed bodice piece. After you have sewn the two bodice pieces together, invert the piece so that the seam is on the inside and hidden. Then, use your fingers to press along the inside of the neckline to push out any fabric that is stuck or uneven.[10]
- If the inverted piece looks bumpy or uneven, then you may want to use an iron to press it. Iron along the neckline to flatten it out.
-
5Complete the rest of your design. After you finish the neckline, you can continue the rest of your garment design as desired. For example, if you are using this bodice as part of a dress or as a top, then add the other elements as desired, such as a skirt, sleeves, or a halter strap.


Expert Q&A
-
QuestionHow do you make a perfect sweetheart neckline?
 Alterations ExpressAlterations Express is a salon-style alteration and tailoring house with walk-in service, spacious dressing rooms, fitting specialists, and an extraordinary team of tailors and seamstresses at 13 storefront locations. With over 70 years of experience, they specialize in guiding individuals through a professional fitting, evaluating an alteration project on the spot, express alterations, and immediately providing pricing for any alteration. Alterations Express has been featured on multiple websites such as TheKnot.com.
Alteration, Tailoring, and Dry Cleaning SpecialistsBe sure to line your garment on the inside and understitch it—this way, the lining won't roll out. -
QuestionHow do I cut a dress pattern with only an illustration?
 MidmorrowCommunity AnswerIt's virtually impossible to cut a pattern from just a photo and make it exact. I would recommend printing it out then cutting. However, make sure the measurements are right.
Things You’ll Need
- Fabric
- Chalk
- Measuring tape
- Scissors
- Pins
- Sewing machine
- Thread
- Bowl for outlining the curve of your neckline (optional)


References
- ↑ https://sewguide.com/draft-necklines/
- ↑ https://sewguide.com/draft-necklines/
- ↑ https://sewguide.com/draft-necklines/
- ↑ https://sewguide.com/draft-necklines/
- ↑ https://sewguide.com/draft-necklines/
- ↑ Alterations Express. Alteration, Tailoring, and Dry Cleaning Specialists. Expert Interview. 15 September 2021.
- ↑ https://www.youtube.com/watch?v=iS0Nwnoe6uY
- ↑ https://www.youtube.com/watch?v=iS0Nwnoe6uY
- ↑ https://www.youtube.com/watch?v=kNEderzgBVw
About This Article