This article was co-authored by wikiHow Staff. Our trained team of editors and researchers validate articles for accuracy and comprehensiveness. wikiHow's Content Management Team carefully monitors the work from our editorial staff to ensure that each article is backed by trusted research and meets our high quality standards.
There are 10 references cited in this article, which can be found at the bottom of the page.
The wikiHow Video Team also followed the article's instructions and verified that they work.
This article has been viewed 87,644 times.
Learn more...
Gloves might seem like a tricky thing to sew, but the process is actually very easy! Start by making a glove pattern so that the gloves will fit your hands perfectly. Then, trace the pattern onto the fabric of your choice and sew along the lines. Cut off the excess fabric and hem your gloves to finish them off. You can make warm winter gloves, costume gloves for dressing up, or a fancy pair to wear with a dress.
Steps
Creating the Glove Pattern
-
1Trace the outline of your hand onto a piece of paper. Use a piece of paper that is long enough to create the size glove you want. Press your non-dominant hand on the paper with your fingers spread apart. For example, use your right hand if you are left-handed. Hold a pen or pencil in your dominant hand and use it to trace around your other hand.[1]
- Keep the pen or pencil close to your skin as you trace. Go around every finger as well as the sides of your hand.
- If you want to create fingerless gloves, trace only to the point on your fingers that you want the gloves to go. Then, add an extra 1⁄2 in (1.3 cm) to the end of each finger for seam allowance.
-
2Extend the sleeve of the glove to the desired length. You can end the glove at the wrist if you want short gloves, or extend the lines down from the wrist to make the glove longer. Make sure to include an extra 1⁄2 in (1.3 cm) for hemming the sleeve later. Press your forearm against the paper and continue to trace alongside your non-dominant arm. Trace along both sides of the glove and then draw a line to connect the ends of the 2 lines. This will indicate the end of the glove.[2]
- Try making a pair of gloves that go to your mid-forearm for a fancy pair of gloves, or make a pair that go up to your biceps for a dramatic looking pair of gloves.
Advertisement -
3Cut along the lines you’ve drawn on the paper. Use a sharp pair of scissors to cut along the lines of the paper pattern. Go slowly to avoid creating any jagged edges or cutting off part of the pattern.[3]
Tip: If you don’t want to go to the trouble of making your own pattern, there are many free patterns available online. Search for “glove pattern” and then download and print one that you like. Follow the patterns instructions for how to use it.[4]

Sewing the Glove
-
1Fold a piece of fabric that is large enough for the entire glove pattern. Fold the fabric so that the right (outer or front) of the fabric is facing in, and then smooth it out so that there are no lumps or bumps. Check to ensure that you can fit the whole pattern on the folded fabric and cut it out in 1 piece.[5]
- You may need to angle the pattern slightly to get it to fit on the fabric if you’re making long gloves.
Tip: You can use any type of fabric you like to make your gloves. If you want your gloves to fit snugly, opt for a fabric with a bit of stretch to it, such as a stretch cotton or fleece, or if you want a fabric that looks luxurious, opt for something soft, such as satin or faux suede.[6]
-
2Pin the paper pattern to the folded fabric. Once you have the pattern in place on the fabric, insert pins along the edges of the paper pattern and going all the way through both layers of fabric. Insert 1 pin every 2 to 3 in (5.1 to 7.6 cm) going all the way around the edges of the gloves.[7]
- For the each of the fingers and the thumb, insert 1 pin near the ends as well.
-
3Trace along the edges of the paper pattern with a pen or fabric marker. Outline the paper glove pattern directly onto the wrong side of the top layer of your glove fabric. Trace right along the edges of the glove pattern.[8]
- Make sure to use a pen or fabric marker that will show up on the fabric since you’ll need to be able to see it clearly.
-
4Remove the pins from the paper pattern and insert pins through the fabric only. Insert a pin every 2 to 3 in (5.1 to 7.6 cm) along the edges of the fabric and 1 through each of the fingertips. This will help to keep the fabric together while you sew.[9]
- Make sure that the fabric is smooth and even on both sides when you do this.
-
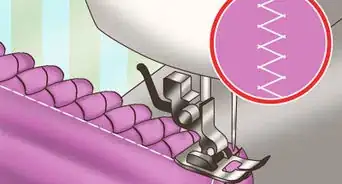
5Sew a straight stitch along the lines except for at the glove opening. Set your sewing machine to the straight stitch setting and raise the presser foot. Then, place the fabric under the presser foot and lower it over the fabric. Begin sewing where the sleeve of the glove begins. Sew a straight stitch all the way up the side of the glove sleeve and around the sides and tips of the thumb and fingers. Then, sew back down and around to the other side of the sleeve.[10]
- Do not sew across the glove’s opening!
- If you're making fingerless gloves, leave the end of each of the fingers and thumb open as well.
Tip: Remove the pins as you sew if they’re in your way. Otherwise, you can leave them in place. Just don’t sew over any of the pins or you may damage your sewing machine.
Finishing the Glove
-
1Cut off the excess fabric 1⁄4 in (0.64 cm) from the stitches. After you finish sewing, raise the presser foot and pull the fabric away from the sewing machine. Snip the thread with a pair of scissors. Then, use a sharp pair of scissors to cut around the outside of the stitches and remove the excess fabric. Cut about 1⁄4 in (0.64 cm) from the stitches and across the line at the bottom of the glove.[11]
- Be careful not to cut through any of the stitches or you will create a hole in the glove.
-
2Hem the opening of the glove. Fold over 1⁄2 in (1.3 cm) of the fabric at the glove’s opening so that the wrong sides of the fabric are together. Then, sew a straight stitch about 1⁄4 in (0.64 cm) from the folded edge going all the way around the end of the glove.[12]
- Cut the excess thread when you get back to the beginning of the hem.
- If you're making fingerless gloves, hem the ends of the fingers and thumb as well.
-
3Turn the glove right side out and try it on. After you finish sewing the hem, the glove is ready to wear. Just turn it inside out and slip it on to see how it fits.[13]
Tip: Make sure to remove any pins still left in the glove before you do this.
-
4Repeat the process to make a second glove. Make the second glove exactly how you made the first glove. You don’t need to create a new pattern. Use the same pattern to create a matching glove and follow the same process for tracing the pattern onto the fabric, sewing along the lines, and cutting it out.[14]

Expert Q&A
-
QuestionShould you wear wedding gloves?
 LaTricia BrownLaTricia Brown is a Master Tailor and Designer and the Owner of Trish B. Stylin' based in the Savannah, Georgia metro area. LaTricia has over a decade of experience including bridal design, men's and women's clothing design, and fashion show directing. She has a BFA in Fashion with a minor in Accessory Design from the Savannah College of Art and Design (SCAD). LaTricia has worked with W Magazine in New York City and has assisted with the personal styling of P. Diddy. She has also assisted the development of Sean John's 10-Year Anniversary Collection and appeared in the filming of Diddy's "If I Were King" Documentary.
Master Tailor & Creative DirectorGo for it! Wedding gloves offer a very classic and regal element. Just make sure you have multiple pairs at your disposal—no one wants to have dingy gloves in their photographs and you'll want to switch out for your photos. -
QuestionHow do you color the glove? I want to make 3-colored gloves but I don't know how to.Get the three colors of your fabric and sew them together in the pattern you want. Then, follow the steps in this article!

Things You'll Need
- Paper
- Pen or pencil
- Fabric
- Pins
- Scissors
- Thread
- Sewing machine


References
- ↑ https://www.youtube.com/watch?v=mjhGYzA0qig&t=16
- ↑ https://www.youtube.com/watch?v=mjhGYzA0qig&t=32
- ↑ https://www.youtube.com/watch?v=mjhGYzA0qig&t=36
- ↑ https://www.threadsmagazine.com/2018/09/10/how-to-make-gorgeous-gloves
- ↑ https://www.youtube.com/watch?v=mjhGYzA0qig&t=40
- ↑ https://www.threadsmagazine.com/2018/09/10/how-to-make-gorgeous-gloves
- ↑ https://www.youtube.com/watch?v=mjhGYzA0qig&t=40
- ↑ https://www.youtube.com/watch?v=mjhGYzA0qig&t=40
- ↑ https://www.youtube.com/watch?v=mjhGYzA0qig&t=40
About This Article