wikiHow is a “wiki,” similar to Wikipedia, which means that many of our articles are co-written by multiple authors. To create this article, volunteer authors worked to edit and improve it over time.
This article has been viewed 8,565 times.
Learn more...
How many of you have been frustrated when going on a trip and your office manager asked for some important documents to send them out, but without luck, you saved them on your home computer? Well, there is a way that you can access your PC remotely with the use of the Remote Desktop feature that is built-in in Windows Computers with Windows 11 Pro or Enterprise Editions. This tool is great for people who work remotely or frequent travelers that require interconnection with their computer equipment at their local office.
You will need to have Windows 11 Professional or Enterprise Edition for this to work. A Home Edition will not have this feature.
Steps
Enabling Remote Desktop in Settings
There are several steps that are required to activate Remote Desktop on Windows 11. The instructions are put into several parts to ease the complications of this process. Please follow each step that is required to activate Remote Desktop.
-
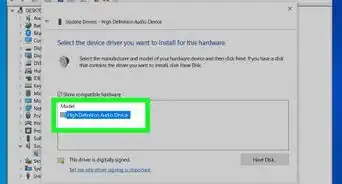
1Open Settings. Click the Start or the Windows icon on your Windows 11 computer and go to Settings.
- You can also use the shortcut Windows+I
-
2Scroll down with your mouse wheel and go to the Remote Desktop tab in Settings. Clicking on it to take you to the Remote Desktop section.Advertisement
-
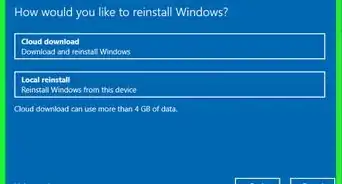
3Enable Remote Desktop by pressing on the switch so that it reads "On."
-
4Click on “Confirm” when an alert pops up.
-
5Click the arrow below the on the switch to the 'Remote Desktop port" and make a note of that number. This is an important number for connection purposes, Make sure to checkmark "require devices use Network Level Authentication to connect".
- By default, the number is 3389.
-
6Click on the third tab where it says "Remote Desktop Users." This will take you to a small window for adding users. This step will add one or more users to access this computer through Remote Desktop.
-
7Click "Add." This will take you to another small window labeled "Select Users."
-
8Add the users in the white text box to give access to this computer remotely. Make sure these users are already available on this computer before doing the above step.
- After adding the users' names, click OK to close adding users window.
- Click OK for Remote Desktop Users to close it.
- When done, close the Settings window.
.jpg)
.jpg)
.jpg)


.jpg)
Changing the Remote Desktop Port
You can Skip this part and Part 3 if you are using the same default port the "Remote Desktop Port" (that would be 3389). Two main reasons to change the Remote Desktop Port from the default port "3389" is if you have more than one computer that will use the access of Remote Desktop, which will cause conflicts between these computers. It is also for safety reasons to change the default port due to difficulty for hackers to access computers with unique port numbers other than the default port "3389."
-
1Open Registry Editor. Press on the search icon on your Windows 11 computer and type "Registry Editor."
- Click on the Registry Editor App.
-
2Press “Yes” when prompted on.
-
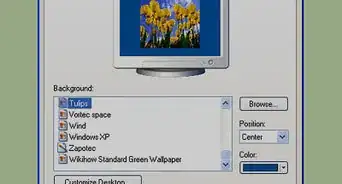
3Locate HKEY_LOCAL_MACHINE\System\CurrentControlSet\Control\Terminal Server\WinStations\RDP-Tcp\. A new window will open that is divided into two sides where the left side has multiple folders.
- Follow the folders below to expand each one to reach the final folder of "RDP-Tcp" without skipping any of them. HKEY_LOCAL_MACHINE\System\CurrentControlSet\Control\Terminal Server\WinStations\RDP-Tcp\
- Double click the RDP-Tcp folder. Youu will see a number of extensions on the right-side of a section of the window.
- In the right section, search for the name "PortNumber".
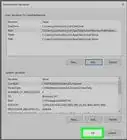
- Double click on it, and it will open a new window will pop up called "Edit DWORD (32-bit) Value".
Warning! Do not, unless you are fully aware of what you are doing, edit or remove any of these folders in the Registry. It will cause files and system corruption if you do.
-
4Click on Decimal to change the Value data into a decimal number in the "Edit DWORD (32-bit) Value" window. By default, the "Value data" is "3389." This is the same one you saved previously. Change the "Value data" to a unique number with a large value (e.g. "15275" in these instructions). Make sure to save that number for future use.
- Press OK after changing the value of port to save it.
- Close the Registry Editor window and restart your PC.


Enabling Inbound for Remote Desktop Port
This part will help in setting up the Windows Defender and give permission for inbound access of the port forward in your Windows 11 computer.
-
1Open Windows Defender Firewall with advanced security. Go to the search icon and write "Window Defender Firewall with Advanced Security” in the search bar and click on the app. The window for "Windows Defender Firewall" will pop up; it is divided into three sections.
-
2Click on "Inbound Rules" on the left side of the window.
-
3Click on "New Rule" on the right-side of the section.
-
4Select "Port" from the options menu, and click "Next" when a new window pops up called "New Inbound Rule Wizard."
-
5Select the "TCP" option and follow the other steps before going to the next page. On the same window, select the "Specific local ports" option and insert the unique port number that you have saved from Part 2, (e.g. "15275" for this example).
- Click "Next" when done.
-
6Click the "Allow the connection" option on the next window. Select the option and click "Next".
-
7Keep all Defaults as is with mark checked for "Domain, Private, and Public" and click "Next".
-
8Choose a unique name. For example, “My remote Computer Access” or any name of your choice and click finish.
-
9Look for new Inbound Rules in the middle of the screen. Look at “My remote Computer Access” on top of the list to make sure that the above steps are correctly implemented. At this point, you are done with giving access to the Remote Desktop port through Windows Defender Firewall. Please close the "Windows Defender Firewall" window and restart your computer for changes to take effect.


Port Forwarding
This part of the instructions will help in the setup of the port forward for the Cable/Modem device of your Internet Service Provider. Due to multiple Internet Service Providers in the States that provide their own unique devices, this part will be difficult to give instructions for each individual device. In this setup, Technicolor Cable/Modem will be used as an example in these instructions. The Cable Modem/Router name and model is “Technicolor CGA4234”.
-
1Make sure your Windows 11 computer is connected directly to Internet Service Provider Cable Modem/Router.
-
2Open Command Prompt. Go to the search icon and type “cmd” in the search bar.
-
3Type "ipconfig" when cmd opens and press enter.
- This will show the computer's unique IP address “IPv4” and “Default Gateway Address”. That is the Cable Modem/Router IP address and the "IPv6" IP address.
- Take note of all these numbers: “IPv4,” “Default Gateway," and "IPv6".
- Close the Command Prompt window.
-
4Go to any browser and type in the search bar the “Default Gateway” IP address. You need to Google search the website for the default Username and Password for your device, or you can call your Internet Service Provider to give you the credential of your device.#*The default gateway IP address for Technicolor is, for example, “192.168.0.1.” The Technicolor page will ask for the Username and Password. By default, the username and password for the Technicolor model are both blanks.
-
5Go to the default page of the Technicolor device.
- Click on the “Connection” tab.
- Click on “Devices” to search for your computer name or the IP address “IPv4” that was saved from Command Prompt.
- Click on the pencil icon of your windows 11 computer to enter the editing mode window.
-
6Click on the Reserved IP option. This will reserve the same IP address on your computer. Click on OK when done.
-
7Go to the Application tab to access the Port Forward table page.
- Click the “Port Forward” tab to show you Port Forward Table.
-
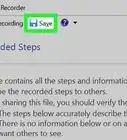
8Click on the plus sign on the right side of the Port Forward table to set up the port forward.
- Under Start Port, type the unique number of the port that you saved.
- By default, it is “3389.” In this case, the unique port is “15275”
- Under End Port, type the same unique port number, default “3389”.
- Under Type, just choose the option “TCP” or “BOTH”.
- Under Server IP, insert the computer IP address “IPv4” that you have saved from the “Command Prompt”.
- Under “Server IPv6”, right-click your mouse and click paste to insert the “IPv6” that you have saved from the "Command Prompt" section.
- Click on the “Enable” switch button to enable the port forwarding of your Remote Desktop.
- Click “Save” when done.
- You can exit your Cable Modem/Router page and close it.
-
9Make sure to get the Public IP address from your Windows 11 computer.
- Open any browser and type “what’s my public IP.” There will be quite a few websites that will provide you with your public IP address “IPv4”. You can use https://whatismyipaddress.com/ to get your public IP address.
- Take a note of that IP address “IPv4” to use it for the next part.
- By now, the Remote Desktop feature has been completed and enabled in the Windows 11 Computer.
.jpg)
.jpg)
.jpg)


Setting Up Remote Access
This is the final part of the instruction that be implemented for your remote access computer or any device of your choice that can access the Windows 11 computer with Remote Desktop
-
1Click on the search icon and type “Remote Desktop Connections” in the search bar, and click on the app from your remote access computer. You may choose other devices of your choice such as android phones, IOS, or regular PC that uses the Remote Desktop Connection App.
-
2Insert your public IP in the small window that popped up for Remote Desktop Connections. For more options, click on “Show Options” to make some changes to the connection.
-
3Go to the local "Resources" tab and checkmark the "Printers" option box. This option will make your local printers work remotely with Windows 11 Computer and Remote Desktop App.
-
4Click on the default tab “General” in the “Computer” text box TYPE your public IP address including a port forward number with a colon separating them. For example, “122.123.145.100:15275” or “122.123.145.100:3389” for the default port forward number. Also, you can add your “User Name” in the text box section of the user name.
- Click “Connect” to start your connection
-
5Insert your user name and password when a new window pops up and asks for your credentials. You can insert only a password if you have saved your user’s name in previous steps.
- You can checkmark the "remember me" if you like this device to remember your credentials
-
6Click "OK" when done. A warning window will pop saying this connection is a trusted certifying authority. Just click “Yes”.
-
7You are connected to your Windows 11 computer remotely which you can access from around the world.