This article was written by Spike Baron and by wikiHow staff writer, Jack Lloyd. Spike Baron is the Owner of Spike's Computer Repair based in Los Angeles, California. With over 25 years of working experience in the tech industry, Spike specializes in PC and Mac computer repair, used computer sales, virus removal, data recovery, and hardware and software upgrades. He has his CompTIA A+ certification for computer service technicians and is a Microsoft Certified Solutions Expert.
The wikiHow Tech Team also followed the article's instructions and verified that they work.
This article has been viewed 216,535 times.
This wikiHow teaches you how to set up a computer network for a group of Windows or Mac computers. You can set up a wireless network for a few computers, or you can use a wired connection if you're adding a large number of computers to a network.
This article is based off an interview with our network engineer & desktop support specialist, Spike Baron. Check out the full interview here.
Steps
Using a Wireless Network on Windows
-
1Click the Wi-Fi symbol . It's in the lower-right corner of the screen. A pop-up window will appear.
- If Wi-Fi is currently disabled, click the Wi-Fi button in the lower-left side of the pop-up window before proceeding.
- In some cases, you'll need to click the ^ icon in the lower-right side of the screen to see the Wi-Fi icon.
-
2Select a network. Click the network to which you want to connect each of your network computers.Advertisement
-
3Click Connect. It's in the lower-right side of the network's name box.
-
4Enter the network's password. Type in the network's password when prompted.
-
5Click Next. It's below the network. As long as the password is correct, doing so will connect you to the network.
-
6Connect other computers in the network to the Internet. For each computer that you want to use in your network, repeat the Wi-Fi connection process. Once each computer is connected to the Wi-Fi network, you can proceed with setting up file sharing.[1]
-
7
-
8Type in control panel. Doing so will search your computer for the Control Panel app.
-
9Click Control Panel. It's a blue rectangle icon at the top of the Start menu.
-
10Click Network and Sharing Center. This option resembles a set of blue monitors.
- If you see "Category" in the upper-right side of the page, first click the Network and Internet heading on the main Control Panel page.
-
11Click Change advanced sharing settings. It's a link in the upper-left side of the page.
-
12Check the "Turn on network discovery" box. This will ensure that your computer can interact with other computers that are plugged into the Internet source.[2]
- You can also enable the "Turn on file and printer sharing" option and the "Allow Windows to manage homegroup connections" option if they aren't automatically selected.
-
13Click Save changes. It's at the bottom of the page.
-
14Enable network discovery on the other network computers. Once each computer in the networked group has network discovery enabled in Control Panel, your wired network will be ready to use.


Using a Wireless Network on Mac
-
1
-
2Select a network. Click the Wi-Fi network to which you want to connect each computer in your network.
-
3Enter the network's password. Type the password for the network into the "Password" field.
-
4Click Join. It's at the bottom of the window. Doing so will connect your computer to the Internet.
-
5Connect other network computers to the Internet. For each computer that you want to use in your network, repeat the Wi-Fi connection process. Once each computer is connected to the Wi-Fi network, you can proceed with setting up file sharing.[3]
-
6
-
7Click System Preferences…. It's near the top of the drop-down menu.
-
8Click Sharing. You'll find this blue folder-shaped icon in the middle of the System Preferences window.
-
9Check the "File Sharing" box. It's on the left side of the page. This will ensure that you can share files from your computer to other computers on the network.[4]
- You can check any other file sharing options that you want to use for your network here as well.
-
10Close the System Preferences window. Your changes will be saved; the current computer is now set up for network sharing.
-
11Enable file sharing on the other network computers. Each computer that's connected to your Internet source will need file sharing to be enabled. Once you've completed this process, your wireless network will be ready to use.


Using a Wired Network on Windows
-
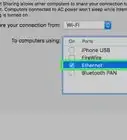
1Make sure that you have the necessary hardware. You'll need an Internet source (e.g., a router) into which you can plug each individual computer, as well as Ethernet cables to connect the computers to the Internet source.
- Most standard routers only come with a few Ethernet ports, but you can buy network hubs that support upward of 10 connections.
- Make sure that you know the approximate distance from each computer to the Internet source. You'll need Ethernet cables that can span this distance.
-
2Set up the Internet source. Plug one end of an Ethernet cable into the "Internet" port on the back of the modem, then connect the other end of the cable to the "Internet" or "Ethernet" port on your Internet source.
- You'll also need to plug in the Internet source's power cable before proceeding.
-
3Plug each computer into the Internet source. Attach one end of an Ethernet cable to the square Ethernet port on your computer, then attach the other end of the cable to the Internet source.
- Typically speaking, you'll use desktop computers for a network, which means the Ethernet ports will be on the back of each CPU box.
-
4
-
5Type in control panel. Doing so will search your computer for the Control Panel app.
-
6Click Control Panel. It's a blue rectangle icon at the top of the Start menu.
-
7Click Network and Sharing Center. This option resembles a set of blue monitors.
- If you see "Category" in the upper-right side of the page, first click the Network and Internet heading on the main Control Panel page.
-
8Click Change advanced sharing settings. It's a link in the upper-left side of the page.
-
9Check the "Turn on network discovery" box. This will ensure that your computer can interact with other computers that are plugged into the Internet source.
- You can also enable the "Turn on file and printer sharing" option and the "Allow Windows to manage homegroup connections" option if they aren't automatically selected.
-
10Click Save changes. It's at the bottom of the page.
-
11Enable network discovery on the other network computers. Once each computer in the networked group has network discovery enabled in Control Panel, your wired network will be ready to use.[5]


-Step-10.jpg)


Using a Wired Network on Mac
-
1Make sure that you have the necessary hardware. You'll need an Internet source (e.g., a router) into which you can plug each individual computer, as well as Ethernet cables to connect the computers to the Internet source.
- Most standard routers only come with a few Ethernet ports, but you can buy network hubs that support upward of 10 connections.
- Make sure that you know the approximate distance from each computer to the Internet source. You'll need Ethernet cables that can span this distance.
-
2Set up the Internet source. Plug one end of an Ethernet cable into the "Internet" port on the back of the modem, then connect the other end of the cable to the "Internet" or "Ethernet" port on your Internet source.
- You'll also need to plug in the Internet source's power cable before proceeding.
-
3Plug each computer into the Internet source. Attach one end of an Ethernet cable to the square Ethernet port on your computer, then attach the other end of the cable to the Internet source.
- Typically speaking, you'll use iMac computers for a network. This means that you'll find the Ethernet port on the back of the iMac's monitor.
- If you're using Mac laptops for your network, you'll need to buy a USB-C network adapter for your computer and then plug it into one of the USB-C slots on the side of your Mac, since Mac laptops no longer include Ethernet ports.
-
4
-
5Click System Preferences…. It's near the top of the drop-down menu.
-
6Click Sharing. You'll find this blue folder-shaped icon in the middle of the System Preferences window.
-
7Check the "File Sharing" box. It's on the left side of the page. This will ensure that you can share files from your computer to other computers on the network.[6]
- You can check any other file sharing options that you want to use for your network here as well.
-
8Close the System Preferences window. Your changes will be saved; the current computer is now set up for network sharing.
-
9Enable file sharing on the other network computers. Each computer that's connected to your Internet source will need file sharing to be enabled. Once you've completed this process, your wired network will be ready to use.
-Step-6.jpg)
-Step-8.jpg)
-Step-15.jpg)


Expert Q&A
Did you know you can get expert answers for this article?
Unlock expert answers by supporting wikiHow
-
QuestionCan you connect computers to a network with the server settings?
 Spike BaronSpike Baron is the Owner of Spike's Computer Repair based in Los Angeles, California. With over 25 years of working experience in the tech industry, Spike specializes in PC and Mac computer repair, used computer sales, virus removal, data recovery, and hardware and software upgrades. He has his CompTIA A+ certification for computer service technicians and is a Microsoft Certified Solutions Expert.
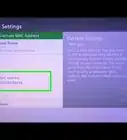
Network Engineer & Desktop SupportYes, in the server settings menu, you type SMB colon, forward slash, forward slash, followed by the name of the computer you're looking to connect. That should connect the PC.
Support wikiHow by unlocking this expert answer.
-
QuestionWhy can't I connect my Mac to a network?Spike BaronSpike Baron is the Owner of Spike's Computer Repair based in Los Angeles, California. With over 25 years of working experience in the tech industry, Spike specializes in PC and Mac computer repair, used computer sales, virus removal, data recovery, and hardware and software upgrades. He has his CompTIA A+ certification for computer service technicians and is a Microsoft Certified Solutions Expert.
Network Engineer & Desktop SupportYou may not have computer discovery or file sharing turned on. You need the computer to be "unlocked" for it to connect to a network.Support wikiHow by unlocking this expert answer.
-
QuestionHow do I set up a computer with proper subnet masks for a local network?
 Community AnswerWithout knowing what IP addresses you are using I can only give you an estimate. I can show the default values based on the private IP addresses I assume you're using. If you see anything between 10.0.0.0 and 10.255.255.254, the default subnet mask is 255.0.0.0. If you see 172.16.0.0 to 172.31.255.254, the default subnet mask is 255.255.0.0. If you see 192.168.0.0 to 192.168.255.254, the default subnet mask is 255.255.255.0, which is the most common range on home equipment and small networks up to 254 computers, so I would guess this is the one you need.
Warnings
- You may need to increase your Internet plan's maximum speed to accommodate multiple computers, especially if you're connecting over Wi-Fi.⧼thumbs_response⧽


-Step-26-Version-2.webp)


References
- ↑ Spike Baron. Network Engineer & Desktop Support. Expert Interview. 9 January 2019.
- ↑ Spike Baron. Network Engineer & Desktop Support. Expert Interview. 9 January 2019.
- ↑ Spike Baron. Network Engineer & Desktop Support. Expert Interview. 9 January 2019.
- ↑ Spike Baron. Network Engineer & Desktop Support. Expert Interview. 9 January 2019.
- ↑ Spike Baron. Network Engineer & Desktop Support. Expert Interview. 9 January 2019.
- ↑ Spike Baron. Network Engineer & Desktop Support. Expert Interview. 9 January 2019.
About This Article