This article was written by Bryzz Tortello and by wikiHow staff writer, Travis Boylls. Bryzz Tortello is a Phone Repair Specialist and the Owner & CEO of Tortello Repair Services. With over ten years of experience, she specializes in iPhone and iPad ranging from screen and battery replacements to microsoldering and data recovery. Bryzz attended The College of the Canyons.
The wikiHow Tech Team also followed the article's instructions and verified that they work.
This article has been viewed 95,579 times.
Do you need to transfer files from your iPhone to another device? There are many ways to files from an iPhone to a different device. While it is not possible to send files from an iPhone using Bluetooth, you can still transfer files wirelessly using AirDrop or iCloud. This wikiHow article teaches you alternatives you can use to transfer files from an iPhone to another device.
Steps

What can I use to send files instead of Bluetooth?
-
1AirDrop. AirDrop is Apple's alternative to Bluetooth, which allows you to transfer files wirelessly from one device to another. The downside to AirDrop is that it only allows you to transfer files between Apple products. For example, you can use AirDrop to transfer files from an iPhone to another iPhone, or from an iPhone to a Mac, but you cannot use AirDrop to transfer files from an iPhone to a Windows PC or Android device.
-
2iCloud. When you sign up for an Apple ID, you get 5GB of free iCloud storage you can use to save any file you wish. You can retrieve the files you save to iCloud on Apple products by signing in with your Apple ID. On non-Apple products, you can retrieve files saved to your iCloud storage by signing into the iCloud website using a web browser.
- USB File Transfer. If you want to transfer files from an iPhone to a PC or Mac, you can do so using a USB cable. Simply use the charging cable you use to charge your iPhone to connect to a free USB port on your computer. Then you can retrieve the files on your iPhone using Finder on Mac, or File Explorer on Windows.
-
3Other Cloud Services. Like iCloud, there are other cloud storage services you can use to save files and retrieve them on other devices, including Dropbox, Google Drive, and OneDrive. Download the cloud storage app from the App Store on your iPhone and sign in or sign up for an account. Then use the cloud storage app to upload the files you want to transfer. Download and sign in to the cloud storage app on a different device and use the cloud storage app to retrieve your files.
-
4Email. Lastly, you can use email to transfer files from one device to another. Simply send yourself an email with the file you want to transfer as an attachment. Open your email on a different device and download the attached file. The downside to this method is that most email services have a limit on how big of a file you can send as an attachment. It's also not practical for sending multiple files.


Transferring Files with AirDrop
-
1Place both devices near each other. Make sure both your iPhone and the device you want to send a file to are near each other and have Bluetooth turned on.
- You can only use AirDrop to send files to other Apple devices. You cannot use AirDrop to send files to Android devices or Windows computers.
- Make sure the feature is on and ready for sharing. To do that, go into Settings, tap on General and select Airdrop. Then, check either Contacts only or Everyone.
-
2Open the file you want to send. You can open the file you want to send in whichever app it is associated with. For example, if you want to send a photo, open the Photos app and then open the photo you want to send. If you want to send a Pages document, open the document in Pages.
- Alternatively, you can open a file from within the Files app on your iPhone. It has an icon that resembles a blue folder.
-
3
-
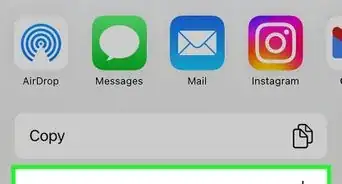
4Tap the AirDrop option. It has a white icon with blue concentric rings with a triangle cut out of the bottom half of the rings. Tap the AirDrop option in the Share menu to open the AirDrop menu.
-
5Tap the device or user you want to send the file to. You should see a list of nearby users and/or devices you can send the file to. Tap the user or device you want to send the file to.
- If you do not see a list of devices you can send to, make sure all users have Bluetooth turned on and are near each other. Also, check your AirDrop permissions in the Control Center to make sure you are able to receive files from the other device.
-
6Open the AirDrop notification on the receiving device. When you send a file to another device using AirDrop, the other device will receive a notification. Check your notifications and open the AirDrop notification.
-
7Click or tap Accept. This will start transferring the file to the device. Once the file is finished transferring, you can find the file in your Downloads folder on PC or Mac. One iPhone and iPad you can open the file in the app it is associated with.[1]


Transferring Files with iCloud
-
1
-
2Tap On My iPhone. It's in the main menu of the Files app. This displays all files stored locally on your iPhone.
-
3Tap the file you want to send. It will most likely be in a folder named after the app the file is associated with (i.e. Pages for Pages documents). Open the folder and tap the file you want to send to open the file.
- If you can't find the file on your iPhone, tap iCloud Drive in the main menu of the Files app and check to make sure it isn't already uploaded to your iCloud storage.
-
4
-
5Tap Save to Files. It's at the bottom of the Share menu. This allows you to select where you want to save the file to.
-
6Tap iCloud Drive. This displays all folders in your iCloud storage.
-
7Tap the folder you want to save the file to and tap Save. Select where you want to save the file to in your iCloud storage and tap Save in the upper-right corner. This saves the file to your iCloud storage.
-
8Go to https://www.icloud.com/ on the device you want to transfer the file to. You can use Safari or any other web browser you want to retrieve your files from the iCloud website.
- If you are on a Mac and you are signed in with your Apple ID, you can simply click the iCloud folder in the Finder.
- On Windows PC, you can download the iCloud app from the Microsoft Store. This allows you to browse your iCloud storage inside File Explorer.
-
9Sign in with your Apple ID. Use the email address and password associated with your Apple ID to sign in to your iCloud storage.
-
10
-
11Select the file you want to transfer. Locate the file you want to transfer and click it to select it.
-
12


Transferring Files with a USB Cable
-
1Connect your iPhone to your computer. Use the same cable you use to charge your iPhone and connect it to a free USB slot on your PC or Mac. Then plug the other end of the USB cable into your iPhone.
-
2Tap Trust on your iPhone. The first time you connect your iPhone to a computer, it asks if you want to trust the computer it is connected to. Tap Trust to allow your computer to access your iPhone.
-
3Select the option to use your iPhone as file storage (if needed). The first time you plug your iPhone into a computer, you receive a pop-up asking what you want to do when your iPhone is plugged in. Select the option to use your iPhone as file storage. This allows you to access the files on the internal storage of your iPhone.
-
4
-
5Click your iPhone. It should be listed in the menu panel to the left. This opens your iPhone's internal storage.
-
6Click Internal Storage. This displays all the files stored on your iPhone or iPad.
-
7Locate the file you want to transfer. It will most likely be in a folder named after the app it is associated with. Open that folder and then locate the file you want to transfer.
- Photos and videos are most likely located in the "DCIM" folder.
-
8Drag and drop the file onto your desktop. This transfers the file from your iPhone to your desktop on your computer. You can access the file on your desktop.


Transferring Files with Cloud Storage
-
1Download a cloud storage app on your iPhone. In addition to iCloud, you can use other storage services to transfer files from your iPhone to other devices. Download the app for the storage service you want to use from the App Store. Other cloud storage apps include Google Drive, Dropbox, and OneDrive.
-
2Open your cloud storage app and sign in. Once you finish downloading the cloud storage app you want to use, tap the icon on your Home screen to open the app. Then sign in with the email address and password associated with your account. If you do not have an account, follow the instruction to sign up for a new account.
- If you are using Google Drive, you can sign in using your Gmail account.
- If you are using OneDrive, you can sign in using your Microsoft account.
-
3Tap the option to add files. It is most likely an icon with a plus (+) symbol at the bottom of the screen or in the lower-right corner. This displays a pop-up menu.
-
4Tap the option to upload files. It will be in the pop-up menu that appears when you tap the plus icon. It will most likely say Upload or Upload File, Create or Upload File or something similar.
-
5Tap the option to browse for files on your iPhone. It will say Browse, Upload File or something similar. Tap the option to browse files on your iPhone.
-
6Select the file you want to upload. Tap the file to select it. It will either start uploading automatically, or you will need to tap Upload to begin uploading the file. Wait until it is completed uploading.
-
7Open the cloud storage app or website on a different device. All of these cloud storage apps are available on iPhone and iPad from the App Store, or the Google Play Store on Android devices. Download the app on a mobile app to retrieve your files. On a PC or Mac, go to the cloud storage website in a web browser. The cloud storage websites are as follows:
- Google Drive: https://drive.google.com/
- Dropbox: https://www.dropbox.com/
- OneDrive: https://onedrive.live.com/
-
8Sign in to your account. Locate the option to sign in to your cloud storage and sign in with your email address and password.
-
9Click or tap the file you want to transfer. This either selects the file or it opens the file inside the app or web browser.
-
10Click or tap the Menu icon ⋯. It's the icon with three dots in the upper-right corner. This displays a drop-down menu.
- Alternatively, you can right-click the file on a PC or Mac to display a context menu.
-
11Click or tap the option to download the file. It will either say Download or it will be an icon with an arrow pointing down at the top of the page. This downloads the file to your device. On most devices, you can find your downloaded files in the Downloads folder.


Transferring Files over Email
-
1Open your email app. You can use Mail on iPhone, Gmail, Outlook, or any other email app you normally use to send and receive email.
-
2Compose a new email. Click the option to compose a new email. This will be different depending on one which app you are using. It may be a button that says New, or Compose or it may be an icon with a plus sign (+) in the lower-right corner or an icon that resembles a pen and paper in the upper-right corner.
-
3Enter an email address as the recipient. If you are sending the file to someone else, enter their email address in the "To:" field. If you are sending the file to another device that you own, you can enter your own email address as the recipient.
-
4Enter a subject. You can enter anything you want on the subject line. Make sure you enter something you or the person you are sending the file to will recognize.
-
5Add the file you want to send as an attachment. To do so, tap the icon that resembles a paperclip. Then tap the file you want to send. This attaches it to your email.
- Most email services limit the size of the file you can send. You should send an attachment that is more than 25 MB large.
-
6Send the email. Tap the icon that resembles a paper airplane or arrow pointing up. This sends the email. You should get a notification when you receive the email.
-
7Check your email on the device you want to transfer the file to. If you are using a mobile device, open your email app on that device. Sign in to your account if you need to. If you are using a computer, go to the website you use to check your email or open your email client.
-
8Open the email with the attachment. Look for the email with the subject you add. Click or tap it to open it.
-
9Open the attached file. Simply click or long-press the file to open it.
-
10Open the menu ⋯. It is most likely an icon with three dots in the upper-right corner. Click or tap this icon to open the menu.
-
11Click the option to download the file. It will most likely say Download, Save, Save as or something similar. This downloads the file to your device. You can find all your downloaded files in your Downloads folder.


About This Article