This article was co-authored by wikiHow staff writer, Nicole Levine, MFA. Nicole Levine is a Technology Writer and Editor for wikiHow. She has more than 20 years of experience creating technical documentation and leading support teams at major web hosting and software companies. Nicole also holds an MFA in Creative Writing from Portland State University and teaches composition, fiction-writing, and zine-making at various institutions.
The wikiHow Tech Team also followed the article's instructions and verified that they work.
This article has been viewed 2,951,958 times.
Learn more...
Want to erase everything on your MacBook Pro and start fresh? Whether you're troubleshooting a problem or giving away your laptop, there's an easy way to erase everything on your MacBook and restore it to its original factory settings. On macOS Monterey and Ventura, you can use Erase All Content and Settings to safely reset your MacBook. On earlier versions, you can wipe your MacBook clean and reinstall the operating system in Recovery Mode. This wikiHow article will walk you through the simple steps of resetting any MacBook pro in minutes.
Things You Should Know
- If your MacBook Pro has an Apple processor and is running macOS Ventura or Monterey, use "Erase All Content and Settings" to do a hard reset.
- For earlier versions and MacBook Pros with Intel processors, start your Mac in Recovery Mode and use Disk Utilities to reset.
- Before resetting your MacBook, create a backup in Time Machine or iCloud.
Steps
macOS Ventura
-
1Open your System Settings. You'll find this option in the Apple menu at the top-left corner of your screen.
- Resetting your MacBook Pro will delete all of the data on your computer. If you haven't already created a backup, you should do so now.
-
2Click General in the left sidebar.Advertisement
-
3Click Transfer or Reset in the right panel.
-
4Click Erase all Content and Settings. This opens the Erase Assistant on your MacBook Pro, which prompts you for your password.
- This option is only available if you're using macOS Ventura on a MacBook Pro using the Apple Silicon chip (2021 models and later), or the Apple T2 Security chip (models from 2018 and later).[1]
-
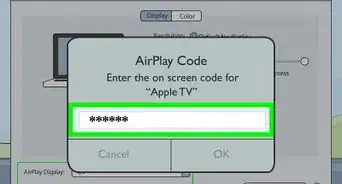
5Enter your password and click OK. Use the password you use to log in to your MacBook Pro.
-
6Create a backup when prompted. Depending on your backup settings, you may be prompted to back up your Mac to an external hard drive using Time Machine.
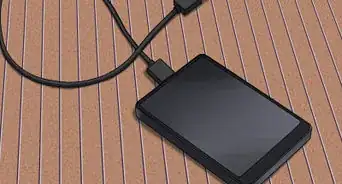
- To create a backup, connect an external drive (such as a USB flash drive), click Open Time Machine…, and follow the on-screen instructions.
- If you've already created a backup or don't have any data you want to keep, click Continue to skip backing up again.
-
7Review the data to be erased and click Continue. This screen displays a list of all items that will be deleted if you proceed with resetting your MacBook Pro.
- If you're prompted to sign out of your Apple ID, enter your Apple ID passcode and click Continue.
-
8Click Erase All Content & Settings to reset your MacBook Pro. Your Mac will now restart and display either a progress bar or a black screen.
-
9Activate your Mac. After your Mac is erased, you may be asked to connect a network cable or select a Wi-Fi network to begin activation. Follow the on-screen instructions to activate your Mac.
-
10Click Restart to complete the reset. This restarts your MacBook Pro and launches the setup assistant, which will guide you through setting up your laptop as if it were new.
- If you're selling, giving away, recycling, or trading in your MacBook, you're finished. The new owner, if any, should complete the setup process.
- If you're keeping your MacBook Pro, follow the on-screen instructions in the setup assistant to sign in and restore your backed-up data.


macOS Monterey
-
1Open your Mac's System Preferences. You'll find it in the Apple menu at the top-left corner of your screen.
- Resetting your MacBook Pro will delete all of the data on your computer. If you've created a backup using Time Machine, you'll be prompted to back up again before you reset your MacBook. If not, be sure to make a backup before you reset your computer.
- This method will only work if you're using macOS Monterey on a MacBook Pro using the Apple Silicon chip (2021 models and later), or the Apple T2 Security chip (models from 2018 and later).[2] If you have an older MacBook Pro, see this method instead.
-
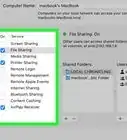
2Click the System Preferences menu. It'll be in your menu bar at the top-left corner of the screen.
-
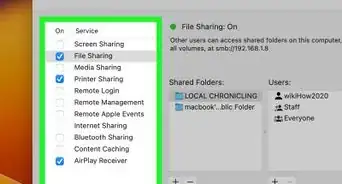
3Click Erase all Content and Settings on the menu. This opens the Erase Assistant on your MacBook Pro, which prompts you for your password.
- This option is only available if you're using macOS Ventura on a MacBook Pro using the Apple Silicon chip (2021 models and later), or the Apple T2 Security chip (models from 2018 and later).[3]
-
4Enter your password and click OK. Use the password you use to log in to your MacBook Pro.
-
5Create a backup if prompted. If you've previously used Time Machine to create a backup of your MacBook Pro, you'll be prompted to create a new backup before you continue.
- To create a backup, connect an external drive (such as a USB flash drive), click 'Open Time Machine…, and follow the on-screen instructions.
- If you've already created a backup or don't have any data you want to keep, click Continue to skip backing up again.
-
6Review the data to be erased and click Continue. This screen displays a list of all items that will be deleted if you proceed with resetting your MacBook Pro.
- If you're prompted to sign out of your Apple ID, enter your Apple ID passcode and click Continue.
-
7Click Erase All Content & Settings to reset your MacBook Pro. Your Mac will now restart and display either a progress bar or a black screen.
-
8Activate your Mac. After your Mac is erased, you may be asked to connect a network cable or select a Wi-Fi network to begin activation. Follow the on-screen instructions to activate your Mac.
-
9Click Restart to complete the reset. This restarts your MacBook Pro and launches the setup assistant, which will guide you through setting up your laptop as if it were new.
- If you're selling, giving away, recycling, or trading in your MacBook, you're finished. The new owner, if any, should complete the setup process.
- If you're keeping your MacBook Pro, follow the on-screen instructions in the setup assistant to sign in and restore your backed-up data.


Earlier Versions & Intel Processors
-
1Back up your Mac if possible. Since restoring your Mac to its factory settings will erase everything on your hard drive, it's a good idea to back up anything that you want to save before doing so.
-
2Find out if your MacBook Pro has an Apple or Intel processor. The steps to reset your MacBook Pro will be different for Apple Silicon and Intel processors. Before you continue, here's how to check your processor:
- Click the Apple menu.
- Click About This Mac.
- If you have Apple Silicon, you'll see a "Chip" section in the menu, followed by a name that starts with the word "Apple."
- If you have an Intel processor, you'll see a "Processor" section, followed by the name of an Intel processor.[4]
-
3Sign out of iTunes if you're using macOS Mojave or earlier. This step isn't required if you're using macOS Catalina or later. To sign out of iTunes:
-
4Sign out of iCloud and iMessage. Before resetting your Mac, you'll want to sign out of iCloud on all versions of macOS, including Ventura and Monterey. Follow these steps to do so:
-
Ventura:
- Click the Apple menu and select System Settings.
- Click your name in the sidebar.
- Click Sign Out on the right panel.
- Open the Messages app.
- Click the Messages menu and select Settings.
- Select iMessage and click Sign Out.
-
Earlier versions:
- Click the Apple menu and select System Preferences.
- Click Apple ID (Catalina, Big Sur, and Monterey) or iCloud (earlier versions).
- Click Sign Out.
- Open the Messages app.
- Click the Messages menu and select Settings.
- Select iMessage and click Sign Out.
-
Ventura:
-
5Start your MacBook Pro in Recovery Mode. The steps to do this will be a little different depending on whether your MacBook Pro has an Intel or Apple Silicon processor:
-
Apple processors:
- Shut down your Mac. Wait until your Mac's screen is black before you continue to the next step.
- Press and hold the power button to start your MacBook. Do not lift your finger from the power button until you see the startup option screen—this screen displays your disks and an "Options" gear icon.[6]
- If prompted, enter your password to continue.
-
Intel processors:
- Shut down your Mac. Wait until your Mac's screen is black before you continue to the next step.
- Turn on your MacBook Pro, then immediately press and hold Command + R at the same time. Continue holding these keys down until you see the Apple logo or another image.
- If prompted, enter your password to continue.
-
Apple processors:
-
6Select Disk Utility and click Continue. You'll see Disk Utility in the list of recovery options.
-
7Select your Mac's hard drive. Click the Mac's hard drive's name in the upper-left side of the Disk Utility window.
- Your Mac's hard drive will be named "Macintosh HD" if you didn't rename it.
- If you have an Apple Silicon processor and previously used Disk Utility to create volumes on your hard disk, you'll need to delete those volumes. To do so, select each volume and click the - symbol.
- Ignore any volumes called Macintosh HD or Macintosh HD – Data. You'll also want to ignore any volumes listed under "External and Disk Images."
-
8Click the Erase tab. It's at the top of the Disk Utility window. A new window will open.
-
9Enter a name and format type. Use the name Macintosh HD in the Name field. In the Format area, use the default option suggested by Disk Utility, which will be either APFS or Mac OS Extended (Journaled).
-
10Click Erase. If you see Erase Volume Group, click that instead. This will erase the data on your MacBook Pro.
- If you have an Apple processor, click Erase Mac and Restart to confirm.
- If prompted, enter your Apple ID username and password to continue.
-
11Click Done when prompted. Your Mac is now completely erased.
- Now that there's no operating system on your Mac, you'll need to reinstall it. To get back to the utilities window, close the Disk Utility window.
-
12Click Reinstall macOS and follow the on-screen instructions. The remaining steps will walk you through installing macOS on your MacBook Pro. This will be the same version of macOS that came preinstalled.
- When prompted, select a wireless network or connect your Mac to the internet using an ethernet cable.
- Once MacOS finishes downloading, you'll be able to install and set up the operating system as though the Mac were brand-new. If you plan to sell or give away your MacBook Pro, follow the on-screen instructions to reinstall macOS. When you get to the "Your Mac is Activated" screen, click Restart, and allow the next owner to complete the final setup steps.


Community Q&A
-
QuestionAfter turning on my MacBook Pro, the display shows a flashing folder icon with a question mark on it. and I cannot do anything. How can I fix it?
 Community AnswerThe flashing folder icon shows that your MacBook can't find the essential drivers and files it needs to load. Pressing the Command and R keys would normally launch local recovery via the recovery partition on the Mac. Since this isn't possible, you need to recover via the Internet. Instead of holding just the command and R keys when you switch on, hold the option key down as well. An animated globe will appear while Internet Recovery initializes. Once that's done, you'll need to select a WiFi network. The animated globe will reappear while the Mac downloads recovery files from Apple servers. When complete, macOS Utilities will appear so you can recover.
 -
QuestionWhen turning on it just displays the Apple icon and the thinker just spins. I tried all four reboot options and nothing?
 Community AnswerHold V on boot up to get a log and look for any "errors" or warnings in the log. Then look up whatever the errors were. It will look overwhelming as it shows the whole bootup console, but look for wherever it stops. For example, eventually it may stop having messages. Look into that to see where the problem may lie, then consider getting some professional assistance if you're unsure.
 -
QuestionMy computer doesn't allow me to log in to my account. It starts to log in, but after the loading bar is more than 60%, it stops. What could be the problem?
 Carmello BilottiCommunity AnswerRestart your Mac, and while it is restarting, hold Command-R until the OS Utilities screen comes up. Click Restore from Time Machine backup, then restore your computer to an earlier point.


References
About This Article

1. Shut down your Mac.
2. Turn it back on.
3. Press and hold ⌘ Command+⌥ Option+P+R for 15 seconds.
4. Release the keys and sign back in.