This article was co-authored by Sarah Stearns. Sarah Stearns is a DIY Specialist, Artist, Maker, Blogger, and the Founder of SarahMaker.com. With over ten years of experience, she specializes in fun, approachable crafts like crocheting, making polymer clay jewelry, quilting, and creating Cricut projects. Her work has been featured in several publications, such as Scientific American, Good Housekeeping, Vox, and Apartment Therapy. Sarah holds a BA in Psychology from Vanderbilt University.
There are 26 references cited in this article, which can be found at the bottom of the page.
wikiHow marks an article as reader-approved once it receives enough positive feedback. This article received 22 testimonials and 90% of readers who voted found it helpful, earning it our reader-approved status.
This article has been viewed 363,334 times.
Needle punching is a fun way to create textured designs on fabric. It’s easier to learn than embroidery, and you can needle punch any design you like. Before you start needle punching, you’ll need to sketch your design on your fabric. Next, thread your needle puncher. Then you’ll be all set to stitch your design with the needle puncher. When you’ve completed the pattern, you can mount your design in the embroidery hoop or turn it into a patch.
Steps
Transferring Your Design onto Fabric
-
1Pick a fun, simple design for your needle punch project. When you are just starting out, you may want to practice doing a small, simple design. Look online for inspiration or sketch your own design on a piece of paper.
- Designs with larger blocks of color will be easier than intricate fine lines.
- To make your life easier, consider using a symmetrical design, so it doesn’t matter which side is the front or back.
-
2Purchase enough weavers cloth for your project. Get enough fabric to easily fit your design plus a few extra inches around the sides so that you can attach the embroidery hoop. Weavers cloth is a kind of woven cotton and polyester blend that will hold your needle punch stitches in place. If you are needle punching a rug, you will need a heavier weight weavers cloth than if you are making a pillow. You can buy weavers cloth online or at a craft store.[1]Advertisement
-
3Draw your pattern onto your fabric in reverse. You can use a fabric pencil, a normal pencil, or even a marker, since the marks will be covered with stitches anyways. When you punch needle, you will create a side with loops and a side with flat stitches. The loops will be on the back as you create the design, but most people want them on the front for the finished design, so you have to draw your design in reverse. That way, when you flip over the pattern, it will be in the right direction.[4]
- If you prefer to have the loops on the back of your fabric, you can draw your design normally, not in reverse.
- If you chose a symmetrical design, it won’t matter whether you draw it in reverse or not.
-
4Use tracing paper to transfer your design in reverse as an alternative. If you don’t want to draw your design by hand, you can transfer it onto your fabric with tracing paper. Put a sheet of tracing paper down on your fabric. Print out your picture, and put it face down on top of the tracing paper. Draw over all the lines in the drawing with a pencil, and the tracing paper will leave marks in the shape of your design on the fabric.[5]
- If you want the loops to be on the back of your design, trace the printed image face up instead of face down.
-
5Unfasten an embroidery hoop and lay your fabric over the small hoop. Embroidery hoops are made off 2 hoops, a smaller inner hoop and a larger outer hoop. Loosen the screw on the outside of the large hoop until you can easily pop it off the small hoop. Lay the fabric over the small hoop so that your design is centered in the hoop.[6]
-
6Lock the fabric tightly in place with the outer hoop. Place the larger hoop over the smaller hoop. Adjust the fabric until it is smooth and tight across the hoop. Turn the screw on the outer hoop so that it is tight around the inner hoop.[7]
- You may have to loosen the screw, adjust the fabric, and tighten the screw again a few times until the fabric is evenly taut across the hoop.


Threading the Punch Needle
-
1Get embroidery floss in all the colors you need for your design. You get to decide what colors you use. For example, if you are making a tree, you might want brown, red, and a few kinds of green. Make sure to buy embroidery floss, not sewing thread. Embroidery floss is thread that is twisted so that it has 6 strands, so it is thicker than the thread you would use for sewing.
- You can use cotton or wool embroidery floss.
-
2Push the metal threader through the needle punch. The metal threader is made of thin metal wires and it should come with the punch needle in the same package. Push the metal threader through the front of the punch needle, at the hollow tip of the needle.[8]
- Push the threader all the way down so that the end sticks out the back of your punch needle.
-
3Thread your floss in the back of metal threader. Push the end of your embroidery floss through the back of the metal threader. Leave 1 inch (2.5 cm) or more of tail, so that when you pull the threader through the needle punch, the floss won’t slip off.[9]
- Remember to use the color of floss that you want to stitch first in your design.
-
4Pull the threader through the punch needle and remove the floss. Pull the metal threader out through the front of the punch needle, so that it pulls the floss with it. Your floss should be coming out the front of your punch needle. Take the string off the back of the metal threader so that it is dangling freely.[10]
- If the threader didn’t bring the floss with it, try again with a longer tail.
-
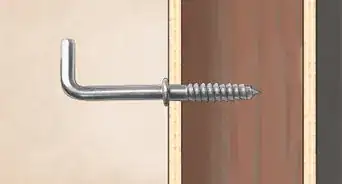
5Put your needle threader through the eye in the tip of your needle. The tip of your needle punch has a scooped out front, called the bevel, and a smooth back. The smooth back has a little hole it in, called an eye. Put your needle threader through this eye, so that the threader is sticking out into the beveled part of the tip.[11]
- It might take you a few tries to get the metal threader through the small eye.
- Working under a bright light should help if you’re struggling with this step.
-
6Pull the floss through the eye with the threader. Put your floss back into the tip of the threader. Pull the threader out of the eye, so that it pulls the floss with it. Remove the floss from the threader.[12]
- The floss will continue to unspool as you needle punch, so you don’t need to cut a specific length of floss at this stage.

Needle-Punching the Design
-
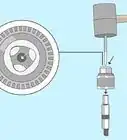
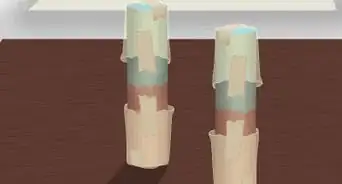
1Set the loop length using the slider on the side of the needle punch. The higher the number, the longer the loop will be. Start with a setting in the middle. If you don’t like the loop after a few stitches, you can easily pull out the stitches and reset the length.[13]
- You can also check the instructions that come with your specific punch needle to see what loop length they recommend.
- Keep in mind that the longer loops you have, the more floss you will use, which can add up in cost if you do a lot of needle punching.
-
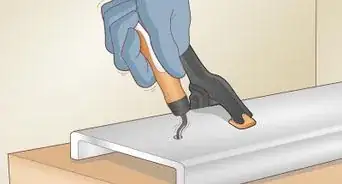
2Hold the needle with the bevel side facing the direction you are punching. Hold the punch needle like you would a pen or pencil, with the tip of the needle resting on your taut fabric.[14] The bevel, which is the scooped-out, open side of the needle, always needs to face the direction of your stitches.[15]
- As you stitch, you’ll have to keep rotating the pen so that it faces the direction you’re stitching.
-
3Start with the outlines and fill in the design row by row. Start with the outline first, then fill in the main elements from the inside out, going a row at a time. You can spiral in toward the inside or start at one end and fill in rows all the way until the other side. Keep your rows so close together that the floss touches.[16]
- For an extra-clean look, punch the stitches in your row so that they line up with the middle of the stitches in the previous row.[17]
-
4Punch your first stitch and pull the tail through the back of the fabric. Place the sharp end of the needle on the pattern, punch directly through the fabric so that the depth gauge touches the fabric. Flip your hoop over so that you can see the front side, and pull the tail of floss through.[18]
- You’ll trim this tail at the end of the project, so don’t worry about it now.
- Each stitch creates a loop of yarn that's held in place by the tension in the foundation fabric.[19]
-
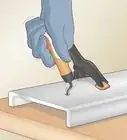
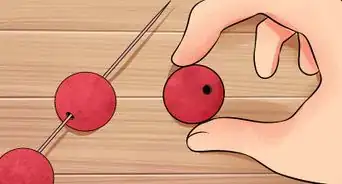
5Pull the needle out and along the surface about 0.125 inches (0.32 cm) to punch again. The needle head should always remain touching the fabric. Punch the needle through the fabric again until the needle is fully through and the plastic part of the pen touches the fabric. Then slowly remove the needle back towards you.[20]
- It’s important to be gentle, because if you tug backwards on the floss, all your stitches will unravel.
- If you're using monk's cloth, skip about 2-3 holes before making your next stitch.[21]
-
6Flip the fabric over now and then to check the other side. Check that the loops are a consistent length and close enough together to form a solid color. You can always go back and fill in gaps in your stitches or make your rows closer together.[22]
- If you don’t like how it looks, you can also pull out the stitches easily.
-
7Trim the excess floss from the first and last stitches when you’re done. Pull the needle punch out very carefully on your last stitch so that you don’t accidentally unravel your hard work. Trim the floss so that it is very close to the fabric. Trim the tail that’s sticking out from the beginning of your stitching, too.[23]
- If you want, you can push the end of the floss out through the other side of the fabric using your metal threader, so that the floss pokes out onto the loop side.
-
8Pull apart the embroidery hoop to remove the completed pattern. Loosen the screw at the top of the large hoop until the hoop easily slides off. Then, just remove your fabric from the top of the small hoop.


Framing in the Hoop
-
1Frame your design in a hoop if you want to hang it on the wall. Framing your punch needle art right in the embroidery hoop is an easy way to frame your art. Then, you don’t have to go to the trouble of buying a frame and making sure the fabric is stretched tight enough.
- If you don’t like the embroidery hoop you used for the needle punching, you could paint it or buy a prettier frame.
-
2Cut a piece of felt 1 inch (2.5 cm) bigger than the hoop to form a backing. You need a backing for your piece to protect your stitches from unraveling. One easy way to measure how big the felt should be is to stick it in the embroidery hoop, and then trim the edges until there is about 1 inch (2.5 cm) all the way around.[24]
- Your measurements don’t have to be exact – you just want enough fabric to be able to glue down the back.
-
3Put your pattern back in the hoop with the felt underneath it. Place the felt over the smaller embroidery hoop. Put the weavers cloth with your needle punch design on top of the felt. Then slide the larger hoop over both fabrics and tighten the screw.[25]
- Adjust the fabrics until they are smooth and taut across the hoop.
-
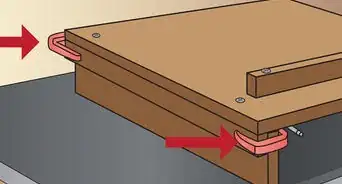
4Hot glue the fabric down onto the back. Start by putting a line of glue around the inside edge of your hoop and carefully press the fabric against it. Fold the weavers cloth down onto the back and glue it down.[26]
- Wait a few minutes for the glue to dry.
- You can hang your mounted design on the wall or give it as a gift.[27]


Turning Your Design into a Patch
-
1Turn your design into a patch so you can put it on clothes or bags. If you have a small, cute design, turning it into a patch is a great way to show it off in your day-to-day life. Instead of leaving the design mounted in your house, turning it into a patch lets you wear it on your clothes or tote bags.
- Patches can also make cool homemade gifts.
-
2Iron on an adhesive to the back of your design. Iron-on adhesive has 2 sides, a matte side and a sticky side. Set your design face down on an ironing board, and put the sticky side of the iron-on adhesive face down on the back of your design. Iron on the adhesive, moving the iron in gentle circles for about 10 seconds.[28]
- Make sure to iron it down well around the edges.
- The steam setting on your iron should be off.
-
3Cut out your design with fabric scissors. Using fabric scissors, cut out your design, trimming off all the excess fabric and adhesive. Cut close to the embroidery floss, but be careful not to cut so close that you’ll accidentally snip your stitches.[29]
- Don’t use normal scissors, because they will be too dull to cut your fabric.
-
4Glue the edges so the patch doesn’t fray. Run fabric glue around the edge of your patch so that the edge don’t fray. If you don’t have fabric glue, you can use super glue instead. Wait for the glue to totally dry.
- You can iron your patch on to a jacket, a tote bag, a pair of jeans, or whatever you want.

Community Q&A
-
QuestionCan I needle punch directly onto wool fabric rather than the weaver's clot?
 Community AnswerYou can use any fabric, as long as you use a hoop and have the correct tension. The stitches require good pressure and tension.
 -
QuestionHow many strands of thread should I use?
 Community AnswerThis depends on the desired design. Start with three strands, adding or subtracting if needed. You just have to make sure the fabric is hooped in nice and tight. Tap the fabric once it hoop. It should resonate like a drum.
 -
QuestionWhat thread do I use for this?Community AnswerEmbroidery floss is a good way to start. I often enjoy using regular sewing thread, because it's thin enough for little details.
Warnings
- A needle punch is very sharp, so be careful not to prick your finger.⧼thumbs_response⧽
Things You'll Need
- Needle punch
- Pattern
- Weavers cloth
- Embroidery hoop
- Embroidery floss
- Fabric scissors
- Felt
- Hot glue-gun
- Iron
- Fabric glue
- Iron-on adhesive


References
- ↑ https://youtu.be/2tCRx-kpC0g?t=9
- ↑ Sarah Stearns. DIY Specialist. Expert Interview. 4 October 2021.
- ↑ https://youtu.be/VoFfesmP6j0?t=125
- ↑ https://youtu.be/S1UTSw5dRIc?t=29
- ↑ https://youtu.be/S1UTSw5dRIc?t=293
- ↑ https://youtu.be/Ys4s8e7Y4q0?t=101
- ↑ https://youtu.be/Ys4s8e7Y4q0?t=98
- ↑ https://youtu.be/Ys4s8e7Y4q0?t=58
- ↑ https://youtu.be/Ys4s8e7Y4q0?t=62
- ↑ https://youtu.be/3LOLTYyXFYg?t=71
- ↑ https://youtu.be/VoFfesmP6j0?t=68
- ↑ https://youtu.be/VoFfesmP6j0?t=92
- ↑ https://youtu.be/hh5gTT8dByY?t=109
- ↑ Sarah Stearns. DIY Specialist. Expert Interview. 4 October 2021.
- ↑ https://youtu.be/Ys4s8e7Y4q0?t=197
- ↑ https://youtu.be/xqHdO8zhy_k?t=216
- ↑ https://youtu.be/hh5gTT8dByY?t=500
- ↑ https://youtu.be/xqHdO8zhy_k?t=192
- ↑ Sarah Stearns. DIY Specialist. Expert Interview. 4 October 2021.
- ↑ https://youtu.be/d487ymp2DzQ?t=101
- ↑ Sarah Stearns. DIY Specialist. Expert Interview. 4 October 2021.
- ↑ https://youtu.be/xqHdO8zhy_k?t=255
- ↑ https://youtu.be/hh5gTT8dByY?t=551
- ↑ https://youtu.be/xqHdO8zhy_k?t=340
- ↑ https://youtu.be/xqHdO8zhy_k?t=351
- ↑ https://youtu.be/xqHdO8zhy_k?t=357
- ↑ https://youtu.be/d487ymp2DzQ?t=166
- ↑ https://youtu.be/S1UTSw5dRIc?t=157
- ↑ https://youtu.be/S1UTSw5dRIc?t=268
About This Article

To needle punch, start by transferring or drawing your design onto the fabric. Next, lock the fabric into the embroidery hoop and thread the punch needle. Then, hold the needle like you would a pencil and punch the outline of your pattern, making sure to go all the way through so that the depth gauge touches the fabric. Afterwards, fill in the inner sections 1 row at a time, punching from the inside out. Once all the sections are filled, carefully pull the needle out of the fabric and cut off the thread with a pair of scissors. To learn more, including how to prepare your fabric before putting it into the embroidery hoop, scroll down.