This article was co-authored by wikiHow staff writer, Eric McClure. Eric McClure is an editing fellow at wikiHow where he has been editing, researching, and creating content since 2019. A former educator and poet, his work has appeared in Carcinogenic Poetry, Shot Glass Journal, Prairie Margins, and The Rusty Nail. His digital chapbook, The Internet, was also published in TL;DR Magazine. He was the winner of the Paul Carroll award for outstanding achievement in creative writing in 2014, and he was a featured reader at the Poetry Foundation’s Open Door Reading Series in 2015. Eric holds a BA in English from the University of Illinois at Chicago, and an MEd in secondary education from DePaul University.
There are 13 references cited in this article, which can be found at the bottom of the page.
This article has been viewed 76,775 times.
Learn more...
Since speakers don’t produce power (that’s an amplifier’s job), speaker wattage refers to the power limit that a speaker can handle before it breaks or overheats.[1] This means that an amplifier’s wattage must fall within the acceptable wattage range for a speaker. You can multiply voltage by amperage to get wattage, so most of the information you need to determine a speaker’s wattage range should be printed on the speaker box, drum, or in the instruction manual. You can also perform a load test on an amplifier of an unknown wattage to see if it will work with a certain speaker.
Steps
Finding the Wattage Ratings for a Speaker
-
1Check the instruction manual to find the RMS. A speaker’s RMS refers to the continuous wattage that a speaker can handle for the ideal audio signal. When matching an amplifier to a speaker, match the amplifier’s wattage to the speaker’s RMS. The RMS is always listed in your speaker’s instruction manual.[2]
- RMS stands for root mean square. It is a formula used to determine the efficiency of a current based on the wattage.
- Without the manufacturer’s recommended wattage range, there is no test that you can use to find the RMS.
-
2Use the max wattage listed in the manual to find your wattage threshold. The maximum wattage refers the highest amount of power that a speaker can handle for a short period of time. If this number is exceeded by an amplifier, the speaker may break or catch fire. This number is usually printed alongside the RMS.[3]
- If your speaker’s manual includes a peak wattage (or peak power), this measurement refers to the maximum amount of power that your speaker can receive for 1-2 seconds before shorting or dying. Think of it as the wattage that will instantly kill your speaker. A max wattage can be sustained for a short period of time.
Warning: Do not perform a load test on a speaker by turning the volume up slowly while it’s connected to a high-powered amplifier. This is exceptionally dangerous and can result in a fire if you don’t know your speaker’s wattage limits.
Advertisement -
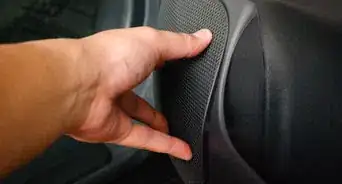
3Look on the back of the speaker box if you don’t have a manual. If you don’t have your instruction manual, there should be a plate or sticker on your speaker listing the wattage, voltage, and amperage. Turn the speaker box around to find this information. Typically, it will list a range of numbers under wattage. This is an RMS range. Use this number to choose an appropriate amplifier for your speaker.[4]
- These numbers are often printed directly on the drum of the speaker as well.
- You can also enter your speaker’s brand and model into a search engine to find the specifications you need.
-
4Find the voltage and amperage numbers if the wattage isn’t mentioned. If you only have the speaker’s drum or there is no wattage information on the box, look for a number that ends in V, for voltage. Jot this number down on a piece of paper. Then, look for a number that ends in A. This is the amperage. Write this number down as well.[5]
- Voltage is a measurement of an electrical current’s strength. Amperage refers to the volume of the current in a signal. The higher the current, the more electricity there is.
- It helps to think of voltage and amperage in terms of a pipe. The amperage is the amount of water in a pipe, while the voltage is how much pressure there is the pipe. Think of the wattage as the size of the pipe. The higher the wattage is, the more voltage and amperage the speaker can handle.
-
5Multiply the amperage and the volts to find the max wattage. Take the speaker’s voltage and multiply it by the amperage to get a rough estimate of the maximum wattage. For example, if your speaker has 120V and 5A, multiply these numbers together to get 600 watts.[6]
- To continue the pipe metaphor, multiplying the amount of water (the amperage) by how hard it is pushed out of the pipe (the amperage), tells you the minimum size of the pipe needed to handle the water and pressure. For the speaker, this essentially means that this is the maximum wattage, since the pipe shouldn’t get any smaller.


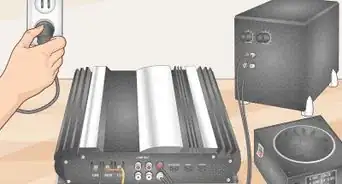
Using an Amplifier Load Test to Test Compatibility
-
1Look in the amplifier’s instruction manual to find the wattage first. A multimeter test is unnecessary if you have the amplifier’s instruction manual. Flip through the first 1-2 pages to find the amplifier’s specifications to find the wattage. If you don’t have this information, you’ll need to perform a load test by hooking the amplifier up to a speaker and testing the wattage through a sound test. If the amplifier’s maximum wattage does not exceed your speaker’s max wattage, they’re compatible[7]
- The wattage information is often printed on the back of the amplifier as well. Look for a sticker or panel with tiny writing on it. The vast majority of amplifiers list the wattage here.
- Testing the amplifier’s wattage involves playing an extremely loud and obnoxious sound, so it’s best to avoid performing the test if you can find the information elsewhere.
-
2Turn your multimeter off and plug the probes into the front. Don’t turn on your multimeter. Insert the red wire that came with your multimeter into the red slot on the front of the device. Take your black wire and plug it into the black slot next to it. For all intents and purposes, the red wire is your positive line and the black wire is your negative line.[8]
-
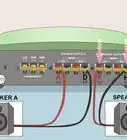
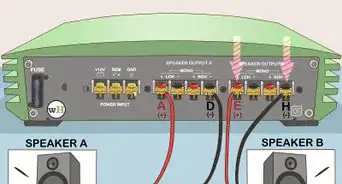
3Insert the multimeter’s probes into the speaker’s output jacks. Turn your amplifier off. On the back of the amplifier, find 2 unused output jacks for the amplifier. Slide the red multimeter probe into the red jack labelled positive (+). Slide the black probe into the black jack labelled negative (-). Plug a speaker into the other output slots if there isn’t one already plugged in.[9]
- The probe refers to the thin length of metal at the end of each wire. These are the pieces that read the voltage.
Tip: If you’re testing an amplifier with vertical screw slots on top for holding wires in place, insert each probe and use a hex wrench or screwdriver to tighten the screws and hold the probes still while you test.[10] If there is no vertical screw slot and the port is covered by a screw, hold the probe against the exterior of the screw while running your test.
-
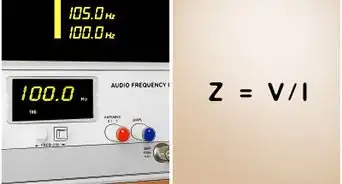
4Set your multimeter to 200 volts (AC) and turn it on. Turn the dial on the front of your multimeter to 200 volts (AC). The AC voltage setting is represented by a V with a wavy line above it. The numbers next to this V are the AC voltage settings. Turn the dial to 200 and turn your multimeter on.[11]
- For a low-powered amp, set the voltage to anywhere between 10-100.
-
5Wrap the clamp meter around the speaker wire in the positive jack. A clamp meter, or current clamp, is a digital meter with 2 jaws sticking out of the top. It reads the current (amperage) of any wire running through the opening in the middle of the jaws. Wrap your clamp meter’s jaws around the output wire that is connecting to your speaker’s positive terminal.[12]
- Just to clarify, you are not clamping the wire directly. It simply needs to run through the opening in the middle of the jaws. Do not pinch the wire with your clamp meter.
- If you speaker wire is color-coded, this positive output wire will be red. Otherwise, look for the wire connecting to the jack labelled positive (+).
-
6Play a 50 Hz test tone through your phone or a CD and turn it up. Turn the volume on the amplifier, speaker, or receiver all the way down. Plug a phone or mp3 player into the headphone jack on the front of your amplifier or speaker. Search online to find a 50 hertz (Hz) test tone. Press play on your phone or player to begin playing the test tone. Turn the test tone up as high as you can tolerate and let it continue playing.[13]
- You cannot perform this test using music because the hertz value and power required to play a song shifts up and down as the sound gets louder and softer.
- The 50 hertz test tones are pretty easy to find. They’re commonly used for this test specifically.
- This part of the test is pretty loud and uncomfortable. Don’t do this late at night when people may be trying to go to sleep.
-
7Read the screens on your meter to find the amplifier’s voltage and amperage. With the sound playing, check the screen on your multimeter and write the number down. Then, check the number on the clamp meter and write this number down. The multimeter’s reading is your amplifier’s voltage, while the clamp meter’s reading is the amperage.[14]
- As the test tone is playing, your multimeter is registering how much power the amplifier is putting on the current. The clamp meter is reading how much current there actually is.
-
8Multiply the voltage by the amperage to find the wattage. Turn the test tone off, shut your amplifier down, and remove your multimeter’s probes. Then, multiply your voltage and amperage together to find the amplifier’s wattage. For example, if your voltage was at 108V and the amperage was at 24A, your amplifier’s wattage is 2592 watts.[15]
- If you didn’t play the test tone as loud as possible, you aren’t getting the maximum amperage. The real number is likely a little higher, but it’s not worth damaging your ears to find out.
-
9Compare the amp wattage to your speaker’s wattage. Use the speaker's wattage restrictions and RMS to determine if the speaker and amplifier can be hooked up together. If the amplifier's wattage exceeds the speaker's wattage, don't use them together.[16]


Things You’ll Need
Using an Amplifier Load Test to Test Compatibility
- Multimeter
- Clamp meter
- Audio player


References
- ↑ https://youtu.be/QaDO9aTFDdk?t=25
- ↑ https://youtu.be/2eknnWWO7TQ?t=180
- ↑ https://youtu.be/2eknnWWO7TQ?t=180
- ↑ https://youtu.be/pUou_noD1Gc?t=89
- ↑ https://youtu.be/vQ3Zw0Il1aY?t=38
- ↑ https://youtu.be/vQ3Zw0Il1aY?t=38
- ↑ https://www.qsc.com/resource-files/productresources/amp/discontinued/rmx/q_amp_rmx_series_specs.pdf
- ↑ https://youtu.be/vQ3Zw0Il1aY?t=79
- ↑ https://youtu.be/vQ3Zw0Il1aY?t=87
About This Article