X
wikiHow is a “wiki,” similar to Wikipedia, which means that many of our articles are co-written by multiple authors. To create this article, 21 people, some anonymous, worked to edit and improve it over time.
This article has been viewed 245,379 times.
Learn more...
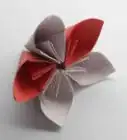
A kusudama ball is a modular origami model made out of 12 kusudama flowers. In ancient Japanese culture, kusudama balls were used for incense or potpourri[1] .
While the kusudama ball looks extremely intricate, it is not as complicated as it looks. This model would make a good table decoration, or, if you thread it on some string, you can hang it from the ceiling. Read on to learn how to make this impressive model.
Steps
-
1Collect the "Things You'll Need", listed at the bottom of this article.
-
2Take one of the flowers. Glue along the middle line of one of its petals.Advertisement
-
3Take a second flower and press the middle line of one of its petals on the glue on the other flower. Press firmly so that the glue can set.
- Secure with a very small washing peg, a paper clip, or even a bobby pin, if you wish.
-
4Glue along the petals indicated with red lines on the previous picture. Take a third flower and press two adjacent petals onto the glue. Secure with pegs.
-
5Repeat with a fourth and a fifth flower, as indicated on the picture.
-
6Take the sixth and final flower. This one will be the most difficult one to add, for you will have to glue three petals at the same time. Glue the petals indicated with red lines on the picture.
- Press three petals of the sixth flowers onto the glue on the rest of your model. Secure.
-
7Repeat the previous steps with the other six kusudama flowers, so that you end up with two identical halves of six flowers each.
-
8Turn both halves over.
-
9Glue along the lines indicated in red on the picture. Press these two lines on glue together, so that your halves start to form a ball. Secure.
-
10Glue between all the petals that are now pressing against each other. In the end you should have glued 12 pairs of petals together.
-
11Secure all the pairs of petals. If you are using pins, you should end up with a ring of pins all round the ball. Beware that the flowers at the bottom do not press those at the top out of proportion.
-
12Let the model dry thoroughly for about a day. Remove the pegs or pins. You're finished - now find a spot to display your new decoration!
Advertisement
Community Q&A
-
QuestionWhat kind if glue should I use so that it sticks together properly?
 Community AnswerElmer's glue should be fine, but you can use different school or paper glue if you want.
 -
QuestionWhat kind of paper should I use, thick or thin?
 Community AnswerThin is a lot easier to fold, but if you want to use thick paper you can. Origami paper is the best, though.
 -
QuestionDo I have to do with 5 petals only or can I do 6 petals?Community AnswerUsing five petals will be better as you may face problems while sticking six petals together.
Advertisement
Warnings
- This model takes a long time to make! Do not attempt it if you are in a hurry.⧼thumbs_response⧽
- This model is not recommended for people with little or no origami experience for it is of quite an advanced level!⧼thumbs_response⧽
Advertisement
Things You'll Need
- Twelve kusudama flowers
- Clear glue - the kind that comes in a tube with a nozzle - a school glue stick or a stapler simply won't cut it.
- Very small washing pegs or paper clips
References
About This Article
Advertisement