wikiHow is a “wiki,” similar to Wikipedia, which means that many of our articles are co-written by multiple authors. To create this article, 32 people, some anonymous, worked to edit and improve it over time.
This article has been viewed 322,552 times.
Learn more...
The art of Japanese paper folding goes back hundreds of years. Designs range from simple shapes such as hats and boxes to more intricate designs such as the traditional origami crane. There are many kind of origami flowers—some more difficult than others—here are a couple to get you started.
Steps
Origami Lily with Stem
-
1Gather your supplies. For this flower, you will need 2 6"x6" squares of origami paper and tape. One of these pieces of paper will form a stem, so you may want to choose a brown or green sheet. If you do not have 6x6 origami paper, then you can use a regular piece of paper. Make it into a triangle and cut the rest off and then you have your 6x6 piece of paper.
-
2Take the piece of origami paper you'd like to use for the flower. Lie it on the table pattern or color side down. Fold the paper in half diagonally to form a large triangle. Fold the bottom left corner to the bottom right corner, making a smaller triangle. Reopen this smaller triangle.Advertisement
-
3Fold the petals. Take the left corner of the triangle and fold upwards from the center crease. This corner will extend beyond the edge of the original triangle and be at approximately the same height as the top corner. Repeat this fold on the right side. Try to make this fold symmetrical to the fold on the left side. Set the flower aside.
-
4Place the piece of paper you want to use for the stem pattern or color side down. Fold the paper in half diagonally. Unfold the paper and position it so it looks like a square diamond.
-
5Pull the right corner towards the center crease. Match the right edge of the paper to the center crease, making sure the bottom corner is also aligned. Repeat with the left corner. When you are done, your paper should look like a kite.
-
6Fold the right and left sides towards the center crease. Be sure the bottom point is precise and sharp. The seam in the middle should be tight.
-
7Fold the upper right corner down towards the center crease. Repeat with the upper left corner. The seam between these two flaps should also be tight.
-
8Fold the top of the kite down so the crease lies two-thirds up from the bottom of the kite. Fold the left side over to the right side matching all of the edges. The shorter, fatter triangle forms the leaf.
-
9Rotate the stem so the points face up. Take the leaf and gently pull it out and away from the stem.
-
10
-
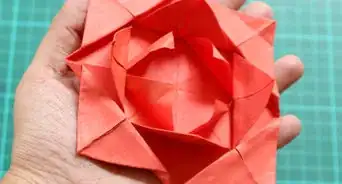
11Finished.

Simple Origami Flower
-
1Take a 6"x6" piece of origami paper, pattern-side up. Fold diagonally in both directions, making sure to align the corners and crease sharply. Your creases should form an "X."
-
2Turn the paper over. Fold from left to right, and reopen. Then, fold from the top down to the bottom. Your paper should be a rectangle.
-
3With the open flaps at the bottom, gently push the top left and top right corners of the paper. The crease in the center of the paper will lift. All four corners will meet at the bottom. You should now have a square diamond shape. Flatten your diamond shape. Make sure there is one top flap on the left side and one top flap on the left side.
-
4Rotate the diamond 180 degrees, so the open flap are at the top.
-
5Fold the bottom left and bottom right edges of the diamond towards the center crease. This will form a fold that looks like a kite. Flip the diamond over to the backside, and repeat the folds you made to the front side.
-
6Open your petals. Grab the top tip of the kite. Pull and fold it down approximately 3/4 of the way down the kite. With your thumb and forefinger, squeeze the center of the flower to make the crease firm.
-
7Finesse the other petals into place. Arrange the side petals until they are in the position you want. Adjustments can be made to any of the petals by pinching the base of the flower near the stem.
-
8Use scissors or pinking shears to either round or scallop the edges. Rounded edges will make the flower into a pansy, while scalloped edges will give you a carnation!
Making Other Types of Origami Flowers
-
1Make a simple origami lotus flower. This beautiful aquatic plant translates well into paper. Tasteful and elegant, yet simple and surprisingly easy to use.
-
2Make a kusudama flower. Kusudama is the Japanese practice or sewing or gluing individual folded units together to form a spherical model. They were originally used an incense holders, but today make a color statement.
-
3Try origami tropical flowers. These flowers have rounded edges to give a relaxed, tropical feel. Easy, painless, and fun to make!
-
4Make a harebell flower. This beautiful origami mimics a tasteful, delicate flower that is native to Scotland. Also called bluebell, fold it in blue paper for an authentic look!
Community Q&A
-
QuestionIs it easy to do origami even though you are not Chinese?
 Community AnswerIt does not matter where you are from, although origami originated in Japan, not in China.
 -
QuestionHow do you make a rose using origami?
 Community AnswerThe article How to Make a Rose shows a few ways you can make a rose, including using origami.
 -
QuestionHow do I make an origami tree?Community AnswerReference wikiHow article Make an Origami Christmas Tree as a starting point for a simple tree.
Warnings
- Use caution when using scissors or pinking shears.⧼thumbs_response⧽
Things You'll Need
- A few sheets of origami paper
- Scissors or pinking shears
- Tape (optional)
- A flat surface to work on
About This Article
To make an origami flower, start by folding a square piece of paper in half diagonally both ways. Then, turn the paper over and fold it in half from left to right and top to bottom, unfolding after each fold. Next, bring all 4 corners together so they meet at the bottom and then rotate the diamond so the open flaps are at the top. After that, fold the bottom left and right edges in toward the center crease on both sides. Finally, fold the triangular flaps at the top of the diamond down to create the petals. If you want to learn how to make an origami lily with a stem, keep reading the article!