This article was co-authored by wikiHow Staff. Our trained team of editors and researchers validate articles for accuracy and comprehensiveness. wikiHow's Content Management Team carefully monitors the work from our editorial staff to ensure that each article is backed by trusted research and meets our high quality standards.
This article has been viewed 78,050 times.
Learn more...
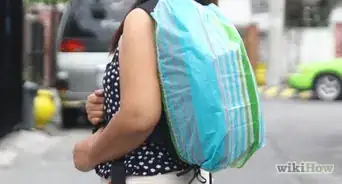
Drawstring backpacks are a great way to carry lightweight items, such as folders, clothing, sneakers, and paperback books. They are great for the beach, concert, or park, and can easily be folded up and tucked into your pocket when no longer needed. Unfortunately, many of the store-bought drawstring backpacks are plain, or they come with large, unsightly logos. If you need a drawstring backpack, and can't find the one you like, why not make your own?
Steps
Cutting and Preparing Your Pieces
-
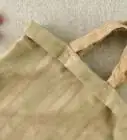
1Cut two 12 by 14-inch (30.48 by 35.56-centimeter) rectangles out of durable fabric, such a canvas. You can also use other fabrics as well, such as cotton, linen, or twill.[1]
- For a larger bag, cut your fabric into two 16 by 18-inch (40.64 by 45.72-centimeter) rectangles.
-
2Fold and press both of the long edges and one of the short edges by ¼ inch (0.64 centimeter). Take one of the fabric pieces, and turn it so that the wrong side is facing you. Fold both of the long edges and one of the narrow edges down by ¼ inch (0.64 centimeter). Secure the edges with sewing pins, then iron them flat.[2]
- Do this step for both fabric rectangles.
Advertisement -
3Sew the folded edges down. Do not sew the two fabric rectangles together just yet. Simply sew along both of the side edges and the bottom edge on each piece. Remove the pins as you sew.
-
4Fold the top, raw edge down twice on each piece to make the casing. Take one of the fabric pieces, and turn it so that the wrong side is facing you. Fold the top, raw edge down by ½ inch (1.27 centimeters), and press it flat with an iron. Fold it down again, but this time by 2 inches (5.08 centimeters), and press it flat with an iron.[3]
- Secure the folded edges with sewing pins, if you need to.
-
5Topstitch the casing down. Sew it as close to the bottom, folded edge of the casing as you can. If you used sewing pins to hold the fabric down, be sure to remove them as you go. You can use a thread color that matches your fabric, or a contrasting color for something more interesting.
-
6Cut two 58-inch (147.32-centimeter) long cords. Use a color that either matches your bag, or contrasts with it. Avoid using cord that is too thin or too rough, or it will "bite" into your shoulder when you wear the bag.


Adding an Appliqué (Optional)
-
1Trace your design onto the paper side of the iron-on adhesive. The paper side is the smooth side. The rough side is the adhesive side.
- Iron-on adhesive is also called "no-sew fusible web" and "heat-n-bond."
-
2Pin the iron-on adhesive to the fabric you want to use for your appliqué. Make sure that you are pinning the iron-on adhesive to the wrong side of the fabric. Also, make sure that the smooth, paper side of the iron-on adhesive is facing up.[4]
- Consider using a contrasting or color for the fabric. For example, if your back is a solid black color, choose a colorful print for your appliqué.
-
3Iron the adhesive using the recommended heat setting on the package. Each iron-on adhesive will be a little different. If you are in doubt, start with a lower heat setting. Avoid using too much heat, or the glue will harden and become stiff.[5]
-
4Let the iron-on adhesive cool, then cut the appliqué out. Cut right along the lines that you drew; there is no need to leave seam allowances.
-
5Peel the backing off, then pin the appliqué to the front of the backpack piece. Make sure that you are pinning the appliqué adhesive-side-down. Also, make sure that you are pinning it to the right side of your backpack piece.
- You can also pin the appliqué to a pocket piece instead. You must do it before sewing the pocket onto the bag, however.
-
6Iron the appliqué using the recommended heat setting on the package. Again, avoid using too much heat, or the glue will harden and become brittle. Once the appliqué cools, pull the sewing pins out.
-
7Topstitch the shape down. You can use a thread color that matches the appliqué, or you can use a contrasting one. If you are using a straight stitch, try to sew as close to the edge of the shape as you can. If you are using a zigzag stitch, sew right over the edge instead. This will help anchor your appliqué to the backpack as well as add some design.[6]


Adding Pockets (Optional)
-
1Cut out your inside and/or outside pockets. You can use the same color as your bag, or a contrasting color. Here are the recommended dimensions for the pockets:[7]
- Inside: 6 by 7 inches (15.24 by 17.78 centimeters)
- Outside: 8 by 10 inches (20.32 by 25.4 centimeters)
-
2Fold and iron both of the narrow edges and one of the long edges by ½ inch (1.27 centimeters). Turn the fabric so that the wrong side is facing you. Fold both of the short edges and one of the long edges down by ½ inch (1.27 centimeters). If you need to, use sewing pins to keep the fabric in place.
- Leave one of the long edges alone. You will be folding it differently.
-
3Fold the remaining long edge down twice. Fold it by ¼ inch (0.64 centimeters) first, then press it flat with an iron. Fold it again, by this time by ½ inch (1.27 centimeters). Press the edge flat with an iron once more. This will be the top edge of your pocket.
-
4Topstitch the top, folded edge down. Try to get as close to the bottom fold as possible. You can use the same color thread as your fabric, or a contrasting one.
-
5Pin the pockets in place. Pin the big pocket to the right side of your first backpack piece. Pin the small pocket to the wrong side of your other backpack piece. Try to pin the smaller pocket towards the top of the backpack piece.
- If you wish to add an appliqué to the outside pocket, do that before you pin it.
-
6Topstitch the pockets in place along the bottom edge and both of the side edges. When sewing your inside pocket, use a thread color that matches the backpack fabric. This way, the stitching won't be visible as much from the outside. You can use any thread color you want for the outside pocket: the same color as the pocket, or a contrasting on.
- Do not sew along the top edge of the pocket.
- To prevent unraveling, sew back and forth a few times along the start and end of your sewing.


Assembling the Backpack
-
1Pin the two backpack pieces together, with the right sides facing in. Make sure that everything is aligned.
-
2Sew around the bottom edge and both of the side edges using a ⅝-inch (1.59-centimeter) seam allowance. Start just below the casing, and finish just below the casing. To prevent unraveling, sew back and forth a few times over the start and end of your sewing.
- Do not start sewing from the top of the bag. If you do, you will sew the casing shut, and won't be able to use your bag.
-
3Pull the cording through the casing. Clip a safety pin to one of the 58-inch (147.32-centimeter) long cords. Starting from the front-left side of the bag, push it all the way through the front and back casing, until it comes out the back-left side of the bag. Repeat this step with the other cord, but start from the right side of the bag.[8]
-
4Set a grommet into the bottom corners of your bag, ½ inch (1.27 centimeters) away from the edges. Make a mark on the fabric where you need the grommets to go first, then make a small "X" shaped hole using a craft blade. Set the grommet using the manufacturer's instructions.
- Do not make the hole too big. You want the fabric to stretch around the base of the grommet as you push it through. If you make the hole too big, the grommet will fall out.
-
5Pull the cords through the grommets, and knot the ends. Take both of the left-side cords, and pull them through the left grommet; you want the cords to be coming out of the front of the bag. Tie the ends of the cords into a tight, overhand knot. Repeat this step for the cords on the right side of the bag.
- If the cords are too thin or the grommet is too big, the knot may not be able to hold the cords in place. Instead, pull just one of the cords through the grommet, then knot both ends of the cord together.


Community Q&A
-
QuestionWhat are shoulder guides?
 T. ChinsenTop AnswererWhen referencing a backpack, a shoulder guide is a padded piece along the straps of the bag. They are positioned to rest on the shoulders so as to spread the load of the bag contents and prevent the straps digging into the body.
 -
QuestionHow do I make a mini backpack?T. ChinsenTop AnswererDecide on the size of your mini backpack and adjust the size to the article instructions. There are patterns for other styles of backpack. Search online for free backpack sewing patterns to find a suitable design.
-
QuestionWhat size in diameter of cord should I be using?
 Mary Beth TocaCommunity AnswerAnything is okay, as long as it fits through the casing. A good choice would be anywhere from 6-12mm, depending on what style of fabric you are using.
Things You'll Need
- Two 12 by 14-inch (30.48 by 35.56-centimeter) pieces of fabric
- Fabric scissors
- Sewing pins
- Sewing machine
- Tape measure
- Iron
- Tailors' chalk or pen (optional)
- Safety pin
- 2 grommets and setting tool
- Two 58-inch (147.32-centimeter) long cords
- Iron-on adhesive (optional, for appliqué)
- Extra fabric (optional, for pockets and/or appliqué)


References
- ↑ http://www.momtastic.com/diy/106558-diy-how-to-make-a-drawstring-backpack/
- ↑ http://www.momtastic.com/diy/106558-diy-how-to-make-a-drawstring-backpack/
- ↑ http://www.momtastic.com/diy/106558-diy-how-to-make-a-drawstring-backpack/
- ↑ http://howtosew.com/blog/sewing-basics/no-sew-fusible-web
- ↑ http://howtosew.com/blog/sewing-basics/no-sew-fusible-web
- ↑ http://www.momtastic.com/diy/106558-diy-how-to-make-a-drawstring-backpack/
- ↑ http://www.aliceandlois.com/diy-drawstring-backpack/
- ↑ http://www.momtastic.com/diy/106558-diy-how-to-make-a-drawstring-backpack/
About This Article

Drawstring backpacks are great for carrying lightweight items like clothing, sneakers, and folders. To make your own, you’ll need 2 pieces of canvas or cotton, a sewing machine, some long cords, and a couple of grommets. Start by pinning the 2 pieces of cloth together, with the outside facing in. Remove the pins and sew the bottom and side edges together, leaving about 5/8th inches off the end. Then, pull 1 cord through the casing on the left side of the bag and repeat this on the right side. Sew grommets into the bottoms corners of the bag, then pull the cords through the grommets and knot the ends. To learn how to decorate your drawstring bag, read on!