X
This article was co-authored by wikiHow Staff. Our trained team of editors and researchers validate articles for accuracy and comprehensiveness. wikiHow's Content Management Team carefully monitors the work from our editorial staff to ensure that each article is backed by trusted research and meets our high quality standards.
This article has been viewed 27,022 times.
Learn more...
A cover for your backpack can save your possessions from being ruined by water damage. By making a rain cover yourself, you can save money and personalize your design as well. All it takes are a few supplies to make the cover and string it with elastic, but should you need a cover in emergencies, there are simple solutions for that as well.
Steps
Part 1
Part 1 of 3:
Creating a Cover
-
1Gather your supplies. Most of the supplies for this project should be available at local grocery stores, general retailers, and hobby shops. When choosing a glue, you should select one that works well for bonding plastic, like PlasticWeld, Amazing GOOP, or Super Glue. You'll need:
- Elastic cord
- Glue
- Marker
- Plastic, waterproof sheet (like a plastic tablecloth or shower curtain)
- Ruler
- Scissors
- Tape[1]
-
2Lay out your sheet on your work area. Choose a clean, flat, level work surface. Lay the sheet down so it is completely flat. The side facing up will be the interior of your cover, so if your plastic sheet has a design you want to show off, the design should be facing down.
- Plastic table cloths intended for children's parties are durable and often come decorated with popular children's characters. These make great options for children's rain covers.
Advertisement -
3Round the edges of your plastic sheet. Measure and use your marker to mark points 5 inches (12.7 cm) away from each corner for both edges of each corner. Then, use your marker to connect the two dots at each corner so the line between each is rounded.
- Your rounded edges don't have to be perfectly alike, so feel free to freehand these markings.
- The edges of your cover will end up bunching, which means as long as the rounded corners are roughly the same, irregularities won't be noticed.[2]
-
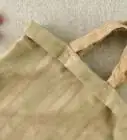
4Fold the long edges along the middle of the plastic sheet. Fold one long edge of your sheet so it lines up evenly with the sheet's middle. Fold the opposite edge in the same way to form two inward facing flaps.
- Both flaps should be evenly aligned with the middle of the sheet, lengthwise, before moving on.[3]
-
5Apply glue to the top and bottom of both flaps. Open one of the long flaps. At one end of the seam and moving in the direction of the opposite end, apply 2 to 3 inches (5 to 7.6 cm) of glue along the seam. Do the same at the opposite end of the flap, then close the flap. Repeat this process with the other flap.
- At this point, you should wait for your glue to dry before moving on. For most quick drying glues, you should be ready to move in as few as 15 minutes.[4]
-
6Fold the flaps between the glued seams and the middle of the sheet. Open your flap gently, being mindful not to pull on the glue too much. Fold the space between the glued seam and the middle of the sheet so the new fold and flap both align with the sheet middle.
- When finished folding the first flap, repeat this process with the other one. When finished with both, the inward facing seam should be beneath the flap, with both the seam and flap edge aligned evenly with the sheet middle.
-
7Glue along to the top and bottom of the second fold. Similar to your flap glue application, you'll be gluing your second fold. Open your unglued fold. Starting from one end of your seam and moving toward its opposite end, apply 2 to 3 inches (5 to 7.6 cm) of glue. Repeat this for the opposite end of the seam.
- The remaining unglued fold should also be glued in this fashion. When finished, you should allow the glue to harden to promote a solid bond.[5]


Advertisement
Part 2
Part 2 of 3:
Stringing the Cover with Elastic
-
1Fold a seam along the outer edge of the sheet. Open your sheet completely. It should bunch where you have glued seams together. Once your sheet is open, fold each outer perimeter of the sheet inward 1 inch (2.5 cm) for all edges. Then:
- Use a durable tape to fasten the edges that have been folded inward to the plastic sheet. Leave about ½ inch (1.3 cm) of space between your tape and the newly formed fold that is now the outer edge.
- The loop of sheet formed by folding the perimeter of the sheet inward is where you will string your elastic cord.[6]
-
2Feed your elastic cord through the seam channel. This can take some patience. Feed your cord into the channel of the seam until you pull it through one entire edge. Then, tie off the opposite end of your string in a large knot to prevent it pulling through while stringing the rest of the cover.
- Continue stringing your elastic cord through the gap created by the loop around the perimeter of the plastic sheet edges until you have returned to your starting point.
- It can be difficult to force the cord through the plastic loop. In some cases, you can grip the cord through the plastic and pull it/inchworm it along.[7]
-
3Tighten your cord to your preferred tautness. Looser elastic may be easier to put on or take off, but it will also be easier for it to be blown off by wind or fall off in transit. Keep this and the approximate size of your backpack in mind when tightening your cord. To tighten your cord:
- Pull on the end of the cord that you have fed through the perimeter loops of your cover. When the elastic is sufficiently taut, stop pulling.
- Refrain from tightening your cord too much. Putting too much strain on the elastic can strain it and compromise its elasticity.[8]
-
4Untie your base knot and connect the ends of the elastic. Keep the free end of your cord firmly in hand to preserve the cord's tautness. Untie the knotted end, keeping a tight grip on it also to maintain tension in the cord. Then, use a simple knot to connect the ends together.
-
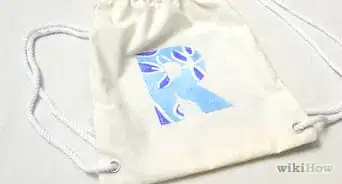
5Cut free excess elastic and enjoy your cover. It's likely you'll have some extra elastic at the ends of your cord. Cut this free with your scissors to finish your bag. If your cover is for a child, you may want to consider labeling it so it doesn't get lost.[9]


Advertisement
Part 3
Part 3 of 3:
Making a Simple Cover in Emergencies
-
1Make a garbage bag backpack poncho. If there's a sudden downpour and you don't have your cover on hand, you can tear arm and head holes in a garbage bag to create a makeshift poncho. Most garbage bags should be large enough to fit both you and your backpack, keeping you both dry.
- Avoid tearing arm and head holes that are too large in your garbage bag. This will create more opportunities for leakage and dripping.
-
2Tie a small umbrella to the top handle of your bag. For this technique, you should prioritize umbrellas with a wrist strap. Take the wrist strap and tie it firmly to the handle at the top of your backpack so the umbrella hangs over the front of your head and your bag as well, keeping you both dry.
- You may be able to use a length of cord, an article of clothing (like a scarf), and so on to tie umbrellas without wrist straps to your backpack.
- Be sure to tie your umbrella firmly and securely to your backpack. Otherwise, your umbrella may be blown away.
- Avoid using this technique in particularly bad weather. Updrafts from sudden gusts of wind could cause your umbrella to jostle painfully against your head.
-
3Wear a large raincoat over your bag. Choose a raincoat or waterproof jacket that's larger than your normal size. You'll want it to be large enough to accommodate your backpack as well. Put on your backpack, then suit up in your raincoat or waterproof jacket to protect your bag from the rain.
- This may look silly, as though you have a hump, but it is very effective for keeping your bag dry.
-
4Create a makeshift bag cover. Take a plastic sheet, garbage bag, or some other similar, waterproof material, and tuck it between your back and backpack. Pull the material so that part of it is pinned between your back and the bag, but the rest of the material is draped over the back of the bag to protect it.
- A plastic garbage bag is a great on-the-go cover. You can fold one of these to a very small size and stow it in your bag for rainy day use.
- To keep your makeshift bag cover in place, you might want to use some waterproof or water resistant tape, like duct tape, to hold the cover to your bag.
-
5Finished.


Advertisement
Warnings
- Check the usage instructions before applying your glue. Some glues may require you to wear gloves when applying.⧼thumbs_response⧽
Advertisement
Things You'll Need
Creating a Cover
- Glue
- Marker
- Plastic, waterproof sheet (like a plastic tablecloth or shower curtain)
- Ruler
- Scissors
Stringing the Cover with Elastic
- Elastic cord
- Scissors
- Tape
Making a Simple Cover in Emergencies
- Garbage bag (optional)
- Raincoat (large size; optional)
- Umbrella (with wrist strap; optional)


Works and Citations
- ↑ https://www.youtube.com/watch?v=xvLGDVjGvfA
- ↑ https://www.youtube.com/watch?v=xvLGDVjGvfA
- ↑ https://www.youtube.com/watch?v=xvLGDVjGvfA
- ↑ https://www.youtube.com/watch?v=xvLGDVjGvfA
- ↑ https://www.youtube.com/watch?v=xvLGDVjGvfA
- ↑ https://www.youtube.com/watch?v=er0wd76t7Qw
- ↑ https://www.youtube.com/watch?v=xvLGDVjGvfA
- ↑ https://www.youtube.com/watch?v=er0wd76t7Qw
- ↑ https://www.youtube.com/watch?v=xvLGDVjGvfA
About This Article

wikiHow Staff
wikiHow Staff Writer
This article was co-authored by wikiHow Staff. Our trained team of editors and researchers validate articles for accuracy and comprehensiveness. wikiHow's Content Management Team carefully monitors the work from our editorial staff to ensure that each article is backed by trusted research and meets our high quality standards. This article has been viewed 27,022 times.
Co-authors: 4
Updated: April 4, 2021
Views: 27,022
Categories: Bag and Purse Projects
Advertisement