This article was co-authored by wikiHow staff writer, Jessica Gibson. Jessica Gibson is a Writer and Editor who's been with wikiHow since 2014. After completing a year of art studies at the Emily Carr University in Vancouver, she graduated from Columbia College with a BA in History. Jessica also completed an MA in History from The University of Oregon in 2013.
There are 17 references cited in this article, which can be found at the bottom of the page.
The wikiHow Video Team also followed the article's instructions and verified that they work.
This article has been viewed 23,732 times.
Learn more...
Whether you're looking for a fun craft or making DIY wedding decorations, you can create realistic, beautiful fabric flowers with organza. This sheer synthetic fabric is a great budget option, and your DIY flowers will last for years! You can cut individual petals and singe the edges with a candle to make them curl a little or gather a long piece of organza to make a giant, puffy textured flower. We've created a step-by-step tutorial to walk you through the process of making organza flowers.
Steps
Making a Flower with Individual Petals
-
1Purchase silk or synthetic organza in any color. Decide if you want to use a single color of fabric or buy a few different shades to get a realistic look. For example, if you want to sew a red organza flower, choose a deep red, a lighter red, and a pale red. The slight color variation will make your flower look more natural.[1]
- You might find organdie or organdy for sale near the organza. Don't use this for your flowers since it's made of cotton and won't curl like organza.
- The amount of fabric you need depends on the size of your flowers and how many layers you use.
-
2Cut out 2 or 3 circular templates in a few different widths. Get out a large piece of cardboard and find a plate or glass that's as wide as you want to make the flower. Set it on the cardboard. Trace around the side of the plate or glass to make a circle and cut it out. Then, make another 1 or 2 templates that are each 1⁄2 to 1 inch (1.3 to 2.5 cm) smaller.[2]
- For example, make 1 circle template that's 5 inches (13 cm) in diameter, 1 template that's 4 inches (10 cm), and a template that's 3 inches (7.6 cm).
Advertisement -
3Lay the templates on the fabric and cut at least 5 or 6 fabric circles. Spread your organza on a flat surface and place the templates on the fabric. Run fabric chalk or a pencil around each circle. Then, cut out the circles. Although you can make as many circles in any sizes you like, cut a total of at least 5 or 6 circles.[3]
- Keep in mind that more layers make a fuller flower. For example, if you'd like a really full flower, work with around a dozen circles.
Tip: Sort the fabric circles based on their size. This makes it easier to quickly assemble your flowers.
-
4Hold the edge of a fabric circle above a candle flame to singe it. To make the edges of your flower petals curl a little, light a candle and hold an organza circle 1⁄2 in (1.3 cm) above the flame. Put it just close enough so the heat melts the edge of the fabric. Slowly move the circle to quickly singe all around the fabric edge.[4]
- Singe every petal so they look like they're curling open a little.
- Set a glass of water near your work surface so you can quickly extinguish fabric if it catches on fire.
-
5Stack your curled layers from largest to smallest. To assemble an organza flower, lay a few of the largest circles on your work surface. Then, set 2 or 3 slightly smaller circles on them. Finish your flower by putting a few of the smallest circles on top.[5]
- You don't need to perfectly stack the circles. In fact, keeping them a little off-center makes the petals more interesting and unique.
-
6Thread a needle and sew through the center to hold the flower in place. Use thread that matches the color of your fabric and insert the needle through the bottom of the flower. Pull the needle up through the center of all the layers and bring the needle back down through the center. Continue sewing back and forth to make stitches that secure the flower.[6]
- If you don't want to sew the flower, use a hot glue gun to stick each layer together. Use caution when working with the hot glue so you don't burn yourself.
-
7Tie the thread and trim the tail. Cut the thread tail close to the knot so it doesn't hang below the flower. Then, you can glue or sew small beads onto the center of the flower if you want to hide the stitches.
- Glue a small felt circle onto the bottom of the flower if you want to make a flat base for it. This can make it easier to attach the flower onto other projects.


Creating a Ruffled Flower
-
1Cut a strip of organza so it's 3 to 4 inches (7.6 to 10.2 cm) wide. Unroll organza fabric in any color and cut a piece that's at least 12 inches (30 cm) long and 3 to 4 inches (7.6 to 10.2 cm) wide. For a flower that's about 5 inches (13 cm) across, cut the strip so it's about 40 inches (100 cm) long.[7]
Tip: This is a great project for using up leftover organza fabric. You could even use old organza curtains instead of buying new fabric.
-
2Fold the strip of fabric into a rectangle. Fold 1 end of the fabric onto the opposite end so the strip is half its original length. Then, bring the folded edge over to the opposite end. Keep folding the fabric until you have a rectangle that's around 2 inches (5.1 cm) across.[8]
- Since you've folded the fabric, you'll only need to cut the petal shape once so this is a quick method for making flowers.
-
3Cut the top of the folded fabric to make a curved edge. Hold the folded fabric and use scissors to cut a curve along the top. You can throw away the fabric scraps and unfold the fabric strip to see the scalloped edge you just cut.[9]
- Don't cut the bottom of the fabric or you'll have trouble holding onto the flower when you shape it.
-
4Hold the scalloped edges over a candle flame if you want to curl the petals. Light a small candle and carefully hold just the curved edge of the fabric 1⁄2 inch (1.3 cm) above the flame. It only takes a second for the heat from the candle to singe the organza, so keep moving the scalloped edge over the flame until you've worked across the whole strip of fabric.[10]
- If you aren't trying to create realistic petals, you can skip this step.
-
5Fold the strip of fabric in half crosswise and thread a needle. Spread out the scalloped strip of organza. Take 1 end of the fabric and fold it so it's almost lined up with the opposite end. Then, thread a needle with thread that matches the color of the organza and tie a knot in the end.[11]
- You don't need to line the scallops up perfectly. The flower will actually look more realistic if you overlap the scallops so they're slightly off-center.
-
6Work a running stitch across the bottom of the folded fabric strip. Insert your needle at the end of the strip so it goes through both layers of fabric. Leave about 1⁄4 inch (0.64 cm) of space and push the needle back down through the fabric. Make a stitch back up through the fabric and leave another gap. Keep doing the running stitch until you reach the folded end of the fabric.[12]
- The running stitch is also called the basting stitch.
-
7Pull the thread to gather the flower and sew the bottom of the flower. Once you've stitched to the end of the fabric strip, pull the thread gently. As you pull, the fabric will ruffle and gather. Bring the ends of the flower together and insert your needle into the other fabric end. Then, sew back and forth across the bottom of the flower so the layers stay in place.[13]
-
8Cut the thread and trim the excess to finish your flower. Cut the thread tail close to the knot so you don't see it trailing under the base of the flower. If you plan on attaching the flowers to other decorations, glue a small felt circle to the bottom of the flower. This gives you a base to attach to the other crafts.[14]

Styling and Using Organza Flowers
-
1Choose 1 color or a few complementary shades to make flowers. If you're making the flower with individual circle petals, you can use several different shades of a color. When you stack the circles, the different shades make the flower look more realistic. To keep things simple or to make the ruffled flower, just choose 1 color of organza fabric.[15]
- For example, to make a vibrant pink flower, stack dark pink petals with pale pink petals on top. Then, place white or cream petals in the center for the flower bud.
-
2Create small flowers if you want to attach them to jewelry, cards, or headbands. Make organza flowers that are less than 1 inch (2.5 cm) across and then hot glue them onto a headband or hairclip for a cute floral hair accessory. You can also glue tiny flowers onto cards, banners, or signs if you want them to have a fun spring look.[16]
Tip: Small organza flowers are also great decorations for handbags or purses. Just stitch the bottom of the flower onto the fabric of your bag so the flower doesn't slide around.
-
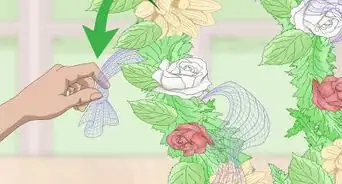
3Make large organza flowers to create wreaths or home decor projects. Buy a wooden or metal wreath frame and hot glue large flowers around the edge. Attach just a few to one side if you want an asymmetrical look or surround the entire frame with flowers to give it a full effect. Play around with using different colors or sizes to make your wreath really stand out.[17]
- To make a nice table display, hot glue the bottom of organza flowers to napkin rings. You can also scatter small organza across the table for a whimsical look.
-
4Assemble a custom flower bouquet with organza flowers. If you're looking to save money on fresh flowers or just want a bouquet that will last for years, slide small green floral wire through the bottom of your organza flowers. Then, wrap floral tape around the base of the flower or hot glue the wire in place. Gather several flower stems together and wrap a ribbon around the center to secure the bouquet.[18]
- Make your bouquet as full or simplistic as you like. For example, try mixing different types of flowers or using organza flowers in different sizes.


Things You'll Need
Making a Flower with Individual Petals
- Cardboard
- Pen or pencil
- Plate or glass
- Organza fabric
- Scissors
- Candle
- Needle and thread
- Hot glue gun, optional
Creating a Ruffled Flower
- Organza fabric
- Scissors
- Ruler
- Needle and thread


References
- ↑ https://www2.cs.arizona.edu/patterns//weaving/books/lds_fof_07.pdf
- ↑ https://youtu.be/La2wiZtA5mw?t=21
- ↑ https://sew4home.com/projects/fabric-art-accents/organza-flower-tutorial
- ↑ https://youtu.be/La2wiZtA5mw?t=400
- ↑ https://sew4home.com/projects/fabric-art-accents/organza-flower-tutorial
- ↑ https://youtu.be/La2wiZtA5mw?t=798
- ↑ https://sewguide.com/diy-fabric-roses/
- ↑ https://youtu.be/U3FFWdBNEfg?t=49
- ↑ https://youtu.be/U3FFWdBNEfg?t=65
- ↑ https://www.youtube.com/watch?v=U3FFWdBNEfg&t=14s
- ↑ https://youtu.be/U3FFWdBNEfg?t=136
- ↑ https://youtu.be/U3FFWdBNEfg?t=154
- ↑ https://youtu.be/U3FFWdBNEfg?t=178
- ↑ https://youtu.be/U3FFWdBNEfg?t=186
- ↑ https://sew4home.com/organza-flower-tutorial/
- ↑ https://youtu.be/ypixEDuk2Mo
- ↑ https://www.countryliving.com/diy-crafts/how-to/g998/flower-craft-ideas/?slide=4
- ↑ https://youtu.be/28OEOHQQ5-A?t=255
About This Article

To make an organza flower, first cut out a circle-shaped piece of cardboard the same width you want your flower to be. Then, cut out 2 more circles, making each one 1/2 inch smaller than the one before it. Trace each circle twice onto some organza, then cut out the fabric circles so you have 6 in total. Carefully singe the edges of each circle with a candle so they curl up. Stack the circles from largest to smallest, then sew through the center of the flower to hold the petals in place. Finally, tie the thread and trim off the excess. To learn how to make a ruffled organza flower, plus how to style and use your flowers when you're done with them, keep reading!