This article was co-authored by wikiHow Staff. Our trained team of editors and researchers validate articles for accuracy and comprehensiveness. wikiHow's Content Management Team carefully monitors the work from our editorial staff to ensure that each article is backed by trusted research and meets our high quality standards.
There are 23 references cited in this article, which can be found at the bottom of the page.
The wikiHow Video Team also followed the article's instructions and verified that they work.
This article has been viewed 34,004 times.
Learn more...
Arts and crafts are a fun way to exercise your creativity. There are crafts that call for almost every type of material imaginable, but some of the best ideas make use of simple supplies like paper, glue, fabric, and paint. If you’re new to the world of arts and crafts, give finger painting, origami folding, basic stitching, or other popular projects a shot, or experiment with materials like paint and clay that will allow you to use your imagination to the fullest.
Steps
Making Paper Projects
-
1Create a constellation of 3D paper stars. Take a 12 in (30 cm) square of patterned scrapbook paper and fold it diagonally both ways to crease it. Unfold the paper and fold both sets of straight edges together, then unfold it again. Use a pair of scissors to cut about 2.5 in (6.4 cm) inward from each straight edge and fold the flaps together into triangles. Glue the edges of the flaps together and watch the paper transform into a multi-dimensional star![1]
- Use lots of different colors and patterns of scrapbook paper to build your own dazzling paper solar system.
- If you want to hang your completed stars, glue 2 stars together on their backsides to make a single star with 8 evenly-spaced points, then attach a string to one of the points and suspend them from the ceiling.
-
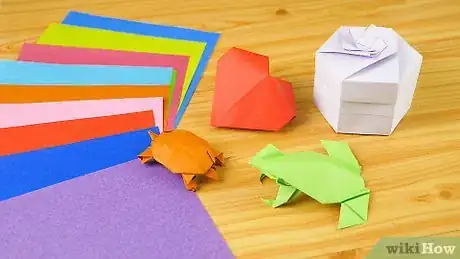
2Teach yourself how to fold origami. Origami is the Japanese art of folding paper into shapes. To try your hand at origami, you’ll need a thin square of paper and a basic template to follow, which you can find online or in art books dedicated to the art. The finished product will have a beautiful, delicate appearance.[2]
Tip: You can create almost anything with origami, from animals to household objects to elaborate shapes.[3]
Advertisement -
3Cut newspaper into one-of-a-kind snowflakes. Take a single square sheet of newspaper and fold it in half diagonally to make a triangle, then fold the triangle in half again 1-2 more times. Use a pair of scissors to snip small circles, squares, and triangles out of the creased edge. When you're done, unfold the paper and marvel at the result![4]
- The more times you fold the paper, the smaller and more intricate your snowflake's pattern will become.[5]
- You can also try cutting your designs into glossy wrapping paper to add some sparkle to your snowflakes.
-
4Make poseable cardboard animal stand-ups. Draw various animals on a large piece of cardboard, using separate outlines for the body and legs. Cut out the shapes carefully. Use paint to fill in each animal’s features, including details like stripes and spots. Cut small slits at the bottom of each and slide in the leg pieces to make your animals stand up on their own.[6]
- Incorporate other types of materials by sticking on googly-eyes and using pipe cleaners for things like tails and horns.
- When you’re finished, arrange your stand-ups into different scenes, such as barnyards, watering holes, or zoo exhibits.
-
5Turn cardboard tubes into racing rockets. Decorate an old toilet paper or paper towel tube with paint, glitter, sequins, or patterned paper. To fashion a nose cone for your rocket, cut a 4–5 in (10–13 cm) circle out of a piece of construction paper, cut a straight line halfway across, and overlap and glue the edges into a cone shape. Complete your rocket by gluing fringed paper, tissue paper, or string to the inside of the bottom part of the tube to mimic flames.[7]
- Hang each rocket from a length of string to freeze it in flight, or stake them into the ground at an angle with wooden skewers covered with striped paper drinking straws to make them look like they’re blasting off.
Crafting with Fabric and Yarn
-
1Assemble your own sock puppet cast of characters. Adorn plain tube socks with fabric paint to add splashes of color. Glue buttons onto the top of the toe section for eyes and use yarn and scraps of felt to make hair, facial features, clothing, and other accents. When you’re done, pull on your finished puppet and use hand movements to bring it to life.[8]
- Fuzzy socks and pom-poms with googly eyes stuck on are perfect for making plush animal puppets.[9]
- Slip a puppet onto each hand to become a one-person show!
-
2Embroider a beaded paper plate dreamcatcher. Cut out the center of a paper plate and use a hole punch to open holes every 1⁄2–1 inch (1.3–2.5 cm) around the inner edge. Thread a long strand of yarn through one of the holes at the top and tape the loose end to the backside of the frame. Weave the yarn in and out of the holes in all different directions and slide colored beads onto each section to put your own unique spin on a traditional Native American dreamcatcher.[10]
- When you’ve used up all the holes or you’re satisfied with the design you’ve created, snip the yarn and tape it to the back of the frame out of sight.
- Mix up the colors of your plates and yarn to play around with different themes. Your dreamcatcher might be inspired by suns, flowers, fruits, or even holiday images.
Tip: Leave one of the holes around the edge of the plate empty in case you want to hang your dreamcatcher later.
-
3Learn to sew by making simple yet lovely fabric flowers. Cut a single piece of fabric into a strip that's about 12 in (30 cm) long and 2 inches (5.1 cm) wide, with 8-10 rounded edges on one side. Thread a needle and sew a straight stitch along the straight edge of the fabric, pulling the thread tight so that the material bunches up in the middle and forms a flower shape. When you’re done, snip and tie off the thread.[11]
- Complete your fabric flowers by stitching a decorative button onto the center of each blossom.[12]
- Use fabrics in solid colors to mock sunflowers or tulips, or look for patterned styles to give your flowers more of a vibrant, dreamy look.
-
4Convert one of your favorite t-shirts into personalized pillow. If you have an old shirt that you don’t wear anymore but still want to show off, stretch it out flat on a tabletop and cut out the main design in a square or rectangular shape. Cut an identical piece from the back of the shirt and pin the edges of both pieces together. Stitch up 3 sides of the pillow, then pause to stuff it full of cotton before sewing the 4th side shut.[13]
- Another option is to sew overlapping flaps of leftover fabric to the backside of the design on the top, bottom, and outer edge to make a pillowcase that you can slip over a small throw pillow.
- Ask a parent or teacher for help if you’ve never used a needle and thread before.
-
5Embellish mason jars, flower pots, or vases with colorful yarn. Brush the outside of your container with craft glue using a sponge brush. Grab a ball of yarn in your favorite color and begin carefully winding it around the container from the bottom up, making sure you hold the container by its mouth. After the glue dries, you'll have a chic, useful accessory that will introduce a splash of color to any part of your home.[14]
- Wrap the yarn just tight enough to take the slack out of each "row." If you pull it too tight, it could crack fragile containers.
- Try using multiple colors to give your container a rainbow effect. When you want to change colors, just cut the yarn on the opposite side of the container that you started on, then begin a new strand.[15]
Working with Other Assorted Materials
-
1Finger paint your masterpiece. Finger painting is one of the simplest forms of art there is, but also one of the most expressive. Just place a large sheet of heavy paper on a tabletop or easel, dip your fingers into a tray of washable paint, and let your imagination run wild![16]
- If you don’t have any paints on hand, you can also try cooking up your own homemade finger paints using flour, water, and food coloring or liquid watercolors.[17]
Warning: Finger painting can get pretty messy, so it may be a good idea to cover your crafting area with a few pieces of plastic sheeting or newspaper before you get started.
-
2Make a relaxing rain stick from a cardboard tube. Cover one end of the tube with aluminum foil, then secure it with heavy-duty tape. Funnel in a few large handfuls of plastic beads, gravel, or uncooked rice or beans and seal the opposite end of the tube. When you turn your rain stick over, you’ll be treated to the sound of a gentle downpour.[18]
- To make sure your rain stick holds up to hours of use, opt for a thick, durable type of tubing, like the kind that comes inside a roll of plastic wrap.[19]
- Use paint or patterned paper to add some flair to the outside of your rain stick.
- If you want your rain stick to make even more noise, insert a rolled-up piece of aluminum foil into the tube before sealing it up.
-
3Sculpt with modeling clay. With a single lump of clay, you can create almost anything you can dream up. A simple hand mold or pinch pot can make a great first project, but you might also put together miniature models of you and your family or give shape to simple animals like snakes, caterpillars, and butterflies.[20]
- Make sure you use air-dry or polymer clay, which doesn't need to be fired in a kiln in order to harden to its finished form.
- Use acrylic paint to add even more color and detail to your sculptures.[21]
-
4Paint rocks to look like ladybugs. Gather a few flat, circular stones and paint each one a different solid color using acrylic paint. Once the colored paint has dried, cover the stone with black spots and paint a big black circle at one end to serve as the head. For eyes, brush 2 small white circles inside the big black circle, then dot them with black paint.[22]
- Hand-painted ladybug rocks can make great decorations for gardens, flower beds, and outdoor walkways.
- If you plan on displaying your ladybugs outside, consider brushing them with a coat of water-based sealant to protect the paint from the elements.
-
5String together dyed pasta into jewelry. Place 1-2 handfuls of pasta into a disposable food storage container. Mix 1 teaspoon (4.9 mL) of vinegar with a few drops of food coloring and pour it over the pasta. Cover the container and shake it for 30 seconds to a minute, or until the pasta is evenly colored. After drying the pasta on a cookie sheet, slide the multicolored pieces onto sections of string cut to different lengths to make necklaces and bracelets.[23]
- You’ll need to mix up a new batch of dye and use a separate container for each individual color you want to add to your craft jewelry.
- Be sure to use a hollow variety of pasta like macaroni, penne, or ditalini that will easily fit over the string.
Community Q&A
-
QuestionHow do I distinguish and apply crimp beads?
 T. ChinsenTop AnswererCrimp beads look like hollow metal tubes. They are designed to be crushable to fasten a cord end, and they can only be used once. Regular beads have a bead hole that is much smaller than the diameter of the bead itself.
 -
QuestionI have tried making these craft ideas. What should I use to fill the cushion: cotton or fiber to make it more fluffy?
 Community AnswerYou can use cotton, fiber, tissues or anything similar. It's your cushion, so it's up to you. You could even fill it with rice.
References
- ↑ https://www.parents.com/fun/arts-crafts/kid/easy-paper-crafts-for-your-kids/?slideId=slide_0081181f-a5dc-4af3-9f42-0824a39595bb#slide_0081181f-a5dc-4af3-9f42-0824a39595bb
- ↑ http://www.origami-instructions.com/
- ↑ http://www.origami-instructions.com/origami-for-kids.html
- ↑ https://buggyandbuddy.com/cut-snowflakes-newspaper/
- ↑ https://www.itsalwaysautumn.com/cut-snowflake-video-tutorial-free-templates.html
- ↑ https://www.parents.com/fun/arts-crafts/kid/easy-paper-crafts-for-your-kids/?slideId=slide_abf26454-bea8-4df7-9dd8-a963cbb3e80e#slide_abf26454-bea8-4df7-9dd8-a963cbb3e80e
- ↑ https://www.happinessishomemade.net/4th-of-july-rockets-kids-craft/
- ↑ https://www.handmadecharlotte.com/7-diy-sock-puppets/
- ↑ https://cincyshopper.com/diy-monster-sock-puppet/
- ↑ https://iheartcraftythings.com/summer-sewing-craft.html?epik=0BQEvE_IW39d1
- ↑ https://www.scatteredthoughtsofacraftymom.com/how-to-make-a-fabric-flower/
- ↑ https://www.redtedart.com/easy-fabric-flowers//
- ↑ https://snapguide.com/guides/make-a-t-shirt-pillow-case/
- ↑ http://thehomespunhydrangea.com/darling-diy-yarn-wrapped-bud-vase/
- ↑ https://celebrationsathomeblog.com/yarn-wrapped-flower-pots
- ↑ http://www.auntannie.com/FridayFun/FingerPaint/
- ↑ https://tinkerlab.com/paint-recipe-kids-homemade-finger-paint/
- ↑ https://www.youtube.com/watch?v=vOCYl4y3t98&feature=youtu.be&t=15
- ↑ https://happyhooligans.ca/rain-sticks/
- ↑ https://www.redtedart.com/air-dry-clay-projects-kids/
- ↑ https://www.createmixedmedia.com/make/5-tips-for-acrylic-painting-on-clay
- ↑ https://craftsbyamanda.com/ladybug-painted-rocks/
- ↑ https://www.cbc.ca/parents/play/view/play_date_idea_pasta_necklaces
About This Article
One great way to make arts and crafts is to get creative with paper projects such as origami, the traditional Japanese art of folding paper squares into shapes. To make one-of-a-kind paper snowflakes, fold a square of paper in half 2 or 3 times and use scissors to snip small shapes out of the creased edges. Then, unfold the paper to reveal a beautiful surprise! You can also draw animals onto thick paper or cardboard and add support pieces to make them stand up on their own. For more ways to get creative with paper and other materials, keep reading!
