This article was co-authored by Lois Wade. Lois Wade has 45 years of experience in crafts including sewing, crochet, needlepoint, cross-stitch, drawing, and paper crafts. She has been contributing to craft articles on wikiHow since 2007.
wikiHow marks an article as reader-approved once it receives enough positive feedback. This article received 11 testimonials and 82% of readers who voted found it helpful, earning it our reader-approved status.
This article has been viewed 1,042,868 times.
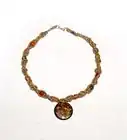
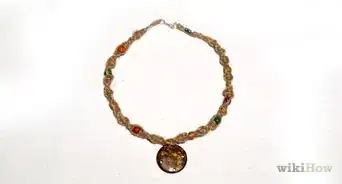
Macramé (MAC-ruh-may) is the art/craft of tying cords into knots in such a way that they form a useful or decorative shape. Choosing the right materials and making sure you have a good work space will help you start your project right. First, learn the basic knots of macramé. The reverse lark’s head knot is how you’ll start most projects. Half knots and square knots are basic macramé knots useful in anything from scarves to wall hangings. Once you master the square knot, you’ll be able to jazz up your projects with beading. Adding diagonal half hitch knots can add different patterns to your work.
Steps
Choosing Materials and Prepping Your Workspace
-
1Determine the type of cord you’ll need based on your project. There are so many types of cords you can use for macramé. You can use cotton rope, yarn, twine, leather, or anything else that comes in an easily pliable strand.[1]
- Leather is great if you’re making jewelry. Cotton rope works well if you’re making a wall hanging, and you can use yarn to make a scarf or blanket.
-
2Collect a few sewing pins. Depending on the knots you’ll be using, you might need pins to hold your knotting material out of the way. Sewing pins are a great option for this. You can also use thumbtacks.[2]Advertisement
-
3Create a project board. This doesn’t have to be anything fancy, just something portable, but soft enough to push pins through. You can glue a garden kneeling pad or an old foam sleeping pad to a clipboard. You can also use balsa wood or styrofoam.[3]
-
4Choose an anchor. The anchor is the piece of metal, wood or plastic that you attach your knotting material to. You'll set it at the top of your project board and use it to build your project on. Your anchors will vary depending on the project. If you’re making jewelry or a keychain, a keyring is probably best. For larger projects, a dowel or a rod will work well.


Starting Your Project with a Reverse Lark’s Head Knot
-
1Fold your cord in half. You’ll want to make sure that your fold is exactly half. You’ll be using the rest of this cord for other knots, and if it’s uneven, it might affect the rest of your project.[4]
-
2Place the loop under your anchor. Place the loop formed by folding the cord in half under the dowel or rod with the 2 ends of the cord above. If you’re using a ring, place the loop under one side of the ring, so the loop is in the center.[5]
-
3Pull the loop up and the cords down through it. Pull the loop over the rod, dowel, or edge of the ring. Stick your finger up through the loop and grasp both halves of the cord. Pull them down through the loop. The loop and cords should make a pretzel shape.[6]
-
4Pull down on the cord to make the knot tight. Hold the rod, dowel, or ring with 1 hand. With the other, pull down on the 2 halves of the cord. As you do, the loop will move up toward the rod, dowel, or ring, pulling the knot tight.[7]
-
5Set up multiple cords for new projects. Most macramé projects are going to require at least 2 sets of knotting cords. You’ll therefore need to tie at least 2 reverse lark’s head knots, with 2 pieces of macramé cord, on the same anchor, to start any project.[8]
Creating a Half Knot Design
-
1Tie a reverse lark’s head knots next to your anchor. You should tie it near the middle of the anchor – the dowel, rod, or ring you’re using to start your project.[9]
-
2Distinguish between your knotting cords and your knot-bearing cords. Once you’ve tied your reverse lark’s head knot, you’ll have 2 cords hanging down. The knotting cord is the cord you'll move to make the knot. The knot-bearing cord is the one you'll be folding the knotting cord over or under to make the knot.[10]
-
3Fold the right knotting cord over the knot-bearing cord. Start near the top of the cords. Pick up the right knotting cord and fold it over the middle knot-bearing cords. Then tuck it under the left knotting cord.[11]
-
4Fold the left knotting cord under the knot-bearing cord. Start at the same height where you began with the right knotting cord. Pull the left knotting chord to the right, passing it under the knot-bearing cords. Then place it over the right knotting cord. Pull the 2 knotting cords until the knot is pulled tight.[12]
-
5Continue making half knots to create a spiral design. As you tie more and more half knots with your cord, a spiral will naturally occur in the cord. How many knots it takes to create 1 swirl in the spiral will depend on how thick your cord is. Once you have the number of swirls you like, tie off the cord.[13]
-
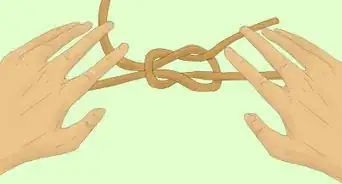
6Create a square knot by making a second half knot from the opposite direction. Once you’ve created the first half knot, begin on the opposite side of your cords. Pull the left knotting cord over the knot-bearing cords in the middle, and tuck it under the right knotting cord. Then pull the right knotting cord under the knot-bearing cords and over the left knotting cord. Pull the cord to tighten and secure the knot.[14] .
Making an Alternating Square Knot Pattern
-
1Tie off at least 8 cords using the reverse lark’s head knot. As you tie each cord to your rod or dowel, make sure it’s snug up against the one next to it.[15]
-
2Divide the cords into sets of 4. Each set of 4 strands will make one square knot. If you’ve tied more than 8 cords to your rod or dowel, that’s fine. You just have to have enough workable cords to be divided by 4 evenly.[16]
-
3Make 1 square knot with each set of 4 cords. Using the process outlined in step 6 of method 3, make 1 square knot for every 4 sets of cords. You should begin each square knot at approximately the same distance from the rod or dowel so that your square knots are even horizontally.[17]
-
4Space your next row of square knots. Where you start your next row of square knots is up to you. If you want a tighter pattern (great for blankets or scarves!), begin the next row right below the first. If you’re looking for a more open, lacier pattern, drop down 1 in (2.5 cm) or so.[18]
-
5Leave 2 cords on either end. For your next row of square knots, Ieave 2 cords on either end of the rod or dowel loose. Then divide the number of remaining cords you have by 4. That’s how many square knots you’ll get in the next row.[19]
-
6Make 1 square knot on each set of 4 cords again. Make sure you begin each square knot the same distance from the knot above it. This keeps your pattern looking even.[20]
-
7Continue leaving 2 cords loose on either end until you run out of cords. Once you’re to the point where you can’t divide your cords evenly into 4 anymore, start the process over with all 16 (or more) strands you began with. Then repeat the alternating pattern as far down as you’d like.[21]
Tying a Diagonal Half Hitch
-
1Tie 4 cords with reverse lark’s head knots. The diagonal half hitch requires 1 knotting cord and 7 knot-bearing cords. So you’ll need to tie 4 cords with reverse lark’s head knots to get the 8 cords you need. They should be tied very close to each on the dowel or rod that you’re using.[22]
-
2Determine where your knotting cord will be. You can start from either the left- or right-hand side on this design. If you start on the left, the very left outside cord will be your knotting cord, and the others will be the knot-bearing cords. If you begin on the right, the very right outside cord will be your knotting cord and the others be the knot-bearing cords.[23]
-
3Pin the knotting cord to the left of the knot-bearing cords. A small pin, like you’d use for sewing, works best for this. Stick the pin into your project board near the anchor and just to the left of the cords. Pull the knotting cord out and around the pin, then cross it over the knot-bearing cords at a diagonal angle. Secure the end of the knotting cord with another pin, about 1 in (2.5 cm) down from where your first pin is.[24]
- If you want a more dramatic diagonal angle, pin the end of the knotting cord further down.
-
4Make the first loop with the knotting cord. Loop the knotting cord over the first knot-bearing cord. Then pull the knotting cord back under itself. Then loop the knotting cord back over the first knot-bearing cord. Pull the cord through the loop created the first time it was knotted.[25]
-
5Repeat with each knotting cord. Once you’ve looped the same knot-bearing cord twice, move to the next knot-bearing cord to the right. Loop the knotting cord twice, pulling the cord through the hole created by the first loop the second time around. Continue to pull the cords tight to make them secure. Repeat this until you reach the end of the diagonal.[26]
-
6Make a zigzag by tying another diagonal half hitch. Once you reach the end of the diagonal, you can make a zigzag pattern by tying a diagonal half hitch in the opposite direction. So if you started on the left to begin, start on the right this time. Your right outside cord is the knot-tying cord and the other cords to the left are all knot-bearing cords.[27]
- You can also just keep repeating the diagonal half hitch from the same side to get a diagonal design with the knots close together.
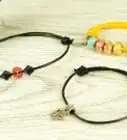
Adding Beads Using a Square Knot
-
1Start by tying a square knot. You’ll want at least one square knot above your bead to secure it. Tie a square knot as you normally would. You can tie more than one above your bead, but you need to have at least one.
- If you’re incorporating the bead into a project that doesn’t use square knots, that’s fine. Just make sure there’s a knot above where your bead will go.
-
2Slide the knot-bearing cords through the bead. These are the 2 center cords you use when create a square knot. You should slide the bead up until it’s snug against the square knot above it.
-
3Tie a square knot under your bead. Once the bead is snug against the square knot above it, tie a square knot underneath it, using the knotting cords. The square knot you tie underneath should also be snug against the bottom of the bead.
-
4Repeat for as many beads as you like. You can create a pattern of so many square knots, followed by a bead, or you can just use one bead to end a project.
Community Q&A
-
QuestionWhat are the most advanced macrame patterns you have seen?
 Community AnswerCheck out the Facebook page "Macrame Engineering." There are some really great, complex designs on there.
 -
QuestionWhy are the bottom half of the images not animated?
 Community AnswerThere are no animated pictures because they are all videos. They are there so we can understand how to make macrame.
 -
QuestionHow do I make a hanging basket?Community AnswerGo get a macrame book from the library, or search online for a pattern.
Things You'll Need
- Project board
- Macramé-specific cords.
- Scissors
- Pattern for your chosen project. You can get these in books from craft stores, or online at crafting websites.
- Anchor (pencil, wooden dowel, etc.)
- Beads and/or other embellishments (optional)


References
- ↑ Lois Wade. wikiHow Crafts Expert. Expert Interview. 31 July 2019.
- ↑ https://feltmagnet.com/misc/Macrame-Basics-Knots
- ↑ https://feltmagnet.com/misc/Macrame-Basics-Knots
- ↑ http://www.redheart.com/articles/macrame-patterns-and-knots
- ↑ http://www.redheart.com/articles/macrame-patterns-and-knots
- ↑ http://www.redheart.com/articles/macrame-patterns-and-knots
- ↑ http://www.redheart.com/articles/macrame-patterns-and-knots
- ↑ http://www.redheart.com/articles/macrame-patterns-and-knots
- ↑ http://www.redheart.com/articles/macrame-patterns-and-knots
- ↑ http://www.redheart.com/articles/macrame-patterns-and-knots
- ↑ http://www.redheart.com/articles/macrame-patterns-and-knots
- ↑ http://www.redheart.com/articles/macrame-patterns-and-knots
- ↑ http://www.redheart.com/articles/macrame-patterns-and-knots
- ↑ Lois Wade. wikiHow Crafts Expert. Expert Interview. 31 July 2019.
- ↑ https://feltmagnet.com/misc/Macrame-Basics-Knots
- ↑ https://feltmagnet.com/misc/Macrame-Basics-Knots
- ↑ https://feltmagnet.com/misc/Macrame-Basics-Knots
- ↑ https://feltmagnet.com/misc/Macrame-Basics-Knots
- ↑ https://feltmagnet.com/misc/Macrame-Basics-Knots
- ↑ https://feltmagnet.com/misc/Macrame-Basics-Knots
- ↑ https://feltmagnet.com/misc/Macrame-Basics-Knots
- ↑ http://www.redheart.com/articles/macrame-patterns-and-knots
- ↑ http://www.redheart.com/articles/macrame-patterns-and-knots
- ↑ http://www.redheart.com/articles/macrame-patterns-and-knots
- ↑ http://www.redheart.com/articles/macrame-patterns-and-knots
- ↑ http://www.redheart.com/articles/macrame-patterns-and-knots
- ↑ http://www.redheart.com/articles/macrame-patterns-and-knots
About This Article

To macrame, start by getting some rope, yarn, or twine to tie your knots with, as well as a dowel or rod to anchor everything on. Then, tie different knots around the anchor to create your design! For example, you could tie a reverse lark's head knot by folding your cord in half, placing the loop under the anchor, and pulling the cord through the loop to tighten the knot. Once you get the hang of it, you can experiment with different knots, like square knots and half knots. To learn how to do different patterns and designs, read on!