This article was co-authored by David Balkan. David Balkan is a Professional Plumber, CEO of Balkan Sewer and Water Main Service, and President of Balkan Sewer and Drain Cleaning. As a hands-on owner of these companies for over 40 years, David is knowledgeable about water service lines, sewers, and drain line issues. David is a Committee Chairman of the Master Plumbers Council and has sat on the Executive Committee of the Sub Surface Plumbers Association of New York for over 30 years. His knowledge and solution-oriented approach contributed to Balkan Sewer and Water Main Service being the largest and most trusted service in New York City and the recipient of the 2017 Angie’s List Super Service Award.
There are 7 references cited in this article, which can be found at the bottom of the page.
This article has been viewed 73,086 times.
Utility sinks require a little bit of plumbing knowledge to install correctly. It’s recommended that you place the sink as close to a drain pipe as possible. The room’s drain pipe and vent pipe have to be sawn apart so you can connect them to the sink. You’ll also have to cut apart the water supply pipes and solder them back together to connect them to the faucet. Fasten on the rest of the sink’s plumbing and you’ll have a new sink where you need it.
Steps
Connecting the Drain and Vent Pipes
-
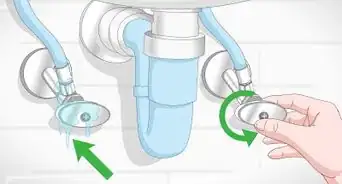
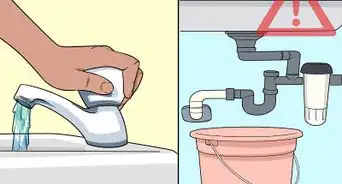
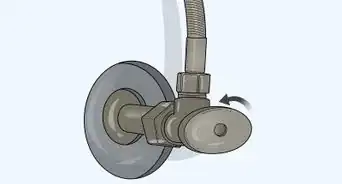
1Turn the water supply valve to shut off the water supply. Locate the main water supply to the building. It’ll be where the water utility line enters your home, either inside or outside that room. It’s often near the water heating unit and has a red handle. Turn it clockwise to shut off the water.[1]
- Always shut the valve that is closest to the inside plumbing, and don’t shut the valve that is closest to the street.
- If the room where the sink will be installed has supply valves, you can shut them off instead. They’ll be on the water pipes, but this isn’t always an option.
-
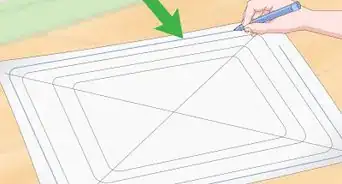
2Cut through the drain pipe with a hacksaw. Locate the room’s drain pipe and pick where you’ll attach the sink’s pipes to it. It’ll run along the room near either the floor or ceiling, depending on where you’re installing the sink. Use a hacksaw to sever the pipe.[2]
- To figure out which pipe is which, consult the house’s blueprint or listen as water flows through the pipe. The drain pipe flows away from the building.
- If the pipe is overhead, such as in some basements, purchase a sink sump pump from the home improvement store.
Advertisement -
3Spread PVC cement over a wye fitting. First, go to a home improvement store and pick up a wye fitting. This piece of PVC pipe has a “Y” shape and is used to connect 3 pipes together. Brush PVC primer around the ends of the drain pipe to clean them. Then spread PVC cement inside the larger ends of the wye fitting.[3]
- If your drain pipe is cast iron, it’s better to buy a rubber wye fitting and solder the pipes together instead of gluing them.
-
4Slide the wye fitting over the drain pipe’s ends. Gently pull one end of the pipe to the side. Place the wye fitting on the pipe, then connect its other end to the remaining pipe. Hold the fitting in place for 4 seconds so the glue settles.
- The wye fitting should be positioned so the small, unattached opening faces towards where your sink will go.
-
5Saw through the vent pipe. Look for a length of PVC pipe splitting from the drain pipe. It’ll go towards the ceiling and, if you follow it, to the roof. Pick a spot on the pipe above the wye fitting and near the ceiling. Use the hacksaw to sever the vent pipe.[4]
- The vent pipe helps the sink drain and prevents sewer gas from entering the house.
-
6Install a wye fitting in the vent pipe. Prime the vent pipe, then coat a 2nd wye fitting with PVC cement. Slide it onto the pipe parts to reconnect the vent. The small opening on the wye fitting should be angled downwards towards the other fitting.[5]
-
7Connect the wye fittings with PVC pipe. First, attach a T-shaped tee fitting to the lower wye fitting. Position it so the middle opening faces the higher wye fitting. Now connect the 2 by gluing together lengths of PVC pipe.[6]
- If you’re using a sump pump, connect it to the vent and drain pipes according to the owner’s manual.[7]


Setting up the Water Supply Lines
-
1Saw through the water supply lines. Locate the pair of copper water supply lines in or on the room’s wall. One pipe carries cold water while the other carries hot water. Use your hacksaw to cleanly sever both lines.[8]
-
2Clean the pipe ends and coat them with flux. Wear down the ends of the pipe with a 120-grit emery cloth. They’ll shine when you’re finished. Then, using a small flux brush, brush an even layer of flux over the shiny copper ends.[9]
-
3Install copper tee fittings on the pipes. Pick up a pair of copper tee fittings from the home improvement store. Brush flux inside the openings on both tee fittings, then slide the fittings onto the pipes. Leave the open end pointing outward towards where the sink will be placed.[10]
-
4Solder the copper pipes together with a propane torch. Hold some lead-free metal solder over one of the connecting joints. Turn on the torch and angle it so the end of the flame hits the solder. Move the torch from side to side to evenly heat the solder, melting it over the joint. Repeat this for the other joints on the pipes.[11]
-
5Drill holes into the wall for wall anchors. Measure about a third of the way up the wall. Using a masonry bit, drill a hole in the wall behind each pipe. Keep the holes smaller than the width of the copper wall anchors.[12]
- You may also use a hammer and nail to tap the holes into the wall.
-
6Screw the anchors to the wall. Place the anchor’s screw in the pilot hole and hang the anchor on top of it. Then use a cordless screwdriver to tighten it against the wall. Gently guide the pipes into the anchor to secure them in place.[13]


Assembling the Sink’s Plumbing
-
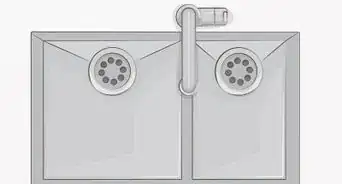
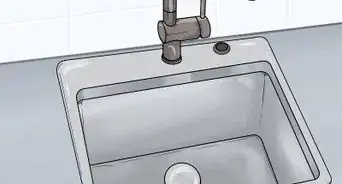
1Move the sink near the pipes. Set the sink in place to prepare for installation. Utility sinks are typically freestanding, so yours shouldn’t need extra fitting. Position the faucet openings near the wall. If the floor is uneven, adjust the screws on the sink’s legs until the sink appears level.
-
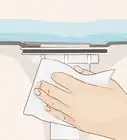
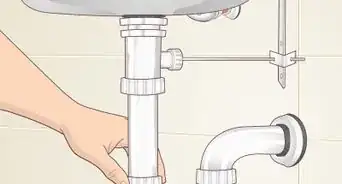
2Secure the drain strainer in place with plumber’s putty. Roll some putty in your hands to warm it up. Wrap the putty around the underside of the strainer’s rim. Then push the strainer into the sink’s hole. Under the sink, turn the strainer’s nut clockwise with pliers to tighten it.[14]
- Wipe away any excess putty that oozes from the strainer.
-
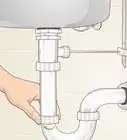
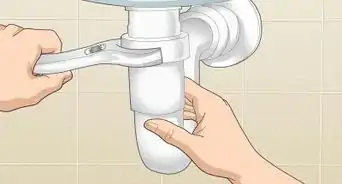
3Set the sink’s tailpiece in a P-trap. First, use pliers to twist the nut on the P-trap counterclockwise. Remove the nut and the threaded flange, then slide them onto the sink’s tailpiece. Attach the tailpiece to the P-trap, then tighten the nut to hold it in place.[15]
-
4Connect the P-trap to the drain pipe with PVC pipe. You’ll need a pipe approximately 2 1⁄2 in (6.4 cm) long. You may also need to glue on a few fittings to reach the drain. Slip some plastic, ring-shaped compression nuts over the pipes and tighten them with pliers.[16]
-
5Secure the faucet to the sink with plumber’s putty. Spread the putty under the base of the faucet. Set the faucet in the hole on the sink’s rim and push it down to secure it. Wipe away any excess putty. Finish by sliding nuts onto the faucet from below the sink and tightening them.[17]
-
6Connect the faucet to the supply pipes with flexible supply lines. You’ll need a pair of flexible, braided, stainless steel supply tubes. Connect a line to each of the tee fittings on the copper pipes. Twist the nuts with pliers to tighten the lines, then run the other ends through the faucet.[18]
-
7Turn the water on to get the sink working. Go back to the water supply valve and turn it on. Hot and cold water both should reach the sink. At last, your sink has running water!


Things You’ll Need
- Hacksaw
- Wye fittings
- PVC cement
- PVC pipe
- P-trap assembly
- Drain strainer
- Plumber’s putty
- Pliers
- Braided supply lines
- Compression nuts
- Copper wall mounts
- Copper tee fittings
- Hammer and nail set
- 120-grit emery cloth
- Flux
- Lead-free solder
- Propane torch


References
- ↑ https://www.thisoldhouse.com/how-to/how-to-install-utility-sink
- ↑ http://www.popularmechanics.com/home/how-to/a154/1275616/
- ↑ https://www.thisoldhouse.com/how-to/how-to-install-basement-utility-sink
- ↑ https://www.thisoldhouse.com/how-to/how-to-install-utility-sink
- ↑ https://www.thisoldhouse.com/how-to/how-to-install-basement-utility-sink
- ↑ https://www.thisoldhouse.com/how-to/how-to-install-utility-sink
- ↑ http://www.popularmechanics.com/home/how-to/a154/1275616/
- ↑ https://www.thisoldhouse.com/how-to/how-to-install-utility-sink
- ↑ https://www.familyhandyman.com/plumbing/how-to-solder-copper-pipe/view-all/
- ↑ https://www.thisoldhouse.com/how-to/how-to-install-utility-sink
- ↑ https://www.familyhandyman.com/plumbing/how-to-solder-copper-pipe/view-all/
- ↑ http://womenyoushouldknow.net/fix-it-friday-anchors-aweigh-how-to-put-anchors-into-walls/
- ↑ http://womenyoushouldknow.net/fix-it-friday-anchors-aweigh-how-to-put-anchors-into-walls/
- ↑ https://homesteady.com/how-8205109-install-utility-sink-drain.html
- ↑ https://homesteady.com/how-8205109-install-utility-sink-drain.html
- ↑ https://homesteady.com/how-8205109-install-utility-sink-drain.html
- ↑ https://www.thisoldhouse.com/how-to/how-to-install-utility-sink
- ↑ https://www.familyhandyman.com/laundry-room/upgrade-your-laundry-sink/view-all/
About This Article