This article was co-authored by Garnik Ovsepyan and by wikiHow staff writer, Eric McClure. Garnik Ovsepyan is a Computer Specialist and the Owner of HeliX PC based in Burbank, California. With over 25 years of experience, Garnik specializes in custom computer builds, computer repairs, virus removal, computer tune-ups, hardware and software troubleshooting and installations, diagnostics, and data backup and recovery.
There are 12 references cited in this article, which can be found at the bottom of the page.
This article has been viewed 54,402 times.
Ribbon cables, also known as multi-wire planar cables, are flat cables with multiple cords fixed together. They’re generally considered obsolete these days, but you may occasionally find them inside some TVs, laptops, gaming systems, and printers. Replacing a ribbon cable is deceptively simple, but you may need to attach a new connector if the cable doesn’t slide directly into a clip on your electronic device. Also, be sure to install the new ribbon cable the same direction and way the old cable was installed.
Steps
Getting Ready to Install a Replacement
-
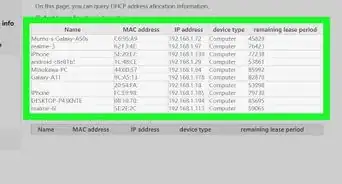
1Get a replacement ribbon cable designed for your specific electronic device. Ribbon cables are not universal and you must purchase a replacement from the manufacturer of your TV, printer, or computer. Measure the width of the cable to determine the size you need and use the color or pattern on the cable itself to find a matching cable.[1]
- Ribbon cables are not particularly common these days, although you do find them in some sleeker electronics, like gaming systems and flat screen TVs, since they save space. If you’re working on a printer, older TV, or some other electronic though, you may not be able to find a replacement ribbon.
- A replacement ribbon cable shouldn’t cost more than $15.
- Ribbon cables are all installed the same way, but the cables themselves come in hundreds of different sizes and shapes. You cannot use a third-party cable to replace the ribbon cable on your specific device. It must come from the original manufacturer.
-
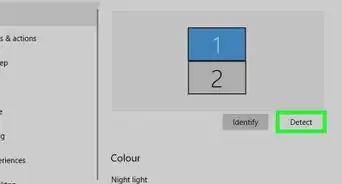
2Make sure your replacement cable comes with any necessary connectors. Look at the end of the old ribbon cable. If the cable locks directly into a flat clip, you do not need a connector. If the cable slides into a plastic or metal piece that connects to the clip though, be sure to get a ribbon cord with the connector you need. Only purchase the replacement from the manufacturer.[2]
- There are thousands of these connectors, so it’s important to get an exact replacement from the manufacturer. These connectors typically look like 1–3 in (2.5–7.6 cm) long rectangular pieces that connect the cable to a port.
- Most replacement cables will come with the connector you need. It may also come pre-installed on the cable. In some cases you’ll need to install it yourself, though.
Advertisement -
3Note the orientation of the old cable to keep installation simple. Ribbon cables generally look different from one another, but there’s usually something on the cable to let you know which way you install it. Look for a colored strip or a symbol near the top of the cable to show you which side is up. If there isn’t anything on the cable, pay attention to the order of the colored cords to put your new ribbon cable in the exact same way.[3]
- Some cables will have “up” or and arrow printed on the cable to show you which direction and orientation the cable should be installed.
Tip: If your old ribbon cable is a single solid color, there is no orientation. These older cables can be installed upside down or right-side up. You don’t need to worry about the orientation.


Connecting a Standard Ribbon Cable
-
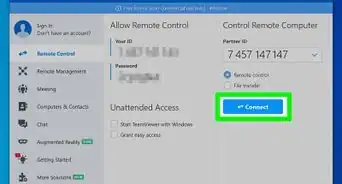
1Flip the cable clip up by hand to remove the old cable. At the end of the ribbon cable where it connects to the electronic, there is a horizontal strip of plastic with little rivets sticking out of it. This is the cable clip. Put the tip of your index finger in the middle of these rivets and gently pull it upwards. Apply light pressure and pull gently to unlock the clip. Slide the old cable out of the clip.[4]
- This process only applies to ribbon cables that do not have a connector on the end. If you don’t have a rectangular piece of plastic or metal on the end of the cable itself, you do not have a connector.
- Turn off the power source and let the item sit for at least 10 seconds whenever you're replacing ribbon cables so you don't risk accidental discharge.[5]
Warning: Do not use a screwdriver or tool to unlock the ribbon cable. If you do, you may end up breaking the clip. Just take your time and gently remove it by hand.
-
2Slide the new ribbon underneath the cable clip. Take your replacement ribbon cable and turn it so that it’s facing the same direction as the old cable with the colors laying the exact same way. With the clip unlocked, lower the end of the cable underneath the clip. Slide the cable through the base of the clip using the horizontal slot near the base of the panel that the clip is attached to.[6]
- This is typically pretty easy. You can see the opening where the cable slides in just by looking at the base of the clip.
-
3Push the ribbon cable flush with the guide on the opposite side. Push the cable through the clip until the tip of the cable pops out on the other side. Keep sliding the cable through until it hits the small vertical lip. This is the guideline for the cable, and the end of the cable must rest flush against the lip. Adjust the cable as needed until the end of the ribbon cable matches the guide line.[7]
- This may sound odd, but if there’s no guideline just push the cable to the other side and let it sit anywhere that it fits. When you install a ribbon cable, there are pins on the clip that puncture the cords to form an electrical connection. You can theoretically install the clip on any part of the ribbon cable.
-
4Close the cable clip by hand to finish attaching the ribbon cable. Put your finger on the rivets you used to pry the cable clip off. Lower the rivets down towards the side that they originally rested. Press the clip down gently until it clicks into place. The pins underneath the clip will puncture the ribbon cable and create an electrical connection between the cable and the electronic component.[8]
-
5Install the other end of the cable with a clip or new panel. Most of the time, you merely need to run the cable to another cable clip on your electronic device. To attach the other end of the clip, repeat these steps by popping the second clip up and sliding the other end of the cable into the slot before closing it. If the cable runs to another panel or electronic device, attach the clip before screwing or assembling the new portion of the device.[9]
- On a TV, this cable typically runs from the screen to the motherboard. On a computer, these cables connect the screen and keyboard to the motherboard. You usually don’t need to install new components for these repairs.
- On a printer or gaming system, the ribbon clip often connects two panels together to power up buttons. Attach both ends of the cable using your clips before screwing in or assembling the device.


Attaching a Ribbon Cable with a Connector
-
1Pry the old connector out of the port to remove the old cable. If there is a piece of thin plastic wrapped over the connector and clip, slide it off by hand or with a small screwdriver. Then, try pulling the connector out of the clip that attaches it to your electronic. If it sticks a little, don’t pry it out. Instead, pull the ribbon out of the connector and leave the actual connector attached to the clip. Slide the old cable out of the connector or clip.[10]
- Do not rip the connector if it won’t come out of the port. Some connectors are built-into the machine and you actually unlock the cable by pushing a button or prying a cover out of the connector itself.[11]
- Refer to the instruction manual for your TV, printer, gaming system, or motherboard if you can’t figure out how to remove the connector.
-
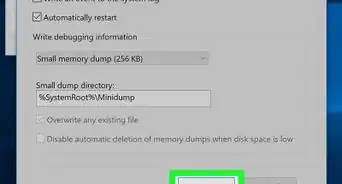
2Crimp the connector on the end of the cable if it isn’t preassembled. If you need to add a new connector to the cable, take the 2 halves of the connector and slide them over the end of the cable so that the edge of the ribbon cable sticks out 1⁄4–1⁄2 in (0.64–1.27 cm) past the connector. Line the edges of the 2 halves up so that the sides are flush with one another. Push the 2 halves together by squeezing them to drive the pins through the cords in the cable and attach the connector.[12]
- The pins that stick out the end of the connector must be pointing away from the main body of the ribbon cable. There is often a little arrow on the 2 halves of the connector showing you which direction the connector needs to face.
- The connector comes in 2 halves that fit together using pegs. So long as the 2 halves are lined up over the cable and the pins are sticking out, you can push the 2 pieces together to attach them to the ribbon cable.
Tip: You shouldn’t need any tools to do this, but you can squeeze the 2 halves of the connector together with pliers or channel locks if you can’t get them to click together.
-
3Slide the new ribbon cable into the connector or attach the connector itself. If the connector is still in the clip, orient the new ribbon cable to slide into the old connector. Turn it so the colors and pins line up with the old cable. Gently slide the cable into the connector until it clicks. If the old connector came out, slide the connector into the cable clip so that the prongs on the clip slide into the connector.[13]
- If you’re attaching a connector, you should hear the connector click into the clip.
- If you slide the ribbon cable into the connector, just line the end of the ribbon up with the bottom of the connector and slide it back into the clip.
-
4Attach the other end of the cable to a clip or your second connector. If there’s a connector on the other end of the ribbon cable connection, simply repeat these steps to install the other end of the cable. If there isn’t a second connector, flip the cable clip up by hand and slide the bare ribbon cable underneath to attach it. You may need to install a new panel or electrical component depending on the nature of the repair.[14]
- In a computer, you’re likely attaching the ribbon cable from the motherboard to your keyboard or screen. Each end will have a separate connector.
- On a gaming device or printer, you will likely need to screw 2 panels together on your device to finish installing the cable.


Expert Q&A
-
QuestionHow do you properly switch off a computer?
 Garnik OvsepyanGarnik Ovsepyan is a Computer Specialist and the Owner of HeliX PC based in Burbank, California. With over 25 years of experience, Garnik specializes in custom computer builds, computer repairs, virus removal, computer tune-ups, hardware and software troubleshooting and installations, diagnostics, and data backup and recovery.
Computer SpecialistMake sure that the power switch along the back of your computer is switched to the "circle" symbol instead of the "line" symbol. Then, unplug the computer from the wall and let it sit for about 10 seconds. -
QuestionHow do I get rid of static in my body before working on my computer?Garnik OvsepyanGarnik Ovsepyan is a Computer Specialist and the Owner of HeliX PC based in Burbank, California. With over 25 years of experience, Garnik specializes in custom computer builds, computer repairs, virus removal, computer tune-ups, hardware and software troubleshooting and installations, diagnostics, and data backup and recovery.
Computer SpecialistTap the power supply section of your case to discharge any extra static. You can also wear an anti-static wrist strap.


References
- ↑ https://www.imore.com/how-replace-joystick-your-switch-joy-cons
- ↑ https://youtu.be/DN5IpjKUXUA?t=89
- ↑ https://youtu.be/HgGVuo-XkCE?t=159
- ↑ https://youtu.be/C9PwK9eGrCY?t=14
- ↑ Garnik Ovsepyan. Computer Specialist. Expert Interview. 1 July 2021.
- ↑ https://youtu.be/C9PwK9eGrCY?t=26
- ↑ https://youtu.be/C9PwK9eGrCY?t=30
- ↑ https://youtu.be/C9PwK9eGrCY?t=33
- ↑ https://youtu.be/6X5UJblX-HM?t=18
About This Article