This article was co-authored by Agustin Renoj. Agustin Renoj is a Home Improvement Specialist with Renoj Handyman based in the San Francisco Bay Area. With over 18 years of construction experience, Agustin specializes in carpentry, painting, and exterior, interior, kitchen, and bathroom renovations. Renoj Handyman is a family-owned business that consists of craftsmen trained in all areas of construction.
This article has been viewed 594,192 times.
Installing ceiling drywall is a very simple process, but can be slightly challenging when working alone. By making a few minor adjustments, almost anyone can accomplish this task on their own. If you make the right preparations and install your drywall in the correct procedure, you should have no problem installing drywall on your ceiling.
Steps
Preparing the Ceiling and Drywall
-
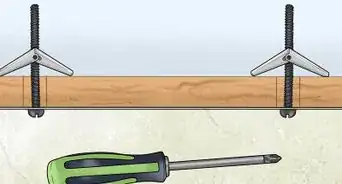
1Inspect the ceiling for obstructions or problems that need to be fixed. Before you install the drywall, check to make sure electrical wires, ductwork, protruding pipes, and other obstructions won’t be in your way. As well, take this opportunity to make sure there aren’t any obvious issues, such as faulty plumbing, that would be easier to address without drywall in the way.[1]
- Install furring strips to the framing in order to create a flat, even surface for drywall installation around these obstacles as necessary.
-
2Find the ceiling joists and mark their location on the wall. You’ll need to know where the ceiling joists are located at all times during this process. If you can’t see the joists, tap on the ceiling with a hammer and listen for a solid sound indicating wood framing.[2]
- You can just use a pencil to mark the locations on the wall.
Advertisement -
3Mark the placement of light fixtures and vents on the drywall. Note where the different light fixtures, vents, and electrical boxes are located on the wall and mark their locations on the drywall you plan to place on top of them. You’ll need to wait until after the drywall is attached to the ceiling before cutting holes in it for these fixtures.[3]
- You might also precisely mark these locations on a plan of the ceiling, noting their exact distance from the walls.
-
4Smooth the rough edges of the drywall pieces. Smoothing the rough edges on the cut edges of your drywall pieces will ensure tight joints between the drywall. Use a surform tool to sand down the edges of the drywall until they’re smooth.[4]
-
5Build a T-brace if you’ll be working alone or without a lift. A T-brace will provide the leverage and support needed to raise the drywall panels to the ceiling when you're working alone. Use a 2 feet (61 cm) piece of 1x4 and nail it to a 2x4 that is long enough to be 1 foot (30 cm) higher than the length from the floor to the ceiling.[5]
- A T-brace isn’t necessary if you’re using a drywall lift, which is a machine that smoothly lifts drywall to the ceiling so you don’t have to lift it. Drywall lifts can be cheaply rented from department stores and most stores that sell construction equipment.


Attaching the Drywall to the Ceiling
-
1Apply adhesive to the joists where the first sheet of drywall will go. Start in the corning and raise the first sheet of drywall to the ceiling so you can get an idea of the placement across the joists. Wait until you know where you're placing the sheet before you apply any adhesive to the joists.[6]
- Drywall adhesive dries within 15 minutes, so make sure you’re ready to begin placing the drywall as soon as you apply the adhesive.
-
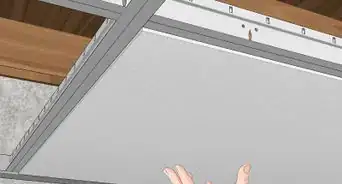
2Raise the first piece of drywall to the ceiling. Using your T-brace, or a friend to assist you, raise the first sheet of drywall to the ceiling and slide it snugly into the corner. Make sure that the tapered edges of the sheet are facing the floor.[7]
- If you’re using a drywall lift, move the lift underneath the ceiling and place the drywall sheet on the lift so that it is directly under the corner of the ceiling. Lift it slowly, making sure the sheet doesn’t jostle or move out of position.
-
3Repeat this process along the first wall. Attach the next piece of drywall using this same process and continue along the wall, always ensuring that the tapered edges abut one another and are facing down.
- The tapered edges are designed to make the process of taping and mudding easier, so it’s important that they remain facing down.
-
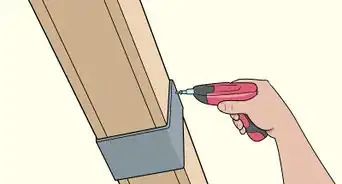
4Affix the drywall sheets permanently to the ceiling joists. Use either nails or screws to attach the drywall to the joists. Drive the fasteners in .375 inches (0.95 cm) away from the edges of each sheet and space them 7 inches (18 cm) apart along the perimeter. Along the interior joist, install the fasteners at about 12 inches (30 cm) increments.[8]
- The heads of the fasteners you choose should come in contact with the paper facing, sinking in slightly without breaking through the paper.
-
5Start the second row with a half sheet of drywall to stagger the seams. When you finish the first row of drywall and move on to the second, make sure the seams don’t line up between the two rows. Having staggered seams will enforce the stability of the drywall.[9]
- Measure and mark the cut line at the vertical midpoint of the drywall sheet and use a utility knife to cut through the drywall. Tip the panel off of the floor or table at a slight angle, then push it down to break it in half.
- Use the same procedure to attach this half-piece of drywall as you used on the first row of drywall.
-
6Repeat this process until the entire ceiling is covered. Continue to place drywall in rows along the ceiling, affixing them in place with nails or screws. As you move from one row to the next, make sure to stagger the seams to ensure the drywall’s stability.
-
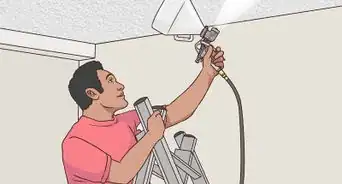
7Go back and cut holes in the drywall for vents and fixtures. Now that the drywall is set, go back and cut holes in the places you marked for vents, lights, and electrical boxes. Use a spiral cutout saw to make the cutting process quick and easy.[10]


Expert Q&A
-
QuestionCan I sheetrock a ceiling myself?
 Agustin RenojAgustin Renoj is a Home Improvement Specialist with Renoj Handyman based in the San Francisco Bay Area. With over 18 years of construction experience, Agustin specializes in carpentry, painting, and exterior, interior, kitchen, and bathroom renovations. Renoj Handyman is a family-owned business that consists of craftsmen trained in all areas of construction.
Home Improvement SpecialistThe best thing to do is to hire someone who does that for a living—it will get finished much faster and will usually look much nicer. If you do decide to do it yourself, you're going to need at least two people to help you, because sheetrock is very heavy and you can easily get hurt. -
QuestionHow do I repair a ceiling where a portion is falling in and needs to be replaced?
 Community AnswerMark off a squared or rectangular-shaped line around the damaged area. Determine the orientation and location of the ceiling joists. Extend your squared off markings so that two opposite sides of the outline fall on center, directly over the ceiling joists. Cut out the box shape, and install new drywall into the area. Fasten along the edges falling over the joists. Also, make sure all of the damaged drywall is removed and that the problem that caused it is also repaired. Finally, finish as you would a regular drywall installation.
 -
QuestionHow do I drywall a ceiling that needs insulation?
 Community AnswerInstall friction fit batts, sized to meet the code requirements in your area; cover the area completely with 6 mil poly, taping all joints; then fasten up the drywall.


References
- ↑ https://www.familyhandyman.com/drywall/drywall-installation/how-to-hang-drywall-like-a-pro/view-all/
- ↑ https://www.do-it-yourself-help.com/hang_drywall_ceiling.html
- ↑ https://www.familyhandyman.com/drywall/drywall-installation/how-to-hang-drywall-like-a-pro/view-all/
- ↑ https://www.familyhandyman.com/drywall/drywall-installation/how-to-hang-drywall-like-a-pro/view-all/
- ↑ https://www.proconstructionguide.com/how-to-install-a-drywall-ceiling/
- ↑ https://www.proconstructionguide.com/how-to-install-a-drywall-ceiling/
- ↑ https://www.proconstructionguide.com/how-to-install-a-drywall-ceiling/
- ↑ https://www.proconstructionguide.com/how-to-install-a-drywall-ceiling/
- ↑ https://www.proconstructionguide.com/how-to-install-a-drywall-ceiling/
About This Article

To install ceiling drywall, start by applying adhesive to the joists where the first sheet of drywall will go. Next, raise the drywall up with the help of a friend or drywall lift. Once the first piece is in place, repeat the process along the first wall, making sure the tapered edges face down. After the drywall sheets are up, nail or screw them into the joists to affix them permanently. When you start the second row, make sure to stagger the seams to enforce the stability of the drywall. Finally, cut holes in the drywall for vents and fixtures. To learn how to build a T-brace to raise the drywall panels to the ceiling when working alone, keep reading!