This article was co-authored by wikiHow staff writer, Travis Boylls. Travis Boylls is a Technology Writer and Editor for wikiHow. Travis has experience writing technology-related articles, providing software customer service, and in graphic design. He specializes in Windows, macOS, Android, iOS, and Linux platforms. He studied graphic design at Pikes Peak Community College.
This article has been viewed 9,916 times.
Learn more...
FAT32 is one of the most commonly used file system formats for USB drives because it is compatible with the widest variety of devices and systems. You can use FAT32 to transfer files between a PC, Mac, Linux, and other devices like game consoles. You can easily format a USB drive to FAT32 format on a Mac using Disk Utility. This wikiHow article teaches you how to format a USB drive to FAT32 format on a Mac.
Steps
Using Disk Utility
-
1Insert a USB drive. You can insert a USB drive into any available USB slot on your Mac.
- Warning: Formatting a USB drive will erase all data on the drive. Be sure to back up any files you want to keep on the drive before continuing.
-
2Click the magnifying glass icon . It's in the menu bar in the upper-right corner. This opens the Spotlight search feature.Advertisement
-
3Type Disk Utility in the search bar. This displays all apps related to Disk Utility.
-
4Click the Disk Utility app. Disk Utility has an icon that resembles a hard drive with a stethoscope over the top. Click the Disk Utility app icon to launch Disk Utility.
-
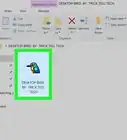
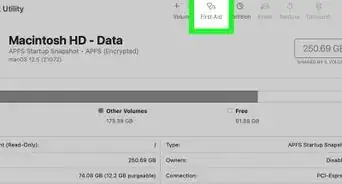
5Click the USB drive. It should be listed in the menu bar to the left in Disk Utility. This selects the USB drive.
-
6Click Erase. It's in the button that has an icon that resembles a hard drive being erased with an eraser. It's the middle button at the top of the Disk Utility app.
-
7Enter a new name for your USB drive (optional). If you want to rename your USB drive, enter a new name for the USB drive in the field next to "Name."
-
8Select "MS-DOS (FAT)" as the format. This is the name that macOS uses for FAT32. Use the drop-down menu next to "Format" to select "MS-DOS (FAT)."
- If you need to transfer files that are larger than 4 GB, or you have files that have long names, you may want to consider selecting "exFAT" as the format instead. FAT32 does not support large files or long file names.[1]
-
9Select "Master Boot Record" as the scheme. This is the partition scheme supported by the widest variety of computers and devices. Use the drop-down menu next to "Scheme" to select "Master Boot Record."
-
10Click Erase. It's in the lower-right corner of the pop-up dialogue. This begins reformatting the USB drive immediately. Allow a few minutes for the process to complete. Do not remove the USB drive until the process is complete.
-
11Eject the USB drive . When you are ready to remove the USB drive, be sure to eject it. To do so, click the eject icon next to the USB drive name in Disk Utility or in Finder. Alternatively, you can click and drag the USB drive name to the trash on your desktop.
- Ejecting your USB drive prevents electric discharge that can damage your USB drive upon removing it.


Using the Terminal
-
1Insert a USB drive. You can insert a USB drive into any available USB slot on your Mac.
- Warning: Formatting a USB drive will erase all data on the drive. Be sure to back up any files you want to keep on the drive before continuing.
-
2
-
3Type Terminal in the search bar. This searches for all apps related to the Terminal.
-
4Open the Terminal. It has an icon that resembles a black screen with a white cursor. Click the Terminal icon to launch the Terminal.
-
5Type diskutil list and press ↵ Enter. This displays a list of all disk drives currently mounted on your Mac and their location.
-
6Note the location of your USB drive. The disk location is listed above all the other drive features (e.g "/dev/disk2"). It will say "(external, physical)" next to the drive location. You can also find the drives name listed below the drive location.
-
7Type sudo diskutil eraseDisk FAT32 MBRFormat [location] and press ↵ Enter. Replace "[location]" with the actual location of the USB drive (e.g. "/dev/disk2"). This command reformats the USB disk.
- sudo: This commands gives grants you root user access.
- diskutil: This command calls on the Disk Utility program.
- eraseDisk: This command tells Disk Utility to reformat the drive.
- FAT32: This command tells Disk Utility to reformat the drive in FAT32 format. You can replace this with "ExFAT" to format it in ExFAT format.
- MBRFormat: This command tells Disk Utility to format the drive in Master Boot Record partition scheme.
- [Location]: This command tells Disk Utility the location of the USB drive.
-
8Eject the USB drive . Once the USB drive has been reformatted and you are ready to remove it, be sure to eject it to prevent your Mac from doing damage to your USB drive. To eject the USB drive, click the Eject icon next to the drive in Finder, or click and drag the USB drive to the Trash on your desktop.


About This Article