This article was co-authored by wikiHow staff writer, Megaera Lorenz, PhD. Megaera Lorenz is an Egyptologist and Writer with over 20 years of experience in public education. In 2017, she graduated with her PhD in Egyptology from The University of Chicago, where she served for several years as a content advisor and program facilitator for the Oriental Institute Museum’s Public Education office. She has also developed and taught Egyptology courses at The University of Chicago and Loyola University Chicago.
This article has been viewed 87,489 times.
Learn more...
Whether you use it for taking class notes, keeping a record of your dreams, or writing down your most private thoughts, a journal or notebook is a very personal item. Decorating the outside of your diary or notebook is a great way to help it reflect who you are as much as what’s on the inside. The possibilities for decorating your diary or notebook are limitless, but a few easy methods are making a collage cover, drawing on the cover with markers, or decorating your cover with stickers, decorative tape, or glue-on embellishments.
Steps
Creating a Collage Cover
-
1Select a notebook or diary with a hard or heavy cardstock cover. You will need a cover that is sturdy enough to hold up to being brushed with a collage adhesive (like Mod Podge or a craft glue and water solution) without wrinkling or ripping.
-
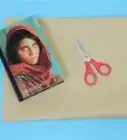
2Gather your crafting tools. You will need scissors or a small precision knife for more precise cutting, soft bristle or foam paintbrushes (for brushing on your adhesive/sealant), and a decoupage adhesive and sealant (like Mod Podge).
- You can make your own sealant/adhesive by mixing two parts white craft glue with one part water.
Advertisement -
3Select collage materials. You can make your collage out of cut out photographs, images or text cut out of magazines, or even just pretty pieces of patterned craft paper or thin fabric. Use whatever you like: pick images that fit your interests and personality, patterns that you find pretty, or words that you find meaningful.
-
4Brush your adhesive onto the cover of your notebook or diary. Make sure the surface you are decorating is covered with an even, smooth coating of adhesive. A foam brush may work best for this.[1]
-
5Attach your collage materials to the cover. You may need to brush a little additional adhesive under the edges and corners of your collage pieces to get them to adhere properly, especially if they overlap each other. Use something hard and flat, like the edge of a ruler, to smooth out any wrinkles or bubbles.
-
6Brush another layer of your adhesive over the finished collage. This will act as a protective sealant and help keep your design in place. Wait for the sealant to set and dry before using your diary or notebook or adding additional decorations.


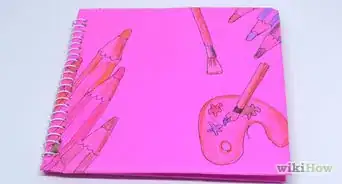
Decorating with Markers
-
1Select a diary or notebook with a plain paper or fabric cover. Alternatively, you can make your own paper cover. Try to select a material that is not too slick or glossy, so your marker won’t smudge.
-
2Buy some markers. Make sure to get permanent markers that will not smudge or wipe off once the ink dries. The type of marker you should get will depend on the material that your cover is made of.
- If your diary or notebook has a paper cover, regular permanent writing or art markers (like Sharpies) may be your best bet.
- For fabric covers, try fabric markers, which are designed to write on fabric without bleeding or washing out.
- Use oil-based paint markers for surfaces that don’t take regular ink well, like leather or glossy paper.
- Opaque or metallic markers are best for drawing on dark surfaces.
-
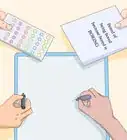
3Decide on a design. Do some sketches on scratch paper before writing or drawing on your cover. Draw pictures, doodle some geometric designs, or have fun with hand-lettering words and phrases that are meaningful to you.
- If you’re not comfortable drawing or writing freehand, you can also use stencils to add ready-made designs.
- Try creating an airbrushed effect with a marker and an airbrush spritzer.[2]
-
4Draw your design on the cover. You may wish to sketch your design in pencil before filling it in with your markers. Take care not to smudge the marker as you are drawing. Allow the ink to dry completely before using your diary or notebook.


Using Adhesive Decorations
-
1Decorate your diary or notebook with stick-on gems or stickers. This is one of the easiest ways to decorate your cover. Buy some stickers or gems with adhesive backs and place them wherever you like. For an extra layer of protection over flat stickers, brush on a layer of decoupage adhesive (like Mod Podge).
-
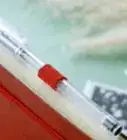
2Decorate your diary or notebook with washi tape. Washi tape is a type of decorative tape that comes in a variety of colors and patterns. Cover your entire notebook with strips of washi tape, fold the edges of the tape inside the cover, and create a tidy border by cutting off the excess with a precision knife.[3] Alternatively, just add a few strips as accents wherever you’d like.
-
3Use hot-glue to add decorative objects. You can use whatever you’d like: decorative “found object” embellishments, buttons, small stones, or anything else you can imagine.[4]
- If you don’t have a glue gun, you can affix the objects with a strong craft adhesive like E-6000.[5] Whatever type of adhesive you decide to use, take care to work in a well-ventilated area and read the directions and safety warnings carefully.


Community Q&A
-
QuestionCan we skip some days?
 Community AnswerYou certainly can. Keeping a diary doesn't mean you have to write every day. Write when you can, when you feel like and when you've got things you'd like to remember.
 -
QuestionWhat's the purpose of keeping a diary?
 Community AnswerA diary is a record of your life. When you get bored or sad, you can read through your diary, and remember all of the happy or interesting things that have happened to you. After you die, your diary can become a family heirloom, and passed down for generations.
 -
QuestionIf we did not get the material what else we can do?Community AnswerYou may be able to decorate your diary or notebook with items you have around the house. There is no right or wrong way to decorate a diary. Even if all you have on hand is some Elmer's Glue and a few old magazines, you can create a simple collage cover.
Things You’ll Need
- Diary or notebook with a sturdy cover
- Collage adhesive (Mod Podge or a homemade solution of craft glue and water)
- Scissors or a precision knife
- Soft-bristle or foam paintbrushes
- Collage materials (cut out photos, magazine clippings, pretty paper, ribbons)
- Plain brown paper (if you choose to make a paper cover to decorate)
- Markers (permanent paper or fabric markers, or oil-based paint markers)
- Stickers or adhesive gems
- Strong craft glue or a glue gun
- Washi tape
- Buttons, gems, fabric flowers, or other glue-on craft embellishments


References
- ↑ http://soapdelinews.com/2012/08/diy-handmade-decoupaged-sketch-book.html
- ↑ http://www.ribbonsandglue.com/how-to-cover-a-textbook.html
- ↑ https://liagriffith.com/washi-tape-your-pencils-and-notebooks/
- ↑ http://craftsbyamanda.com/mod-podge-book-cover-craft/
- ↑ http://www.dreamalittlebigger.com/post/glue-guide-use-the-right-glue-for-the-job.html
About This Article