X
wikiHow is a “wiki,” similar to Wikipedia, which means that many of our articles are co-written by multiple authors. To create this article, volunteer authors worked to edit and improve it over time.
This article has been viewed 47,794 times.
Learn more...
Crocheting a baby sweater might seem like an intimidating project as a beginner, but you can still create a cute garment even if you only know a few basic stitches. Use fine, soft yarn to create a sweater that's as comfortable as it is adorable.
Steps
Part 1
Part 1 of 5:
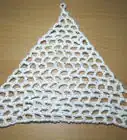
Part One: Yoke[1]
-
1Tie the yarn to the hook. Attach the primary yarn to your crochet hook using a standard slip knot.
- Note that the primary yarn (color A) will be used for the yoke, body, and sleeves of the sweater. The secondary yarn (color B) will only be used for the edging.
-
2Work a foundation chain. Work 32 chain stitches from the loop on your hook to create your foundation row. Turn your work once you reach the end.
- You'll need 32 chain stitches to create a sweater sized for babies between 3 and 9 months old. For babies in 6 to 12 month clothing, create a bigger sweater by starting with 43 chain stitches.
Advertisement -
3Single crochet across the first row. Work one single crochet into the second chain from the hook, then one single crochet into each of the remaining chains after that.
- Once you reach the end of the row, chain two and turn the work.
-
4Half double crochet across the second row. Work one half double crochet into each of the first two stitches, then half double crochet twice into the stitch after that.
- Afterward, half double crochet once into each of the next three stitches and twice into the stitch the follows those. Repeat this pattern across the rest of the row.
- Note that the stitch count will increase by the time you reach the end of this row, creating a slight curve.
- Once you reach the end of the row, chain two and turn the work.
-
5Half double crochet across the third row. Work one half double crochet into each stitch across the entire row.
- Chain two at the end of the row, then turn the work over.
-
6Increase the fourth row. Work one half double crochet into each of the first three stitches, then half double crochet twice into the stitch after that.
- Afterward, half double crochet once in each of the next four stitches, then half double crochet twice into the stitch after that. Repeat this pattern across the row.
- Chain two when you reach the end of the row and turn over the work.
-
7Alternate between same and increase rows. For the remaining yoke rows, switch back and forth between straight half double crochet rows and half double crochet increase rows. Create a total of 8 rows for sweaters sized 3 to 9 months, or 12 rows for sweaters sized 6 to 12 months.
- For row five: Half double crochet once in each stitch. Chain two and turn at the end of the row.
- For row six: Half double crochet once in each of the first four stitches, then half double crochet twice in the stitch after that. Half double crochet once in each of the next five stitches, then half double crochet twice in the stitch after that; repeat across the row. Chain two and turn at the end.
- For row seven: Half double crochet once in each stitch. Chain two and turn at the end of the row.
- For row eight: Half double crochet once in each of the first five stitches, then half double crochet twice in the stitch after that. Half double crochet once in each of the next six stitches, then half double crochet twice in the stitch after that; repeat across the row. Chain two and turn at the end.
- For row nine: Half double crochet once in each stitch. Chain two and turn at the end of the row.
- For row ten: Half double crochet once in each of the first six stitches, then half double crochet twice in the stitch after that. Half double crochet once in each of the next seven stitches, then half double crochet twice in the stitch after that; repeat across the row. Chain two and turn at the end.
- For row eleven: Half double crochet once in each stitch. Chain two and turn at the end of the row.
- For row twelve: Half double crochet once in each of the first seven stitches, then half double crochet twice in the stitch after that. Half double crochet once in each of the next eight stitches, then half double crochet twice in the stitch after that; repeat across the row. Chain two and turn at the end.
-
8Do not fasten off. The yoke should be done by this step, but you should not cut the yarn or fasten it off.


Advertisement
Part 2
Part 2 of 5:
Part Two: Body[2]
-
1Create armholes. Work a series of chain stitches and half double crochets across the last row of the yoke to form the armhole base row.
- Half double crochet once into each of the first seven stitches, then half double crochet twice into the eighth stitch. Half double crochet once into each of the seven stitches after that.
- Chain five (for 3 to 9 month size) or seven (for 6 to 12 month size), and skip 16 (for 3 to 9 month size) or 19 (for 6 to 12 month size).
- Half double crochet once into each of the next eight stitches (3 to 9 month) or ten stitches (6 to 12 month). Half double crochet twice into the stitch after that. Repeat once, then half double crochet once into each of the next eight (3 to 9 month) or ten (6 to 12 month) stitches.
- Chain five (3 to 9 month) or seven (6 to 12 month), and skip 16 (3 to 9 month) or 19 (6 to 12 month).
- Half double crochet once into each of the next seven stitches, then half double crochet twice into the stitch after that.
- Half double crochet once into each of the remaining stitches until you reach the end of the row.
- Turn your work at the end of the row.
-
2Work v-stitches across the first body row. Double crochet once into the first stitch from the hook. Skip two stitches, then work one v-stitch into the stitch after that.
- Work v-stitches across the rest of the row, skipping two stitches in between each one. Continue until you reach the last two stitches.
- To create a v-stitch: double crochet once, chain one, and double crochet once more into the same space.
- Double crochet once into the last stitch.
- Chain three at the end of the row, then turn the work.
- Work v-stitches across the rest of the row, skipping two stitches in between each one. Continue until you reach the last two stitches.
-
3Cluster stitch across the second body row. Double crochet once into the first stitch from the hook, then cluster stitch into the center of each v-stitch in the previous row.
- More precisely, you must cluster stitch into the chain-one space of each v-stitch.
- Double crochet once into the final stitch of the row.
- Chain three at the end of the row, then turn over the work.
-
4Repeat the body rows to desired length. Alternate back and forth between the first (v-stitch) and second (cluster stitch) body rows until the sweater reaches an appropriate length.
- For 3 to 9 month sweaters, you'll need approximately eight body rows total. For 6 to 12 month sweaters, you'll need approximately 12 body rows total.
-
5Fasten off the yarn. When you reach the end of the final body row, cut the yarn, leaving a 3-inch (7.6-cm) tail. Pull this tail through the loop on your hook to fasten off the work.
- Use a yarn needle to weave the remaining tail into the stitches along the underside of the garment. Doing so should hide the excess while further securing the end.


Advertisement
Part 3
Part 3 of 5:
Part Three: Sleeves
-
1Join the yarn. Tie the yarn to your crochet hook, then attach the yarn to the center bottom of one armhole using a slip stitch.
-
2Slip stitch around the armhole. Work one slip stitch into each stitch around the armhole. You'll need 23 stitches for 3 to 9 month sizes, or 30 stitches for 6 to 12 month sizes.
- Join the last slip stitch to the first with another slip stitch.
-
3Half double crochet in the round. Chain two, then work one half double crochet into each stitch across the previous round.
- Slip stitch the last and first stitches together to create another round.
- Do not turn the work at the end of the round.
-
4Repeat the round to your desired length. Continue working rounds of half double crochet to match the previous round. Repeat as needed until the sleeve reaches an adequate length.
- For a long-sleeve 3 to 9 month size, you'll need approximately 10 rounds total. For a long-sleeve 6 to 12 month size, you'll need approximately 14 rounds total.
-
5Decrease one round. Half double crochet once into the first stitch, skip two stitches, then half double crochet once into the stitch after that. Repeat across the round.
- Slip stitch the last and first stitches together at the end of the round.
- Decreasing the stitch count in this manner creates a cuff for the sleeve.
-
6Slip stitch across the final round. Work one slip stitch into each stitch of the previous round.
- This will be the final round of the sleeve.
-
7Fasten off the yarn. Cut the yarn, leaving a 3-inch (7.6-cm) tail. Pull this tail through the loop on your hook to fasten it off.
- Weave the excess tail into the stitches along the inside of the sleeve.
-
8Repeat for the other sleeve. Work a second sleeve onto the other armhole. Follow the same procedure used to create the first sleeve.
- Note that both sleeves must be identical, so you need to use the same amount of stitches in each one. Pay close attention to your stitch count to maintain uniformity.


Advertisement
Part 4
Part 4 of 5:
Part Four: Edging[3]
-
1Join the contrasting yarn to the bottom of the sweater. Tie the secondary yarn to the crochet hook with a slip knot, then join the yarn to the bottom of the sweater with a slip stitch.
- Join the yarn to either end of the bottom edge; do not join it to the center of this edge.
-
2Single crochet across the first row. Work one single crochet into each stitch across the entire row.
- Do not chain or turn the work once you reach the end of the row.
-
3Double crochet increase across the second row. Work two double crochets into each stitch across the entire row.
- Do not chain or turn the work once you reach the end of the row.
-
4Chain and double crochet across the final row. Chain four, then work one double crochet into the same stitch as your chain.
- Afterward, chain two, then double crochet once into the next stitch. Repeat this pattern across the row.
- Do not chain or turn the work once you reach the end.
-
5Fasten off the yarn. Cut the yarn, leaving a 3-inch (7.6-cm) tail. Pull this tail through the loop on your hook to secure the end.
- Weave the excess along the underside of the ruffled edge.
-
6Repeat the ruffle on both sleeves. Follow the same steps to create a ruffle on the open edge of both sleeves.
- The pattern remains the same, but at the end of each row, you'll need to slip stitch the last and first stitches together.


Advertisement
Part 5
Part 5 of 5:
Part Five: Finishing
-
1Tie ribbon to the yoke. Cut six 5-inch (12.5-cm) lengths of 3/8-inch (9.5-mm) wide ribbon. Tie these pieces of ribbon to either edge of the yoke.
- The ribbon should roughly match the color of the secondary yarn (color B).
- Tie three pieces to the right side and three pieces to the left, positioning them as close to the garment edge as possible. Pair the pieces off into three sets of ribbon.
-
2Put on the sweater. Put the finished sweater on the baby. To close it, tie each of the three ribbon pairs into bows.


Advertisement
Things You'll Need
- 1 to 2 skeins fine/lightweight yarn, color A
- 1 skein fine/lightweight yarn, color B
- Size J (6.0 mm) crochet hook
- Scissors
- Yarn needle
- 3/8-inch (9.5-mm) wide ribbon, color B
References
About This Article
Advertisement