This article was co-authored by wikiHow Staff. Our trained team of editors and researchers validate articles for accuracy and comprehensiveness. wikiHow's Content Management Team carefully monitors the work from our editorial staff to ensure that each article is backed by trusted research and meets our high quality standards.
There are 24 references cited in this article, which can be found at the bottom of the page.
This article has been viewed 67,457 times.
Learn more...
Ball bearings are found in the wheels of rollerblades, skateboards, and bicycles. They need to be cleaned and lubricated periodically to keep your ride smooth and your wheels in shape. For skate bearings, stack them in a specially designed cleaning kit. To clean bicycle cartridge bearings, take off the wheels and degrease the cartridges at the hubs’ centers. To clean loose ball bearings on a bike, you'll first need to do a little extra disassembling to get to them.
Steps
Removing Skate Ball Bearings
-
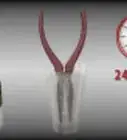
1Take the wheels off of your skates or skateboard. To remove wheels from a skateboard, loosen the nut using a socket wrench or skate tool. Use an Allen wrench to remove the wheels from a rollerblade casing.
- Be sure to store all nuts and washers in a safe place, such as a plastic bag or small container.
-
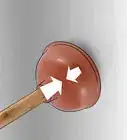
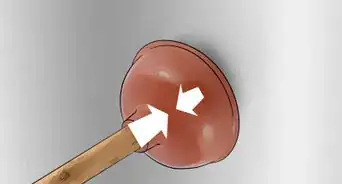
2Take the bearings off of your wheels. In addition to a socket that tightens and loosens nuts, most skate tools also have an attachment that pokes the bearing from the center of the wheel.[1] While using a skate tool is the preferred method, you can also use a screwdriver to poke out the bearing casing.
- If you have a skateboard, you can use the axle to poke out the bearing casing. Hold the wheel against the axle so the side that would normally face outward faces in and touches the axle. Apply gentle pressure to pop out the bearing casing.
Advertisement -
3Remove the rubber or metal seals. Once you’ve popped the bearing casings out from the wheels’ centers, you’ll need to remove the seal to expose the ball bearings. If your bearings have a rubber seal, use a paperclip to carefully pry off the seal.[2]
- Alternatively, you might have a metal seal secured by a C-clip. Use a utility knife to pry out the C-clip, then tap the metal seal out.[3]
- You’ll be able to see the outline of the C-clip if your metal seal is removable. If the seal is pressed with no visible seam or outline, the seal is not removable and you will not be able to access the ball bearings.


Cleaning Skate Ball Bearings
-
1Use a skate bearing cleaning kit. The easiest way to clean skate ball bearings is to use a specially made kit, but you can also make your own kit at home. Grab a sports drink bottle and cut hole in the cap large enough for a bolt that’s a quarter inch (0.6 cm) wide and six inches (15 cm) long. Run a gasket down the bolt’s length until it’s flush with the head, insert the bolt through the cap, then secure it to the cap using a washer and a nut.[4]
- You can cut a ballpoint pen casing into quarter inch (0.6 cm) wide cylinders to create spacers to place between the bearings.[5]
- If you want to purchase a skate ball bearing cleaning kit, you can find one online or at a skate shop.
-
2Stack the bearings onto your cleaning kit. If you’re using a store bought kit, place a bearing casing onto the base, snap a spacer over it, then repeat the sequence until you’ve stacked all of the casings. If you’re using a homemade cleaning kit, slide the bearing casings down the bolt’s length and place a ballpoint pen spacer between each casing.[6]
- Stacking the bearing casings instead of free washing them in a container will help prevent casings from scratching each other. It’ll also help keep the balls from falling out of the casings.[7]
-
3Fill the cleaning container with citrus cleaner, alcohol, or solvent cleaner. After stacking the casings, fill your kit container or bottle with a cleaner.[8] You can use a citrus-based cleaner, 90% pure isopropyl alcohol, or a solvent cleaner, such as acetone.[9]
- Each cleaner has pros and cons. A citrus cleaner is the safest choice, but might leave a residue on the casings. Isopropyl alcohol and acetone are stronger and won’t leave residue, but are skin irritants and emit hazardous fumes.
- Be sure to wear gloves if you choose 90% pure isopropyl alcohol or a solvent cleaner.
- Don’t use WD-40 or oil to clean ball bearings or bearing casings. These will just cause buildup without actually removing any debris.
-
4Shake and soak the bearings. Insert the stacked bearings into the cleaner-filled container and secure the lid. Shake the container for a few seconds, then let it sit for five to ten minutes to cut through buildup. After letting it sit, give the container another shake.[10]
-
5Dry and lubricate your bearings. Remove the casings from the container and unstack them. Use compressed air to thoroughly dry them.[11] Once they’re dry, apply a few drops of lubricant using a hypodermic needle or pin.
- Use either a lubricant made for skate ball bearings, sewing machine lubricant, or lubricant made for electronic devices. These products typically come with a needle applicator.[12]
-
6Reinstall your bearings and wheels. Once you’ve lubricated your ball bearings, you can reassemble your bearings and wheels. Snap the rubber or metal seals back onto the bearing casings. Use a skate tool to reinsert the bearing casings back into the wheels’ centers, then fasten the wheels back onto your skates or skateboard.[13]
- You can use a skateboard axle to pop the bearing casing back into place, but you might risk damaging the casing. Using a skate tool is the preferred method.[14]


Cleaning Bicycle Wheel Cartridge Bearings
-
1Take the wheels off of the bike. Many bikes have a quick release lever that you simply pull and turn counterclockwise. In addition to the quick release lever, most mountain bikes also have an axle that you’ll slide out after unfastening the quick release. Some bikes have heavy nuts that secure the wheels in place, which you can remove using a wrench.
-
2Remove the axle endcaps and rear freehub body. Once you’ve taken the wheels off of the bicycle frame, you’ll need to expose the cartridge that holds the ball bearings. For the front wheel, just twist or pop off the axle endcaps at the hub, or center of the wheel.[15]
- For the rear wheel, you’ll also need to pull out the freehub body as well. Simply pull it out of the center of the wheel.[16]
-
3Pry off the seal on the cartridge bearing. Use a utility knife to carefully pry off the cartridge seal. Take care not to warp or damage the seal or the cartridge races, which hold the ball bearings in place.[17]
- Be sure to store the seals and the other parts you removed in a safe place to avoid losing them.
-
4Degrease and wipe the cartridge bearing. Use a rag to wipe away as much debris as possible from the cartridge. Grab an aerosol degreaser with a small straw, spray into the cartridge, then wipe away the degreaser. Spray into the cartridge with WD-40 to eliminate any water residue, as the degreaser will contain some water, then wipe away excess WD-40.[18]
-
5Use a grease gun to repack the cartridge with grease. Liberally repack the cartridge bearing with bicycle grease. A grease gun, which you can find online or at a bike shop, is the best way to access the cartridge’s tight spaces. If you live in a wet area, pack more grease into the cartridge to protect the bearings.[19]
- Once you’ve cleaned and repacked one wheel, repeat the process on the other.
-
6Replace the cartridge seal and reinstall the wheels. Snap the seals back over the cartridge bearings. Reinsert the rear freehub body and pop the endcaps onto the wheel hubs. Realign the wheels with the bicycle frame and fasten them by tightening the quick releases or nuts.[20]


Cleaning Bicycle Wheel Loose Bearings
-
1Use cone spanners to remove the hub cone and axle. You’ll need a pair of thin cone spanners to disassemble a cup-and-cone hub. Place one cone spanner around the cone itself and the other spanner around the lug nut. Twist the lug counterclockwise to remove it.[21]
- For the rear wheel, you’ll have to remove the cassette in order to access the cup-and-cone. You’ll need a cassette removal tool, which you can find online or at a bike shop, to fit into the cassette and loosen the locking nut.
- Set the lug nuts and any washers or spacers aside in proper order to make reassembly easier.
-
2Lift the ball bearings out each side of the hub. Once you’ve removed the cone, you can access the ball bearings, which sit on each side of the hub. Use a scalpel blade or narrow utility knife to carefully pull the balls out from the seat on each side.[22] There are also magnet tools, which look like magnetic sticks, that make it much easier to pull out the ball bearings.[23]
- If you use a blade, spray a little grease onto it so the balls will stick to it. That’ll make it easier to pull them out from their seat.
- Keep the ball bearings separate so you know which side is which.
-
3Degrease and wipe the balls and bearing seat. Spray the ball bearings with an aerosol degreaser and wipe them down with a rag. Fit a small straw into the nozzle of the aerosol degreaser and spray inside the bearing seat. Wipe inside the seat by wrapping your finger in a rag.[24]
- Wear gloves when using a degreaser.
-
4Pack grease into the bearing seat before reassembling the hub. Use your grease gun to pack a thick layer of grease into the bearing seat. Any excess will simply work it’s way out, so pack liberally and don’t worry about adding too much.[25]
- If necessary, use your finger to work grease all around the bearing seat.
-
5Insert the ball bearings back into each seat and add more grease. When replacing the ball bearings, it’s possible to miss the seat, causing the balls to drop through the hub and come out the other side. To prevent this, you can place the axle through the hub, but in the opposite way that it would normally fit. That way, the tip of the axle will prevent the ball bearings from falling through, making it easier to slide them into their seat.[26]
- Pack even more grease into the bearing seat after you slide the ball bearings back into place.
- Once you’ve inserted the bearings one one side of the hub, repeat the process on the other side.[27]
-
6Replace the cone, spacers, and lug nut. Slide the axle through the hub and place the cone over it. Replace any washers or spacers you removed. Twist the lug onto the threaded axle by hand, then tighten it until it’s snug with the cone spacers using the cone spanners.[28]
- For the rear wheel, place the cassette back onto the hub and tighten its locking nut using the cassette tool.


Things You'll Need
- Skate tool
- Utility knife
- Skate bearing cleaning kit (or a bottle, bolt, gasket, washer, nut, and pen casing)
- Citrus cleaner, 90% pure isopropyl alcohol, or acetone
- Compressed air
- Lubricant and applicator
- Cleaning rag
- Aerosol degreaser
- WD-40
- Bicycle grease
- Grease gun
- Bicycle cassette removal tool
- Cone spanners
References
- ↑ https://www.youtube.com/watch?v=FN8kFgmMhTU&feature=youtu.be&t=4
- ↑ https://www.youtube.com/watch?v=AXmZhfvH9y0&feature=youtu.be&t=37
- ↑ https://www.youtube.com/watch?v=AXmZhfvH9y0&feature=youtu.be&t=52
- ↑ https://www.youtube.com/watch?v=mEkAeVVivK8&feature=youtu.be&t=121
- ↑ https://www.youtube.com/watch?v=mEkAeVVivK8&feature=youtu.be&t=132
- ↑ https://www.youtube.com/watch?v=mEkAeVVivK8&feature=youtu.be&t=239
- ↑ http://bonesbearings.com/support/maintenance/
- ↑ https://www.youtube.com/watch?v=mEkAeVVivK8&feature=youtu.be&t=266
- ↑ http://bonesbearings.com/support/maintenance/
- ↑ https://www.youtube.com/watch?v=mEkAeVVivK8&feature=youtu.be&t=285
- ↑ http://bonesbearings.com/support/maintenance/
- ↑ https://www.youtube.com/watch?v=mEkAeVVivK8&feature=youtu.be&t=384
- ↑ https://www.youtube.com/watch?v=FN8kFgmMhTU&feature=youtu.be&t=46
- ↑ http://bonesbearings.com/support/maintenance/
- ↑ https://www.youtube.com/watch?v=ZhuAQqPXAQ4&feature=youtu.be&t=20
- ↑ https://www.youtube.com/watch?v=ZhuAQqPXAQ4&feature=youtu.be&t=21
- ↑ https://www.youtube.com/watch?v=ZhuAQqPXAQ4&feature=youtu.be&t=23
- ↑ https://www.youtube.com/watch?v=AchbSMDjwyw&feature=youtu.be&t=101
- ↑ https://www.youtube.com/watch?v=AchbSMDjwyw&feature=youtu.be&t=112
- ↑ https://www.youtube.com/watch?v=AchbSMDjwyw&feature=youtu.be&t=116
- ↑ https://www.youtube.com/watch?v=90XxoPHWbI4&feature=youtu.be&t=99
- ↑ http://www.bikeradar.com/us/gear/article/workshop-servicing-your-bearings-18623/
- ↑ https://www.youtube.com/watch?v=90XxoPHWbI4&feature=youtu.be&t=143
- ↑ http://www.bikeradar.com/us/gear/article/workshop-servicing-your-bearings-18623/
- ↑ https://www.youtube.com/watch?v=90XxoPHWbI4&feature=youtu.be&t=212
- ↑ https://www.youtube.com/watch?v=90XxoPHWbI4&feature=youtu.be&t=230
- ↑ https://www.youtube.com/watch?v=90XxoPHWbI4&feature=youtu.be&t=237
- ↑ https://www.youtube.com/watch?v=90XxoPHWbI4&feature=youtu.be&t=245
About This Article

To clean ball bearings, start by removing the casing from the wheels and prying off the seal with a paperclip to expose the bearings. Then, stack the bearings onto the bolt of a cleaning kit and fill the bottle with citrus cleaner, isopropyl alcohol, or acetone. Next, slide the stacked bearings into the bottle and screw on the lid. Once the lid is secure, shake the container for a few seconds before allowing it to sit for 10 minutes. Finally, remove the casings from the bottle, dry them with compressed air, and add a few drops of lubricant. To learn how to make your own ball bearing cleaning kit, read on!