This article was co-authored by wikiHow staff writer, Darlene Antonelli, MA. Darlene Antonelli is a Technology Writer and Editor for wikiHow. Darlene has experience teaching college courses, writing technology-related articles, and working hands-on in the technology field. She earned an MA in Writing from Rowan University in 2012 and wrote her thesis on online communities and the personalities curated in such communities.
This article has been viewed 12,330 times.
Learn more...
Do you have a table in Excel that you need to add more data to, like an outdated grade sheet? This wikiHow will teach you how to add a row to a table in Excel using the "Resize Table" setting for Windows, the web version, and Mac.
Steps
Windows
-
1Open your project in Excel. Double-click your .xls worksheet file in File Explorer. Alternatively, right-click the file and select Open with > Excel.
- If you already have Excel open, go to File > Open and open your project.
-
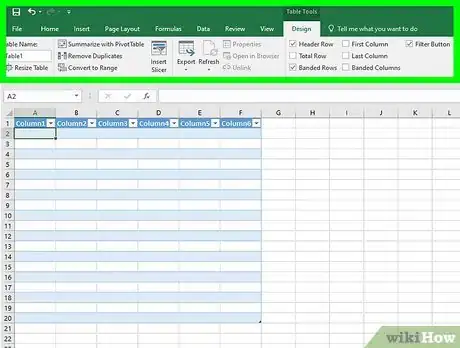
2Click anywhere in the table. Once you click the table, you'll see "Table Tools" are listed as your current tab at the top of the editing space.Advertisement
-
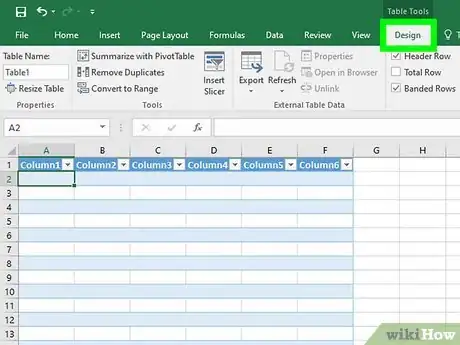
3Click Design. It's in the menu near the top of your screen.
-
4Click Resize Table. This icon is listed in the "Properties" grouping to the far left in the menu.
-
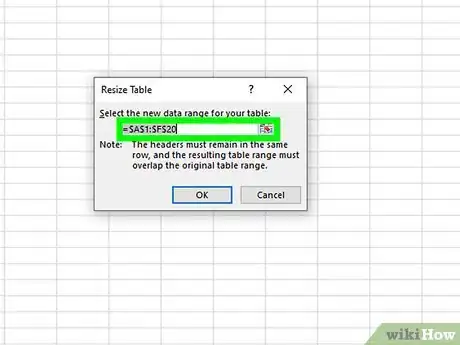
5Select the new range of rows and columns you want to use in the table. Start with the upper-left cell of your table, and end with the bottom-right cell, which means you can add rows at the bottom of the table. Your original data set will highlight in blue. Your new selection will be outlined with a dashed border.
- Added rows must be below your table so they can be added.
-
6Click OK. Once you've selected the new rows to include in the table, select OK in the dialog window to close it.[1]
- You can also insert a row or column in the middle of the table by right-clicking a cell in your data, selecting Insert and Table Columns to the Left/Right or Table Rows Above/Below.
Mac
-
1Open your project in Excel. Double-click your .xls worksheet file in Finder or right-click the file and select Open with > Excel.
- If you already have Excel open, go to File > Open and open your project.
-
2Right-click your table. A menu will appear at your cursor.
-
3Hover your mouse over Insert and click Table Rows Above. You'll be able to specify how many rows you want to add to the table in the next step.
- If hovering your mouse over the option doesn't work, click it, then select Shift cells down.
-
4Enter how many rows you want to add and press ⏎ Return. The rows will be added to the bottom of your table.[2]
- You can also insert a row or column in the middle of the table by right-clicking a cell in your data, selecting Insert and Table Columns to the Left/Right or Table Rows Above/Below.
The Web Version
-
1Go to https://www.office.com/, login, and launch Excel. Once you navigate to the login site and enter your Microsoft account information, you'll be logged in. Finally, launch Excel.
-
2Click a project to open it. You'll also see all the projects you have saved to OneDrive.
-
3Click anywhere in the table. Once you click the table, you'll see "Table Design" as an option in the editing ribbon above your spreadsheet document.
-
4Click the Table Design tab and select Resize Table. The "Resize" option is all the way to the left of the menu in the "Table Design" tab.
-
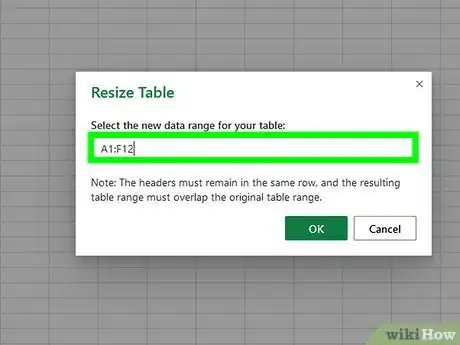
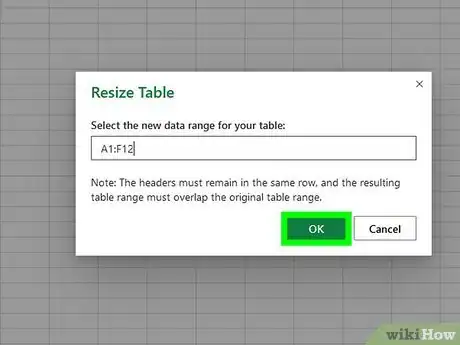
5Enter the new range for your table. For example, if you want to add one row, just increase the last number: If your current data set for the table is A1 to H13, input A1:H14 to add a row at the bottom of the table.
-
6Click OK. This will close the window and change the range of the table.
- You can also insert a row or column in the middle of the table by right-clicking a cell in your data, selecting Insert and Table Columns to the Left/Right or Table Rows Above/Below.
References
About This Article
1. Open your project in Excel.
2. Click anywhere in the table.
3. Click Design.
4. Click Resize Table.
5. Enter the new range of rows and columns you want to use in the table.
6. Click Ok.








-Step-4Bullet1.webp)


